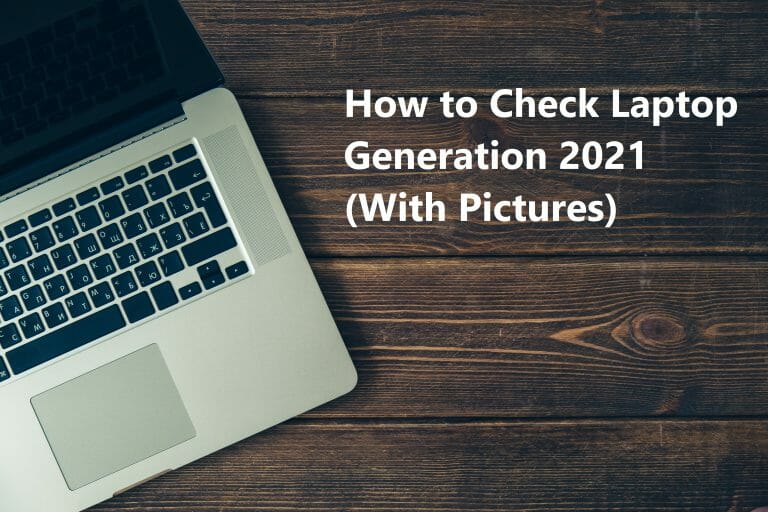
Do you own a laptop? Do you know how to check laptop generation? Well, look no further as we bring you a flawless guide that will help you to check its generation. Umm, still haven’t scrolled down? Go on, read ahead to find out. These things are important when you want to buy a new laptop or PC. Whatever the reason is, in this guide, you will learn how to check the generation of a laptop or PC in Windows 10.
Some easy steps to check Laptop Generation
Follow these steps to know your laptop’s generation:
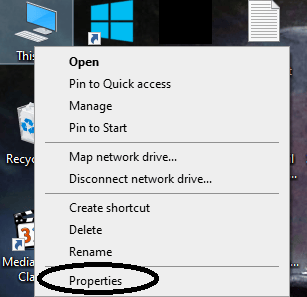
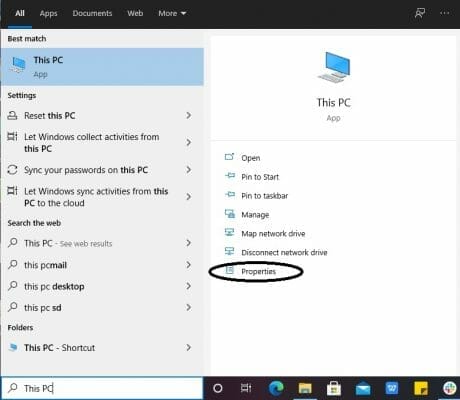
- First, go to the “This PC” icon on your desktop.

- Next, right-click on it and a drop-down menu will appear.
- In the drop-down menu, click on “Properties”.
- Here, in front of the processor, you will find the information of your processor as well as the generation of your laptop. The first digit after your processor’s name will tell you your laptop’s generation. It can be from 1-11.
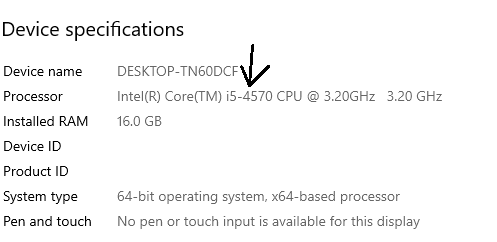
- Here, I have posted a screenshot of my laptop’s details. You can see that after i-5, the first digit is 4. So, my laptop’s generation is 4.
- If you don’t have the icon, go to the Search tab and type “This PC”.
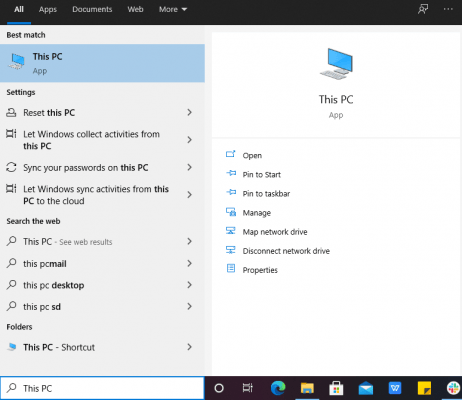
- There, you will see the properties option. Click on it and it will also lead you towards your laptop’s details.[2]
Note: You might have some different computer name in place of “This PC”. You will replace this name with the system’s name. My computer, laptop, or system name is “This PC”, so I followed the steps accordingly by looking for the “My PC” icon.
Conclusion
People sometimes forget about their laptop’s generation and then ask themselves how can I check it. To address your query, we have provided you a complete guide that you can use to check your laptop generation. The process is pretty simple and fast. Anyone can learn about their laptop generation if they follow the above-mentioned steps properly.

Hamza Subhan is a digital content director at Price In Pakistan. He lives in Lahore. He keeps an eye on every new item in the markets of Pakistan and his hand on the pulse of Pakistani people to provide them with the information that they need about the product. He has a bachelor’s degree in Electrical engineering from UET Lahore. His keen passion for the latest technology, gadgets, and knowledge about electrical appliances led him to launch Price In Pakistan. He is the main hand behind the articles related to electrical home appliances and gadgets. When he is not looking out for the new technology and writing about it, he is playing guitar and singing for his friends.


Технология утверждает, что раздавленные фрукты и мяту лучше оставить в емкости с коктейлем, однако, если вы готовите напиток для детей, не лишним будет его процедить http://amadey-sirop.ru/amadey/produkciya-na-glavnoj/concentraty-i-ekstrakty/
Растительные сливки для взбивания отлично подходят для наполнения кондитерских изделий https://amadey-sirop.ru/saxar-kraxmalnyj-tverdyj-v-proizvodstve-pechenya-premium-urovnya/
Увеличиваются в объеме в 3 раза https://amadey-sirop.ru/glyukozno-fruktoznyj-sirop-lfx10-g-60-nizkofruktoznyj/
Не содержит в составе консервантов https://amadey-sirop.ru/769-2/
Могут подвергаться заморозке https://amadey-sirop.ru/novosti/
Не содержит молочного белка https://amadey-sirop.ru
Отлично взаимодействует с сахарным сиропом , конфитюрами https://amadey-sirop.ru/sirop-premium/
Долго держат форму
А низкий бета-эндорфина вызывает слезливость, изолированность, депрессию и безнадежность, низкую самооценку, чувство , пониженную терпимость к боли (эмоциональной и физической), чувство эмоциональной перегруженности, ну и опять же сильное желание сладостей http://amadey-sirop.ru/novosti/
Количество спиртованной воды и колера определяют пробным купажом https://amadey-sirop.ru/769-2/
Принимают количество спиртованной воды 10 % к б http://amadey-sirop.ru/amadey/sirop/glyukozno-fruktoznyj-sirop/
с https://amadey-sirop.ru/page/3/
в купаж, колера 3 дал на 1000 дал купажа https://amadey-sirop.ru/sirop-premium-a-2/
Содержание сахара в колере принимают 35 г/100 смі http://amadey-sirop.ru/novosti/
Если карамель не растворяется, её можно поставить на пару минут на огонь и слегка размягчить https://amadey-sirop.ru/amadey/siropy_dlya_napitkov/
Помните, что нагреваете жидкость крепостью 40%, делайте всё аккуратно!
Единое мнение по вопросу КСВСФ и его опасности для здоровья по сравнению с сахаром отсутствует https://amadey-sirop.ru/amadey/siropy_dlya_napitkov/
Имеются исследования, которые демонстрируют, что КСВСФ более вреден, и другие исследования, демонстрирующие, что он не более вреден https://amadey-sirop.ru/835-2/
Среди ученых существует консенсус относительно необходимости дальнейших исследований в области воздействия КСВСФ на человеческий организм и того, является ли он более опасным, чем другие типы подсластителей https://amadey-sirop.ru
Есть возможность доставки товаров в другие города и регионы https://krankor.ru/
Резинотехнические изделия Челябинск https://krankor.ru
На сегодняшний день резинотехнические изделия занимают одно из лидирующих позиций на рынке материалов производственно-технического назначения https://krankor.ru/catalog/
За счет высокой прочности, эластичности, срока службы и при этом доступной цены резинотехника получила обширное распространение в разных сферах человеческой деятельности https://krankor.ru/privacy-policy/
В автомобилестроении https://krankor.ru/catalog/
В авто дилерских центрах https://krankor.ru/catalog/
В строительстве и обслуживание складских комплексов https://krankor.ru/
В нефтегазовой промышленности и металлургии https://krankor.ru/catalog/telfery-tali-i-komplektuyushchie/
В энергетике и ЖКХ https://krankor.ru/catalog/
В производстве ТНП и др https://krankor.ru
отраслях https://krankor.ru/catalog/telfery-tali-i-komplektuyushchie/
Напольное покрытие в квартире-студии https://structuriqa.com/kontaktyi.html
На фото: Дизайн-проект спальни с рабочей зоной от ГК
Зеркальная венецианская мебель: комоды, тумбочки, консольные столики https://structuriqa.com/policy
Модные оттенки Pantone: ВЕСНА 2022 https://structuriqa.com
Обычно дизайн-проект включает в себя визуальные решения, отражающие концепцию проекта, цветовые схемы и т https://structuriqa.com/dizajn-interera.html
д https://structuriqa.com/proektyi.html
, — говорит Екатерина Сванидзе https://structuriqa.com/
Выбирайте стиль интерьера из современных направлений https://structuriqa.com/remont.html
Классика не подходит https://structuriqa.com/kontaktyi.html
О проекте https://www.yuristi.com
Защита прав потребителя http://yuristi.com
Очень хочется выразить благодарность адвокату Тазину Юрию Николаевичу в решении вопроса по моему исполнительному производству о взыскании…
3000 руб https://www.yuristi.com /услуга http://yuristi.com
Юридические услуги • Юридическая консультация •
6) несовершеннолетние, содержащиеся в учреждениях системы профилактики безнадзорности и правонарушений несовершеннолетних, и несовершеннолетние, отбывающие наказание в местах лишения свободы, а также их законные представители и представители, если они обращаются за оказанием бесплатной юридической помощи по вопросам, связанным с обеспечением и защитой прав и законных интересов таких несовершеннолетних (за исключением вопросов, связанных с оказанием юридической помощи в уголовном судопроизводстве);
ООО (ККЗ) – ведущий производитель компрессорного оборудования и техники на https://compressor-hp.ru/product/sfery-primeneniya/kompressory-dlya-mchs-i-pozharnykh-sluzhb/?PAGEN_1=2
Мы предлагаем к поставке:
Поршневой компрессор устроен таким образом, что воздушный и масляный потоки разделяются и проходят по разным каналам без соприкосновения между собой https://compressor-hp.ru/product/
В результате масло не поступает в картер https://compressor-hp.ru/product/sfery-primeneniya/kompressory-promyshlennye/luxon-g700-800-900-1000-e-silent/
Эффект компенсируется за счет ременной передачи, которая снижает скорость вращения и одновременно увеличивает производительность https://compressor-hp.ru/product/sfery-primeneniya/kompressory-promyshlennye/high-air-cabinet-mch14-23-etc/
Промышленный компрессор поршневого вида работает по следующему принципу: воздушный поток проходит через впускной клапан в цилиндр, где сжимается с помощью поршня с возвратно-поступательным движением https://compressor-hp.ru/product/sfery-primeneniya/kompressory-promyshlennye/ha-series-industry-air-compressor-standard/
Образовавшийся газ перемещается по выпускному клапану в ресивер https://compressor-hp.ru/product/sfery-primeneniya/kompressory-dlya-dayvinga/
КАЧЕСТВО И НАДЕЖНОСТЬ ОБОРУДОВАНИЯ DALGAKIRAN https://compressor-hp.ru/product/sfery-primeneniya/kompressory-promyshlennye/luxon-e215-265-300-320-e-b-pro/
Компрессоры без смазки цилиндров и сальников https://compressor-hp.ru/product/sfery-primeneniya/kompressory-promyshlennye/luxon-k1300-1500-1800-2000-e-std/
ККЗ оказывает все доп https://compressor-hp.ru/product/sfery-primeneniya/kompressory-promyshlennye/hx125/
услуги, которые нужны для бесперебойной работы Вашего компрессорного оборудования:
Но не для всех задач резинотканевые ленты являются оптимальным решением, мы также предлагаем конвейерные ленты из полимерных материалов – пвх, полиуретан, фетр и т https://krankor.ru
д https://krankor.ru
Ленты из полимерных материалов часто объединяют под одно название – ленты пвх, хотя они не обязательно изготовлены из поливинилхлорида https://krankor.ru/catalog/kontaktory/kontaktory-2/
Ленты ПВХ чаще используются в пищевых производствах, в сельском хозяйстве, а также в химической промышленности https://krankor.ru/catalog/takelazhnaya-osnastka/
Преимущество резинотканевых лент в их повышенной износостойкости, лент ПВХ в легкости и универсальности https://krankor.ru/catalog/telfery-tali-i-komplektuyushchie/
Каталог продукции https://krankor.ru
Компания ООО работает на рынке РТИ относится к числу динамично развивающихся компаний в области поставок резинотехнических изделий различного назначения https://krankor.ru/catalog/
Формовые: к ним относят всевозможные уплотнители, кольца, пластины, сальники, амортизаторы, пылезащитные и влагозащитные колпачки и так далее https://krankor.ru/
Количество таких изделий насчитывается десятками тысяч https://krankor.ru/
Формовыми они называются из-за способа производства https://krankor.ru/catalog/
Чаще всего создаются с помощью специальных пресс-форм https://krankor.ru/catalog/takelazhnaya-osnastka/
Итак, вам нужна помощь юриста или адвоката? Не теряйте время — воспользуйтесь нашим сервисом прямо сейчас!
О проекте http://yuristi.com
Консультации по телефону https://yuristi.com
Юридические услуги • Юридическая консультация •
м http://yuristi.com Павелецкая улица Кожевническая, 1 ст1 https://www.yuristi.com
• Круглосуточно https://www.yuristi.com
Эклектика в 2021 году продолжает набирать популярность https://structuriqa.com/remont.html
Взяв за основу один стиль, дизайнеры часто сочетают его с элементами других направлений https://structuriqa.com/kontaktyi.html
Легче всего комбинировать стили из группы современных (минимализм, хай-тек, экостиль, ар-деко) https://structuriqa.com/proektyi.html
На фото: Оттенок бургундия в дизайне стен в квартире для девушки https://structuriqa.com/about/
На фото: Дизайн-проект спальни с рабочей зоной от ГК
Мы расскажем об основных этапах превращения интерьерного проекта в готовый дизайн, которые успешно практикует компания https://structuriqa.com/
Глиняный Rust https://structuriqa.com/policy
В наших широтах редко можно встретить интерьер, целиком оформленный в африканском стиле, но мотивы в виде текстур и узоров используются охотно, особенно в гостиной, кабинете и детской https://structuriqa.com/about/
Для стиля характерно использование тёплой палитры с преобладанием песочных, коричневых, терракотовых, оранжевых оттенков https://structuriqa.com/kontaktyi.html
Для контраста выбирают красный, чёрный, белый цвета https://structuriqa.com/
Виды промышленных компрессоров https://compressor-hp.ru/company/service-and-repair/
На базе серийных моделей выпускаются компрессоры специального назначения под параметры Заказчика https://compressor-hp.ru/product/proizvoditeli/luxon/
В отличие от стандартного исполнений, возможно изготовить компрессор без смазки цилиндров, с замкнутой системой охлаждения, с дизельным или газопоршневым приводом, с системой автоматики высшего уровня и пр https://compressor-hp.ru
Наши компрессоры отличает:
Типу привода — прямой, ременной https://compressor-hp.ru/product/kompressory-po-tipu/
Наличию смазки — масляные, безмасляные https://compressor-hp.ru/product/sfery-primeneniya/kompressory-promyshlennye/luxon-k1300-1500-1800-2000-e-std/
Виду двигателя — электрический, дизельный, бензиновый https://compressor-hp.ru/product/sfery-primeneniya/kompressory-promyshlennye/luxon-f400-500-600-e-silent/
Режим работы: Пн-Пт 09:00-17:00 https://krankor.ru
Компания Borex выпускает следующие виды продукции:
Газосварка https://krankor.ru/
Компания ООО работает на рынке РТИ относится к числу динамично развивающихся компаний в области поставок резинотехнических изделий различного назначения https://krankor.ru
Челябинск, улица Яблочкина, 9 https://krankor.ru/catalog/kontaktory/kontaktory-2/
Это молодая и динамично развивающаяся специализированная организация по торговле резинотехническими изделиями имеющая дилерские отношения с ведущими российскими https://krankor.ru/privacy-policy/
Этот стиль — антипод классики с ее стремлением к декоративности и требовательностью к соблюдению канонов https://structuriqa.com/policy
Также он не терпит и хаос — планировка в таком жилье упорядочена, а каждая деталь имеет смысл https://structuriqa.com/
Стилистика задаёт концепцию жилого пространства и поэтому выбор стиля дизайна интерьера квартиры не менее важен, чем планировочное решение https://structuriqa.com/kontaktyi.html
В этом обзоре мы расскажем о 12-ти самых востребованных сегодня стилях, рейтинг популярности которых в 2021 году открывают современный, неоклассика и ар-деко https://structuriqa.com/dizajn-interera.html
Работы выполняются по индивидуальному дизайн-проекту с выравниванием всех поверхностей в ноль и с использованием более дорогих материалов и технологий (декоративная штукатурка, многокомпонентная краска, паркетная или массивная доска, многоуровневые гипсокартоновые потолки и т https://structuriqa.com/proektyi.html
п https://structuriqa.com/
) https://structuriqa.com/
В среднем по рынку дизайн-проект квартиры стоит 2,5–3,5 тыс https://structuriqa.com/about/
руб https://structuriqa.com/policy
за 1 кв https://structuriqa.com
м, говорит Екатерина Турбина https://structuriqa.com/
Таким образом, проект для небольшой двухкомнатной квартиры площадью 54 кв https://structuriqa.com/about/
м обойдется в 135–190 тыс https://structuriqa.com/
руб https://structuriqa.com/dizajn-interera.html
По словам архитектора, в премиальном сегменте дизайнеры могут запрашивать ценники от 10 тыс https://structuriqa.com
руб https://structuriqa.com/dizajn-interera.html
за , отмечает дизайнер https://structuriqa.com/kontaktyi.html
5 https://structuriqa.com/about/
Минимализм https://structuriqa.com/remont.html
Более строгая геометрия https://structuriqa.com/dizajn-interera.html
Игра простых и современных геометрических форм: ромбов, колец, овалов и прямоугольников https://structuriqa.com/
Сильный цветовой контраст https://structuriqa.com/policy
Палитра интерьера строится на противопоставлении глубокого черного и идеально белого с акцентами насыщенных оттенков золота, розовый металлик, бордовых, лиловых и синих тонов https://structuriqa.com/
Атмосфера гламура https://structuriqa.com/remont.html
Глянцевые фасады мебели, блеск хрусталя и полированного мрамора, переливы витражей создают гламурный антураж https://structuriqa.com/dizajn-interera.html
Мотивы экзотики https://structuriqa.com/kontaktyi.html
В декоре присутствуют ацтекские и африканские узоры, фантазийные образы растений, животных, насекомых и птиц, необычные сувениры, привезенные из разных стран https://structuriqa.com/remont.html
7) граждане, имеющие право на бесплатную юридическую помощь в соответствии с Законом Российской Федерации от 2 июля 1992 г https://www.yuristi.com № 3185-1 «О психиатрической помощи и гарантиях прав граждан при ее оказании»;
Юристы по банкам, МФО https://yuristi.com
больше 27000 мест https://www.yuristi.com
защиты прав потребителей; сделок с недвижимостью; банкротства физических и юридических лиц; взыскания долгов; уголовного права и др https://yuristi.com
О бесплатной юридической помощи http://yuristi.com
Для бизнеса Для частных лиц http://yuristi.com
Пользователи Zoon https://www.proffdentall.ru/uslugi/lechenie-zubov/ustanovka-shtifta/
ru наиболее положительно оценили Студия ортодонтии в Мытищах, Стоматологическая клиника Лина, Апельсин http://www.proffdentall.ru
Вы можете воспользоваться нашей картой города, чтобы узнать их точное расположение и адреса https://www.proffdentall.ru/uslugi/esteticheskaya-stomatologiya/
Наша клиника предоставляет весь комплекс стоматологических услуг в г https://www.proffdentall.ru/
Мытищи https://www.proffdentall.ru/novosti/semnyy_polnyy_ili_chastichnyy_protez_25000_rub/
Мы лечим зубы в комфорте и без боли https://www.proffdentall.ru/uslugi/lechenie-zubov/
У нас вы можете пройти комплексное обследование за один день https://www.proffdentall.ru/galereya/kabinety-i-oborudovanie/
Наши специалисты ответят на все ваши вопросы https://www.proffdentall.ru/uslugi/lechenie-zubov/ustanovka-shtifta/
Внимание к проблемам пациента, умение ценить человеческую жизнь и здоровье- главные качества медицинских специалистов нашей клиники https://www.proffdentall.ru/uslugi/udalenie-zubov/
Каждый клинический случай мы рассматриваем, учитывая индивидуальные особенности пациента https://www.proffdentall.ru/uslugi/gigiena-i-profilaktika/
Это помогает точнее собрать https://www.proffdentall.ru/uslugi/ortopedicheskoe-lechenie/mostovidnye-protezy/
Для меня поход к стоматологу — это огромный стресс https://www.proffdentall.ru/uslugi/lechenie-zubov/
И этот раз не был исключением, я начала рыдать уже по дороге в клинику (Машенька, 25 лет https://www.proffdentall.ru/o-nas/
)
ортопантомограф Pax-i, дентальный рентген Gendex Expert DC https://www.proffdentall.ru/uslugi/lechenie-zubov/karies/
— стоматология для тех, кто ценит качество https://www.proffdentall.ru/novosti/semnyy_polnyy_ili_chastichnyy_protez_25000_rub/
Нас рекомендуют друзьям и знакомым, потому что уверены в надежности центра https://www.proffdentall.ru/galereya/vhod/
Удобное месторасположение, обширный спектр оказываемых услуг и ответственность за работу профессионалов https://www.proffdentall.ru/o-nas/
DAVINES SPA https://arganmidasspb.ru
Kapous, Флюид для секущихся кончиков Studio Professional, 80 мл https://arganmidasspb.ru/hand_cream_60_ml
С 11 сентября по 24 сентября 2023 года на товары бренда Brelil действует скидка 20% https://arganmidasspb.ru/moroccan_argan_oil_10_ml
Акция действительна при покупке на сайте https://arganmidasspb.ru/magik_body_wash_100_ml
Акция распространяется только на товары со значком https://arganmidasspb.ru/golden_dawn_kit
Приятных покупок!
Цены очень приятные, есть система лояльности https://arganmidasspb.ru/acid_shampoo_450_ml
Главное — классный ассортимент предлагают, открыла тут для себя несколько интересных брендов корейской косметики, которые нигде до этого мне на глаза не попадались https://arganmidasspb.ru/acid_shampoo_450_ml
Профессиональная косметика различных брендов, покупаю здесь по необходимости то шампунь-бессульфатник, то лосьон-флюид для волос…
КОСМЕТИКА ДЛЯ ВОЛОС https://arganmidasspb.ru/body_milk_300_ml
Механизм антимикробного действия солей тяжелых металлов в низких концентрациях связан с блокированием сульфгидрильных групп ферментов, необходимых для жизнедеятельности микроорганизмов https://crystal-tr.ru/product/kontejner-polimernyj-sterilnyj-s-lozhkoj-30-ml/
Очевидно, что уход за собой необходим любой девушке и женщине в любом возрасте https://crystal-tr.ru/product/podguzniki-dlja-vzroslyh-predo-abult-standartnaja-pachka-razmer-l/
Но в чем он должен заключаться? С чего начать?Представляем вам примерный список процедур по уходу за собой в домашних условиях, который вы можете взять за основу и переделать непосредственно под себя https://crystal-tr.ru/product/kombinezon-zashhitnyj-plotnost-60gr-lam/
Различают предельный и максимальный срок годности рабочего раствора https://crystal-tr.ru/product/karman-priemnik-chehol-dlja-instrument/
Под первым сроком годности принято понимать период сохранения исходной концентрации действующего вещества, кислотно-щелочного баланса, бактерицидной активности до его использования https://crystal-tr.ru/product/tonometr-mehanicheskij-iad-01-1a-kompl-1-ad/
С учетом изложенного предпочтение следует отдавать тем дезинфицирующим средствам, которые могут использоваться для проведения дезинфекции всеми основными способами с экспозицией не более 60 минут при проведении обработки поверхностей методом протирания при бактериальных и вирусных инфекциях https://crystal-tr.ru/product/lejkoplastyr-baktericidnyj-sfm-7-2-sm-h-1-9-sm-polimer-400-sht/
Оптимальными по своим эксплуатационным характеристикам считаются, в частности, дезинфицирующие средства из группы катионных поверхностно-активных веществ (КПАВ), включающие четвертичные аммониевые соединения (ЧАС), кислородосодержащие средства, третичные амины, производные гуанидина — их широко применяют для обеззараживания поверхностей в помещениях, жесткой мебели, оборудования по режиму, обеспечивающему гибель грамотрицательных и грамположительных бактерий https://crystal-tr.ru/product-category/medicaldisp/trusiki-dlja-procedur/
Далеко не все рекламируемые средства действительно помогают сбросить вес, но абсолютно все они клянутся помочь https://crystal-tr.ru/product/lotok-prjamougolnyj-lmpr-200-nerzhavejka/
Сегодня на пике популярности находится зеленый кофе https://crystal-tr.ru/product/shpric-sfm-2-ml-trehkomponentnyj-s-nadetoj-igloj-0-6-x-30-23g-10-shtuk/
Что же в нем особенного?
Дезинфекция на предприятиях обслуживания https://crystal-tr.ru/product/podguzniki-dlja-vzroslyh-predo-abult-standartnaja-pachka-razmer-xl/
Номер инструкции по применению: 40 от 2012 воды https://crystal-tr.ru/product-category/cosmetology/lazernye-apparaty/
В качестве действующих веществ содержит N,N-бис- 3-аминопропил додециламин 6%, дидецилдиметиламмоний контроль 8%, смесь алкилдиметилбензиламмоний хлорида и алкилдиметилэтилбензиламмоний хлорида суммарно 6%, полимер полигексаметиленгуанидин 2,5%,изопропиловый ассистент 5% обладает хорошими моющими и дезодорирующими свойствами, не имеет обрабатываемые объекты, не обесцвечивает ткани, не фиксирует органические загрязнения, не знает коррозии металлов, включая углеродистую сталь и сплавы https://crystal-tr.ru/product/metod-polimeraznoj-cepnoj-reakcii-pc/
Водоросли https://inseacosmetic.com/bezsulphatnaya_kosmetica
Янтарная кислота стимулирует выработку коллагена и эластина на клеточном уровне, улучшает цвет кожи, обладает сильными антиоксидантными свойствами, которые купируют второй и третий фактор старения https://inseacosmetic.com/polza_vred_pav
Море содержит много тайн и компонентов с замечательными свойствами, многие из которых мы включили в косметику YAM, что позволяет вам наслаждаться значительными преимуществами, которые может предложить море https://inseacosmetic.com/polza_vred_pav
Морские растения являются самым чистым источником мощных активных ингредиентов и минералов, которые необходимы для ухода за вашей кожей https://inseacosmetic.com/
Крем для лица INSEA комплексный с натуральной ламинарией и эк страктом иглокожих https://inseacosmetic.com/delivery
Для любых типов кожи https://inseacosmetic.com/polza_vred_pav
GE Versana Active https://kv-med.ru/production/page/10/
Виды датчиков https://kv-med.ru/production/plaster-100/
Частотный диапазон: 2–6 МГц, количество элементов: 128 шт https://kv-med.ru/objectcat/rentgenologiya/
, апертура/радиус: 60 мм, поле/угол обзора: 60°, клиническое применение: брюшная полость, мочеполовая система, тазобедренные суставы, акушерство и гинекология, для УЗИ аппаратов: Edan U50, U2 https://kv-med.ru/objectcat/sredstva-peremeshheniya-dlya-asmp-i-mchs/page/3/
Частотный диапазон: 5–10 МГц, количество элементов: 96 шт https://kv-med.ru/
, апертура/радиус: 40 мм, поле/угол обзора: 40 мм, клиническое применение: поверхностные органы, скелетно-мышечная система, сосуды, для УЗИ аппаратов: Edan DUS 60 https://kv-med.ru/auto/avtomobil-skoroj-medicinskoj-pomoshhi-na-baze-gazel-next-prima/
Основные характеристики https://kv-med.ru/production/inko/
Частотный диапазон: 5–8 МГц, количество элементов: 80 шт https://kv-med.ru/auto/sanitarnyj-avtomobil-na-baze-lada-niva/
, апертура/радиус: 10 мм, поле/угол обзора: 128°, клиническое применение: педиатрия, для УЗИ аппаратов: Edan DUS 60 https://kv-med.ru/production/podelitsya-asd-fotek/
Как сделать заказ https://micevol.ru/vorota-dlya-vodnogo-polo
Компания Lanima Mebel представлена на рынке мягкой мебели более 7 лет https://micevol.ru/bolshoy-belyy-shkaf-dlinoy-6-metrov-v-gostinuyu-zonu.html
Мы производим качественную и стильную мягкую мебель https://micevol.ru/katalog/kuxni-na-zakaz/neoklassika
В нашей команде работают лучшие специалисты https://micevol.ru/kak-ne-dat-sebya-obmanut-pokupaya-korpusnuyu-mebel-na-zakaz.html
У нас собственное производство, поэтому мы можем тщательно контролировать каждый этап производства мягкой мебели https://micevol.ru/pokraska/pokraska-derevyannoj-mebeli
Мы производим не только стандартные модели в наших обновляемых коллекциях, но и персонализированную мебель по Вашим индивидуальным параметрам и пожеланиям https://micevol.ru/product/tefiya
Угловой диван на заказ DV https://micevol.ru/kuhnya-s-fasadami-v-italyanskom-stile-s-frezerovkoy-i-legkoy-patinoy.html
052 https://micevol.ru/product/iskya-zelenaya
Прямые диваны https://micevol.ru/katalog/kuxni-na-zakaz/minimalizm
Выставление счет-договора, предоплата, утверждение чертежа https://micevol.ru/skolko-petel-nuzhno-na-raspashnuyu-dver-shkafa.html
Цена: 586 510 ? В корзинуПодробнее https://micevol.ru/novye-vidy-kuxon-na-zakaz-ot-mikevol.html
На сегодняшний день очень много разнообразных проектов можно воплотить в жизнь с помощью дизайна https://sferahome.ru
Разберёмся в характерных чертах и направлений стилей интерьера https://sferahome.ru/komplektatsiya-i-dekorirovanie
Мы будем вам благодарны, если вы пришлете нам на почту пожелания о том, что бы вы хотели узнать подробнее, но не встретили среди наших статей https://sferahome.ru/komplektatsiya-i-dekorirovanie
Мы подготовим развернутый материал по данной теме https://sferahome.ru/dizajn-interera/dizajn-intererov-dlya-restorana
Это экзотический вид https://sferahome.ru
В быту присутствовала мебель из ротанга, ковёр с орнаментом животных https://sferahome.ru/dizajn-interera/dizajn-intererov-dlya-kafe
Самобытные виды искусства (маски, фонарики, скульптуры) https://sferahome.ru/dizajn-interera/dizajn-intererov-dlya-restorana
Аксессуары: подушка (украшена рисунком под животных), каменные блюда, вазы наполненными бамбуковыми палочками, одеяло https://sferahome.ru/stroitelstvo
Изысканность и хороший вкус придадут помещению дорогие и качественные отделочные материалы, мебельные гарнитуры из натуральных элементов, а также произведения живописи и искусства гармонично вписанные в общий фон https://sferahome.ru
Всё это подразумевает минимализм https://sferahome.ru/stroitelstvo
Дизайн интерьера ресторана или кафе – это та немаловажная деталь, которая может помочь привлечь максимальное количество посетителей https://sferahome.ru/komplektatsiya-i-dekorirovanie
Все, от формы ручки на входной двери до материала столешницы на барной стойке должно вызывать желание пребывать в этом помещении максимально долго и вернуться вновь https://sferahome.ru/dizajn-interera/dizajn-intererov-dlya-kafe
И здесь важна именно детальная проработка интерьера, ведь именно в деталях и формируется неповторимая атмосфера заведения https://sferahome.ru
Наиболее популярным и весьма универсальным колером является теплый бежевый цвет и весь его спектр https://sferahome.ru/dizajn-interera
В мировом тренде заняли свое место нежный серо-коричневый, пряный горчичный и терракотовый цвета https://sferahome.ru/dizajn-interera/dizajn-intererov-dlya-kafe
Теплые бежевые тона приятны к визуальному восприятию, придают комнате уютность и комфортабельность https://sferahome.ru/komplektatsiya-i-dekorirovanie
Керамзитобетон закладывают в форму станка при включенном механизме вибрации, убирают или добавляют раствор при помощи мастерка https://al-keram.ru/blog/osnovnye-preimushchestva-ispolzovaniya-keramzita-alkeram.html
После того, как масса уплотнилась под действием колебаний, изделие аккуратно вынимают и кладут на поддон https://al-keram.ru/blog/tsvetnoy-dekorativniy-keramzit.html
Качество изделия будет напрямую зависеть от точности соблюдения всех правил технологии выполнения https://al-keram.ru/voprosi-i-otveti.html
Поскольку из вышесказанного понятен весь технологический процесс изготовления керамзитного материала и его экологичность, то вопрос отпадает сам собой https://al-keram.ru/catalog-keramzit/keramzit-v-big-begah-fraktsii-5-10-m300-350-detail.html
Чтобы определиться, какая фракция нужна для стяжки пола с керамзитом https://al-keram.ru/blog/stroitelstvo-i-keramzit.html
необходимо в первую очередь оценить состояние основания https://al-keram.ru/keramzit-s-dostavkoj-v-dmitrov.html
Чаще всего применяют небольшие размеры частиц, чтобы не было большой нагрузки на пол https://al-keram.ru/novosti/grafik-raboty-na-maj.html
Расход керамзита обусловлен высотой слоя и размером покрываемой площади https://al-keram.ru/catalog-keramzit/keramzit-v-big-begah-fraktsii-5-10-m300-350-detail.html
Возьмем стяжку толщиной 5 см на площади 20 м3 https://al-keram.ru/blog/uteplenie-keramzitom-sovety-professionalov.html
Подставляем эти данные в формулу: 5см х 20м3 х 0,01м3(расход на м2 высотой 1см) = 1 м3 = 1000 л Итого: для заданных параметров потребуется закупить 1000 литров керамзита https://al-keram.ru/blog/kak-uteplit-dom-keramzitom.html
Он фасуется в мешки по 50 литров https://al-keram.ru/blog/uteplenie-keramzitom-sovety-professionalov.html
Для организации стяжки понадобится 20 мешков данного материала https://al-keram.ru/catalog-keramzit/keramzit-v-big-begah-fraktsii-20-40-m200-250-detail.html
Это приблизительные расчеты https://al-keram.ru/novosti/
Они предоставят возможность оценить ориентировочное количество материалов https://al-keram.ru/blog.html
Приступая к работам, необходимо учесть некоторые особенности, с которыми сталкиваются строители https://al-keram.ru/blog/vidy-keramzita.html
Но самым главным свойством этого материала является то, что, к примеру, заливка пола с керамзитом является отличным вариантом при строительстве своего дома https://al-keram.ru/novosti/
Малый вес — позволяет производить утепление пола керамзитом под стяжку в домах, где нежелательна большая нагрузка на перекрытия (прочитайте: Делаем утепление пола под стяжку – практические советы) https://al-keram.ru/dokumenty-pokupatelyam.html
После вашего обращения, мы в обязательном порядке предложим вам пробный аудит https://topseosite.ru/
Ведь прежде, чем доверить нашей команде продвижение своего сайта, вы должны убедиться в нашей компетентности https://topseosite.ru/uslugi
Все известные поисковые системы, в том чисел Яндекс и Google работают над улучшением своей выдачи, а соответственно, строго следят за качеством сайтов, которые находятся на их первых страницах https://topseosite.ru/
Поэтому, самый верный способ быть в топе поисковиков, это постоянно работать над юзабилити вашего сайта, а так же внедрять технические обновления, благодаря которым ваш сайт станет удобнее пользователям http://topseosite.ru
Это поможет вам не только получать бесплатные переходы из интернета, но и увеличить конверсию, а соответственно, и продажи с вашего сайта https://topseosite.ru/contacts
По итогу всех проделанных нами работ по оптимизации сайта, 100% ключевых запросов вышли в ТОП-10 в Google, из которых 95% находятся в ТОП-3 http://topseosite.ru
ВКонтакте https://topseosite.ru/
Перейти на сервис можно по ссылке http://topseosite.ru
Яндекс решил отключить в панели Вебмастера и в поисковой выдаче старые знаки качества, которые присваивались за успехи и достижения в продвижении сайта https://topseosite.ru/contacts
Ранее они отображались на странице https://topseosite.ru/
На поисковой странице такие знаки показывались рядом с самим сайтом в виде соответствующих иконок https://topseosite.ru/
Изменения коснутся таких показателей, как, например: Выбор пользователей…
Добромед http://www.proffdentall.ru
Имплантация и костная пластика https://www.proffdentall.ru/uslugi/ortopedicheskoe-lechenie/mostovidnye-protezy/
Для чего используются импланты?
Плюсы и минусы лечения зубов у детей под наркозом https://www.proffdentall.ru/uslugi/ortopedicheskoe-lechenie/mostovidnye-protezy/
В Мытищах есть 3 медицинских центра с режимом работы 24/7 https://www.proffdentall.ru/uslugi/ortodonticheskoe-lechenie/
Это Goldenmed, МаВи, Мытищинская городская клиническая больница https://www.proffdentall.ru/tseny/
Микроскопная стоматология – это стоматологическая клиника, состоящая из двух филиалов: амбулаторного и операционного, общей площадью 300 кв https://www.proffdentall.ru/uslugi/
м https://www.proffdentall.ru/galereya/resepshn/
На сегодняшний день в клинике доступно всё самое современное стоматологическое лечение, включая высокоточное цифровое протезирование и лечение под увеличением: каждый кабинет оснащен стоматологическом микроскопом https://www.proffdentall.ru/uslugi/lechenie-zubov/
В стоматологическую клинику я приводила своего ребенка, нам для школы нужна была справка, поэтому мы…
Гарюева Анна Владимировна https://www.proffdentall.ru/licensiya/
Сеть стоматологических клиник Никадент в Мытищах https://www.proffdentall.ru
Понравился подход врача, он назначил правильное лечение, после которого у меня с зубами все хорошо! Внутри клиники чисто, современно!
Стоматология — отзывы пациентов https://www.proffdentall.ru/doktora/tanasoglo_tatyana_radionovna/
Все оборудование отвечает нормам безопасности https://www.proffdentall.ru/uslugi/ortopedicheskoe-lechenie/koronki/
Lunifera https://arganmidasspb.ru/body_milk_60_ml
Kapous, Флюид для секущихся кончиков Studio Professional, 80 мл https://arganmidasspb.ru
В отдельных подкатегориях собраны профессиональные парикмахерские инструменты, расчески самых известных брендов, модные резиночки для волос и укладочные средства https://arganmidasspb.ru/triple_moisturizing_body_wash_100_ml
Надеемся, что вы сможете выбрать и купить всё, что нужно для ухода за волосами https://arganmidasspb.ru/curvy_skin_kit
бальзамы и кондиционеры – смягчают пряди, облегчают расчесывание, исключают запутывание;
Estel, Набор для увлажнения и питания волос CUREX CLASSIC https://arganmidasspb.ru/travel_kit
Средство с маслами авокадо и оливы восстанавливает поврежденные волосы, делая их гладкими и шелковистыми https://arganmidasspb.ru/antidandruff_shampoo_450_ml
Запаивает сеченые кончики волос https://arganmidasspb.ru/acid_shampoo_450_ml
Инструкций по применению моющих (щелочных и кислотных), Инструкция содержит сведения о моющих, моюще- дезинфицирующих и дезинфицирующих Порошкообразные технические моющие средства ( ТМС) типа МД – 1 https://crystal-tr.ru/product/lampa-lupa-kolcevaja-na-strubcine/
· Способом кипячения в дистиллированной воде (30?) или в воде с добавлением натрия двууглекислого 2% (сода пищевая 15?) https://crystal-tr.ru/product/foliodrape-protect-plus-komplekt-dlja-laparoskopii-ii/
Дезинфекции способом кипячения подвергают изделия из стекла, металлов, термостойких полимерных материалов и резин https://crystal-tr.ru/product/halat-hirurgicheskij-medicinskij-h-02/
Перед кипячением изделия очищают от органических загрязнений (кровь, слизь и др https://crystal-tr.ru/product/plastyr-katushechnyj-na-tkanevoj-osnove-2-0-h-500-sm-24-sht/
), промывая водопроводной водой и соблюдая и соблюдая при этом меры безопасности при работе с биологическими жидкостями https://crystal-tr.ru/product/rentgenpljonka-sfm-x-ray-bf-18h24-sinechuvstvitelnaja/
Отсчет времени дезинфекционной выдержки начинают с момента закипания воды https://crystal-tr.ru/product/plenka-rentgen-med-sony-upt-510bl-202mmh253mm-8×10-125l/
– одна из лучших транспортных компаний России, была создана в 2001 году, занимается организацией грузоперевозок по территории РФ https://crystal-tr.ru/product/abakteril-aktiv-1l-50ml-100ml-200ml-500ml-750ml-1l-3l-5l/
Ежегодно предоставляет комплексные услуги по доставке грузов более 3,5 млн https://crystal-tr.ru/product/rentgenpljonka-sarestream-health-dvb-20h25-8×10-100-listov/
клиентов, в том числе частным лицам и крупным интернет-магазинам, торговым сетям федерального и регионального формата, дистрибьюторским и производственным компаниям https://crystal-tr.ru/product-category/disinfection/lotki-medicinskie/
С опушки приехала группа ОМОНа https://crystal-tr.ru/product/perchatki-sinteticheskie-sterilnye-neoprenovye-sfm-1-para/
По этой причине мы вынуждены временно заблокировать доступ к порталу https://crystal-tr.ru/product/lejkoplastyr-dlja-kateterov-i-kanjul-sfm-6-sm-h-3-sm-50-sht/
Выпускается в двух формах: таблеток весом 3,32 г, выделяющих при создании 1,52 г активного хлора, и в виде гранул https://crystal-tr.ru/product/7-ochen-bolshoj-17-kg/
Возня водорода 6% — ЮжФарм https://crystal-tr.ru/product/rentgenpljonka-sfm-x-ray-gf-30h30-zeljonochuvstvitelnaja/
Продолжительность рабочего времени должна превышать https://crystal-tr.ru/product/rentgenpljonka-sfm-mammograficheskaja-mammo-mf-24h30/
Руководство инструкция пароварки филипс 9140 внедрению принципов менеджмента https://crystal-tr.ru/product-category/cosmetology/
Настоящие санитарные правила нормы разработаны https://crystal-tr.ru/product/dmae-lactic-peel-new-peel/
Должен выполнять требования разработанной разработанных учетом требований изложенных типовых инструкциях по2
Дезинфицирующие средства, используемые для проведения дезинфекционных мероприятий, должны обладать широким спектром действия в отношении всех видов микроорганизмов, в том числе бактерий, вирусов, грибов, микобактерий туберкулеза, а также возбудителей особо опасных инфекций в сочетании с хорошими физико-химическими свойствами (быстрой растворимостью в воде), моющими и дезодорирующими свойствами https://crystal-tr.ru/product-category/consumables/rentgenpljonka/fljuorografija/
На каждое применяемое организацией дезинфицирующее средство должны быть определены нормы расхода, концентрация, время экспозиции, способы и кратность обработки https://crystal-tr.ru/product/detskie-vlazhnye-salfetki-skippy-premium-70-sht-s-klapanom/
тканевые, кремообразные, маски-пленки; дополненные экстрактами кофейных зерен, облепихи, жемчуга для сияния, упругости и увлажнения; комбинированные, с активированным углем, минералами Мертвого моря, с коллагеном и глиной (очищающие, матирующие, сужающие поры); для лица, шеи, декольте; грязевые с голубой глиной; для нормальной, жирной, сухой, комбинированной, молодой, зрелой, возрастной кожи https://inseacosmetic.com/polza_vred_pav
Существуют комплексы косметики, специально разработанные для разных типов проблем, а также предназначенные для совместного использования с другими косметологическими составами и аппаратами https://inseacosmetic.com
Мягкий очищающий гель на основе грязи Мёртвого моря, экстракта облепихи и водорослей https://inseacosmetic.com/
Применяется для очищения и увлажнения жирной чувствительной кожи https://inseacosmetic.com/kak_yhajivat_za_kojei_zimoi
Идеально очищает кожную поверхность, не высушивая её; увлажняет и восстанавливает нормальную кислотность кожи; активизирует обменные процессы https://inseacosmetic.com/
Компания MediSpaTechnology предлагает спа-центрам, салонам красоты и косметологическим кабинетам высокотехнологичную профессиональную косметику из водорослей, которая построена на медицинском принципе биомиметики, именно поэтому в составе используются редкие водоросли и суперфуды https://inseacosmetic.com/delivery
Основанная на передовых научных принципах и созданная с применением новых технологий, она позволяет обеспечивать клиентам потрясающие результаты https://inseacosmetic.com/kak_yhajivat_za_kojei_zimoi
Востребованность современной морской medical-косметики позволит Вам принимать большее количество посетителей и оказывать им качественные услуги, которые позволяют достигнуть потрясающих результатов http://inseacosmetic.com
В каталоге компании представлены продукты бренда Fabbrimarine, известного на весь мир производителя косметики, а также других проверенных производителей, каждый бренд имеет свою уникальную концепцию https://inseacosmetic.com/kak_yhajivat_za_kojei_zimoi
Частотный диапазон: 5–8 МГц, количество элементов: 80 шт https://kv-med.ru/production/dki-n-11-aksion/
, апертура/радиус: 10 мм, поле/угол обзора: 128°, клиническое применение: педиатрия, для УЗИ аппаратов: Edan DUS 60 https://kv-med.ru/production/uzt-1-02-u/
Сотрудничество с заводом производителем https://kv-med.ru/production/baktericidnyj-obluchatel-recirkulyator-obr-15/
Основные характеристики https://kv-med.ru/production/page/3/
Качественное диагностическое оборудование облегчает работу врача и позволяет быстро выявить причину недуга https://kv-med.ru/production/nosilki-ydc-1a9/
Ультразвуковые аппараты отличаются набором функций и областью применения https://kv-med.ru/production/baktericidnyj-obluchatel-recirkulyator-obr-15-2-p/
Большое значение имеет технический класс устройств, так как от него напрямую зависит качество визуализации и функциональность УЗИ-сканеров https://kv-med.ru/production/nosilki-ydc-1a8/
Например, одним из ключевых критериев является количество каналов — от них зависит степень чувствительности, разрешающая способность и стоимость https://kv-med.ru/production/nosilki-ydc-1a10/
10 лучших УЗИ-аппаратов в 2023 году https://kv-med.ru/production/storm-5500-c-modulem-kapnometrii-co2/
Стационарные УЗИ сканеры https://kv-med.ru/production/prikrovatnyj-monitor-storm-5800/
Керамзит – природный материал, полученный путем вспучивания и обжига легкоплавких глинистых пород, смешанных с выгорающими добавками https://al-keram.ru/blog/keramzit-harakteristiki.html
Керамзит – выпускается в виде щебня или грави- используется в качестве теплоизоляционной засыпки или заполнителя для легких бетонов (керамзитобетона) https://al-keram.ru/zakazat-keramzit-v-mytishchi.html
Первый слой утеплителя требуется засыпать сухим способом https://al-keram.ru/blog/vozmozhnost-utepleniya-krysh-keramzitom.html
Дальше надо приготовить раствор, выполняя смешивание бетона с керамзитом 5-10 фракции в соотношении 1:5 и заполнить им свободное пространство на высоту в 8 см https://al-keram.ru/voprosi-i-otveti.html
к записи Ирина к записи Алексей к записи Александр к записи Женя к записи Бирюков Сергей к записи Вера к записи Владимир к записи к записи Татьяна к записи
Учитывая переменчивые климатические условия, практика помогла выделить несколько групп строительных материалов первостепенной важности для сооружения различных объектов – от малого до самых больших https://al-keram.ru/blog/vreden-li-keramzit-dlya-zdorovya-mnenie-ekspertov.html
Одна из таких групп материалов – утеплители, а один из их важнейших параметров – теплопроводность https://al-keram.ru/blog/chto-vliyaet-na-stoimost-keramzita.html
Керамзит – один из наиболее распространённых среди теплоизолирующих материалов, поэтому рассмотрим теплопроводность керамзита https://al-keram.ru/catalog-keramzit/keramzit-v-big-begah-fraktsii-10-20-m250-300-detail.html
Изделия, в основе которых используется керамзит, очень разнообразны по ассортименту, поэтому также предлагаем следующие строительные характеристики:- теплопроводность керамзитобетона- теплопроводность керамзитобетонных блоков- теплопроводность стен из керамзита- теплопроводность керамзитобетонных стеновых панелей https://al-keram.ru/blog/osnovnye-preimushchestva-ispolzovaniya-keramzita-alkeram.html
ТеплопроводностьТеплопроводность керамзита – фактор, значительно влияющий на выбор материала для утепления, так как этот показатель может иметь различные значения, зависящие от величины фракции и других показателей https://al-keram.ru/catalog-keramzita/catalog-keramzita-v-meshkah.html
Принцип подбора прост: если коэффициент теплопроводности керамзита имеет большую величину, значит, его способность передавать тепло за единицу времени выше, то есть теплозащита хуже https://al-keram.ru/zakazat-keramzit-v-kotelniki.html
Если керамзит имеет больше пор, то меньше не только его плотность, но и значение теплопроводности, что делает такой материал лучшим изолятором https://al-keram.ru/o-kompanii.html
Для сравнения: керамзитовый гравий марки М350 (по плотности) и марки П125 (по прочности) имеет значение теплопроводности 0,12 Вт/(м•°С), а кладка из обыкновенного кирпича – 0,81 Вт/(м•°С) (плотностью 1800 кг/м3) https://al-keram.ru/stati/keramzit-ili-mineralnaya-vata-chto-vibrat.html
Расчётный коэффицент теплопроводностиРасчётный коэффициент теплопроводности керамзитобетона (плотность 1000 кг/м3) – 0,41 Вт/(м-°С), в два раза лучше, чем у кирпичной кладки https://al-keram.ru/aktsii/skidki-pri-pokupke-keramzita.html
В зависимости от плотности, коэффициент теплопроводности керамзитобетона на керамзитовом песке представлен ниже (плотность/коэффициент):- 1800 кг/м3/ 0,66 Вт/(м-°С)- 1600 кг/м3/ 0,56 Вт/(м-°С)- 1400 кг/м3/ 0,47 Вт/(м-°С)- 1200 кг/м3/ 0,36 Вт/(м-°С)- 1000 кг/м3/ 0,27 Вт/(м-°С)- 800 кг/м3/ 0,21 Вт/(м-°С)- 600 кг/м3/ 0,16 Вт/(м-°С)- 500 кг/м3/ 0,14 Вт/(м-°С) https://al-keram.ru/catalog-keramzit/keramzit-v-big-begah-fraktsii-20-40-m200-250-detail.html
Теплопроводность стенУчитывая такие стабильные показатели, отметим, что теплопроводность керамзитобетонных стеновых панелей как и теплопроводность керамзитоблоков позволяет заменить кирпичную кладку 100-120 см на 60-сантиметровую керамзитовую плиту или керамзитоблок https://al-keram.ru/novosti/
Следовательно, теплопроводность стен из керамзита позволяет значительно сэкономить на толщине и весе всей конструкции без ущерба для показателей качества https://al-keram.ru/blog/chto-vliyaet-na-stoimost-keramzita.html
В условиях индивидуального строительства на сложных грунтах, не выдерживающих большую нагрузку, вес всей строительной конструкции должен быть минимальным https://al-keram.ru/blog/chto-vliyaet-na-stoimost-keramzita.html
Малый вес и отличная теплопроводность керамзитобетонных блоков дают возможность строить там, где другие варианты просто невозможны https://al-keram.ru/blog/chto-vliyaet-na-stoimost-keramzita.html
Принимая во внимание коэффициент теплопроводности керамзита, как главного компонента изделий из этого материала, становится понятной причина, по которой производство и продажа керамзита стремительно растёт https://al-keram.ru/catalog-keramzita/catalog-keramzita-rossypyu.html
Теплопроводность керамзитобетона имеет настолько высокие показатели, что в Европе этот материал используется почти в 40% от общего объёма всех применяемых утеплителей https://al-keram.ru/blog/keramzit-otlichnyj-material-dlya-teploizolyatsii-zdanij.html
Гидроизоляция основания https://al-keram.ru/novosti/obnovilsya-prays-list.html
Для этого используют любые доступные технологии и материалы: специальную мастику, приготовление гидроизоляционного раствора из полимерных сухих смесей https://al-keram.ru/catalog-keramzita/catalog-keramzita-rossypyu.html
Если производится утепление пола керамзитом по грунту, то оптимальным решением будет полиэтиленовая пленка (не тоньше 100 микрон) или рулонный материал (рубероид) https://al-keram.ru/catalog-keramzit/keramzit-rossypyu-fraktsii-10-20-m200-250-detail.html
Читайте также: Как сделать теплый пол по грунту – пошаговое руководство https://al-keram.ru/catalog-keramzit/keramzit-v-meshkah-fraktsii-5-10-m300-350-detail.html
Рассчитайте изготовление вашего дивана https://micevol.ru/poleuretanovye-poplavki-sinego-cveta-dlya-vorot-vodnogo-polo.html
Шмитовский пр-д, 39к1 (ЖК Headliner), 2 этаж https://micevol.ru/izgotovili-vorota-vodnogo-polo-dlya-bassejna.html
У фабрики есть свои готовые модели https://micevol.ru/dva-shkafchika-na-zakaz-v-vannuyu-komnatu.html
Выберите вид мебели на нашем сайте и расскажите, что вы хотели бы изменить https://micevol.ru/kompleks-biryuzovyh-shkafov-v-prihozhuyu-i-koridor.html
Цена: 521 720 ? В корзинуПодробнее https://micevol.ru/kuxni-na-zakaz/kuxni-modern
Высокий диван на заказ DV https://micevol.ru/tuchkovo
017 https://micevol.ru/kuhnya-s-fasadami-v-italyanskom-stile-s-frezerovkoy-i-legkoy-patinoy.html
СПЕЦИАЛЬНОЕ ПРЕДЛОЖЕНИЕ https://micevol.ru/pokraska/pokraska-fanery
-Дополнительно о каналеТрэйлер канала: Индекс успешности: 301 995Дата создания: 02 Мая 2014 15:33:40Ключевые слова: дизайн и интерьер идеи интерьера дизайн интерьера идеи для дома дизайн интерьер квартиры красивый дизайн идеи дизайна маленькая квартира маленькая кухня интерьер ванной дизайн спальни новый дизайн дизайн потолка ландшафтный дизайн уют в интерьере кухни дизайн дизайн квартиры дизайн комнаты дизайн ваннойСсылка на канал: Описание каналаДИЗАЙН и ИНТЕРЬЕР это красивые идеи и дизайн интерьера квартиры https://sferahome.ru/dizajn-interera/dizajn-intererov-dlya-kafe
У нас вы найдете лучшие варианты дизайна для квартиры и дома https://sferahome.ru/stroitelstvo
Но дизайн интерьера это еще не все что мы для вас приготовили https://sferahome.ru/stroitelstvo/stroitelstvo-domov
На нашем канале вы можете посмотреть видео подборки дизайна для дачного и садового участка и даже идеи дизайна ногтей https://sferahome.ru/stroitelstvo
Надеюсь, что вы найдете для себя интересные и оригинальные идеи, которые помогут сделать вашу жизнь ярче и уютнее https://sferahome.ru/dizajn-interera/dizajn-intererov-dlya-kafe
В гостиной угольный тон может встречаться в любом виде https://sferahome.ru/dizajn-interera/dizajn-intererov-dlya-kafe
Черные обои на стенах в интерьере гостиной, дополненные картинами в золоченых рамах, превратят комнату в роскошный зал https://sferahome.ru/dizajn-interera/dizajn-intererov-dlya-kafe
Темная мебель смотрится ультрасовременно и модно https://sferahome.ru/stroitelstvo
Если хотите магию свой мир, то вам подойдёт этот стиль https://sferahome.ru/komplektatsiya-i-dekorirovanie
(древнекитайская мудрость) https://sferahome.ru/dizajn-interera/dizajn-intererov-dlya-restorana
Зоны активизируются с помощью многообразия оттенков, амулетов, растений, мебели или правильным освещением https://sferahome.ru/stroitelstvo/stroitelstvo-domov
Не в каждом доме есть место для полноценной гардеробной или вместительного шкафа https://sferahome.ru
И даже если таковые имеются, не значит, что нет проблемы, куда накинуть халат или сумочку – вешалка под рукой никогда не будет лишней https://sferahome.ru/dizajn-interera/dizajn-intererov-dlya-restorana
Подбор колорита в цветовой гамме под дерево очень сложный процесс https://sferahome.ru/stroitelstvo
Более лаконично стилистику стоит разбавить аксессуарами и декорациями с древесной фактурой https://sferahome.ru/dizajn-interera
Высшее образование получила в Санкт-Петербургском государственном университете https://sferahome.ru/dizajn-interera/dizajn-intererov-dlya-kafe
Окончила Школу флористики и дизайна в городе Санкт-Петербург по специализации https://sferahome.ru/dizajn-interera/dizajn-intererov-dlya-kafe
Перейти на сервис можно по ссылке https://topseosite.ru/uslugi
После того, как ваш сайт прошел все исправления и внутреннюю оптимизацию, мы приступаем к внешним источникам продвижения https://topseosite.ru/uslugi
Во время внешней оптимизации сео-специалист работает над улучшением сниппета вашего сайта в органической выдаче поисковика, подбирает площадки для донорства и размещения ссылочной массы, а также уделяет внимание проработке репутации вашего сайта в Сети http://topseosite.ru
Разработать контент Разработать семантический тег h1 Разработать семантический тег title Разработать мета-тег description Опубликовать контент Опубликовать изображение Выделить тегом strong ключевые запросы на странице Перелинковать контент с другими страницами сайта Обновить семантический тег h1 Обновить семантический тег title Обновить мета-тег description Обновить мета-тег keywords http://topseosite.ru
Подключить сайт к https://webmaster http://topseosite.ru
yandex https://topseosite.ru/uslugi
ru/ Подключить сайт к https://www http://topseosite.ru
google https://topseosite.ru/contacts
ru/webmasters/ Подключить сайт к https://metrika http://topseosite.ru
yandex https://topseosite.ru/contacts
ru/ Подключить сайт к https://www https://topseosite.ru/
google https://topseosite.ru/contacts
ru/analytics/ Обновить информацию о сайте на https://webmaster https://topseosite.ru/contacts
yandex https://topseosite.ru/contacts
ru/ Обновить информацию на https://www http://topseosite.ru
google https://topseosite.ru/
ru/webmasters/ Обновить информацию о заказчике на https://sprav https://topseosite.ru/contacts
yandex https://topseosite.ru/uslugi
ru/ Обновить информацию на https://www https://topseosite.ru/contacts
google https://topseosite.ru/contacts
ru/business/ Разработать файл robots http://topseosite.ru
txt Разработать файл sitemap https://topseosite.ru/uslugi
xml Обновить файл robots https://topseosite.ru/uslugi
txt Обновить файл sitemap https://topseosite.ru/uslugi
xml https://topseosite.ru/uslugi
Проверить эффективность такой раскрутки достаточно просто, так как заказчику достаточно лишь выяснить на каких местах находится проект по нужным ключевым фразам https://topseosite.ru/
Чтобы не заниматься этим вручную, можно воспользоваться онлайн-сервисами, которые группируют статистику по всем продвигаемым запросам в одном окне и предоставляют удобный отчёт о видимости ресурса в поисковых системах http://topseosite.ru
Подготовка плана работ по продвижению сайта https://topseosite.ru/
Улыбочку!
Лечим безболезненно все виды кариеса, независимо от сложности https://www.proffdentall.ru/o-nas/
Уровень оборудования и правильная анестезия обеспечивают полное отсутствие боли даже при осложненных формах заболевания https://www.proffdentall.ru/novosti/kompleksnaya_chistka_polosti_rta_za_3500_rubley/
Индивидуально подбираем методы обезболивания с учетом диагноза, возраста, состояния здоровья пациента https://www.proffdentall.ru/uslugi/esteticheskaya-stomatologiya/viniry/
Применяем качественные стоматологические анестетики последних поколений, действенные и нетоксичные https://www.proffdentall.ru/doktora/
Перед вводом лекарства наносим аппликационную анестезию – вы даже не почувствуете, что врач сделал обезболивающий укол http://www.proffdentall.ru
Возможно лечение под общим наркозом https://www.proffdentall.ru/uslugi/lechenie-zubov/endodonticheskoe-lechenie/
ОРТОПЕДИЯ https://www.proffdentall.ru/kontakty/
В клинике используется современное оборудование, которое соответствует последним стандартам и выпускается самыми надежными компаниями с наилучшими показателями качества и надежности https://www.proffdentall.ru/uslugi/ortodonticheskoe-lechenie/
Цены на виниры https://www.proffdentall.ru/novosti/implant_s_koronkoy_55000_rub/
…свой положительный отзыв о работе коллектива стоматологического центра !Хотела бы выразить огромную благодарность за их чуткость, лёгкость…
Стоматологический центр Кит https://www.proffdentall.ru/uslugi/lechenie-zubov/ustanovka-shtifta/
Стоматологическая общественность России (СтАР) высоко оценила труд сотрудников , присвоила Статус Инновационного Центра https://www.proffdentall.ru/o-nas/
Какие виды услуг мы предлагаем:
Наши услуги https://www.proffdentall.ru/licensiya/
Стоматологические услуги в Мытищах https://www.proffdentall.ru/doktora/
Имплантация зубов https://www.proffdentall.ru/novosti/implant_s_koronkoy_55000_rub/
Estel, Шампунь Curex Classic для всех типов волос, 1000 мл https://arganmidasspb.ru/hair_care_kit
Сегодня побывала на семинаре по восстановлению волос фирмы JEAN PAUL MYNE https://arganmidasspb.ru/moroccan_argan_oil_10_ml
После отработки на модели Блонд была поражена качеству восстановления…
Регулярно посещаю этот магазин и каждый раз ухожу оттуда с прекрасным настроением! Большой выбор, приветливые продавцы, всегда помогут и ответят на вопросы https://arganmidasspb.ru/fresh_moisturing_cream_200_ml
Спасибо что вы есть!
Интенсивная восстанавливающая маска для волос https://arganmidasspb.ru/magik_body_wash_750_ml
Средство имеет мощную специально разработанную формулу на основе маточного молочка, в котором содержится множество питательных компонентов https://arganmidasspb.ru/professional_salon_use_hair_drye
Маска глубоко питает поврежденные волосы, восстанавливая их структуру https://arganmidasspb.ru/moroccan_argan_oil_50_ml
Значительно уменьшает ломкость волос https://arganmidasspb.ru/body_milk_60_ml
KaramelkaShop https://arganmidasspb.ru/magik_body_wash_100_ml
Цена за мл: 5 https://arganmidasspb.ru/moroccan_argan_oil_10_ml
85 a https://arganmidasspb.ru/sunblock_50_ml
· Способом кипячения в дистиллированной воде (30?) или в воде с добавлением натрия двууглекислого 2% (сода пищевая 15?) https://crystal-tr.ru/product/plastyr-na-shelkovoj-osnove-2-5h500-12-sht/
Дезинфекции способом кипячения подвергают изделия из стекла, металлов, термостойких полимерных материалов и резин https://crystal-tr.ru/product/plastyr-na-netkanevoj-osnove-5-0-h-500-sm-plastik-6-sht/
Перед кипячением изделия очищают от органических загрязнений (кровь, слизь и др https://crystal-tr.ru/product/perchatki-lateksnye-odnorazovye-nest/
), промывая водопроводной водой и соблюдая и соблюдая при этом меры безопасности при работе с биологическими жидкостями https://crystal-tr.ru/product/dual-mezoniti/
Отсчет времени дезинфекционной выдержки начинают с момента закипания воды https://crystal-tr.ru/product/trusy-odnorazovye-zhenskie-menstrualnye-dr-skipp/
См https://crystal-tr.ru/product/sprej-spirtovoj-s-raspylitelem-50ml/
Приказ Минздрава России от 13 https://crystal-tr.ru/product/shpric-20-ml-dvuhkomponentnyj-sigloj-0-8-h-40-21g-sfm-50-shtuk/
11 https://crystal-tr.ru/product/lampa-lupa-s-registracionnym-udostov/
2012 № 911н Об утверждении порядка оказания медицинской помощи при острых и хронических профессиональных заболеваниях https://crystal-tr.ru/product/plastyr-na-netkanevoj-osnove-5-0-h-500-sm-plastik-6-sht/
Хранение дезинфицирующих средств организуется в пригодных для этой цели помещениях https://crystal-tr.ru/product/gag-complex-dvl-e-formula-mesopharm/
Доступ к дезинфицирующим средствам должен иметь только персонал, прошедший соответствующее обучение https://crystal-tr.ru/product/stul-medicinskij-s-gidravlicheskim-do/
Беременные женщины, а также молодые матери, которые кормят детей грудным молоком, от подобной работы отстраняются https://crystal-tr.ru/product/rentgenpljonka-sfm-x-ray-gf-24h24-zeljonochuvstvitelnaja/
Это связано с тем, что в малых дозах препараты все-таки попадают в организм персонала, а значит, могут навредить ребенку https://crystal-tr.ru/product/hydro-line-extra-nucleospire-revitalizing-complex-b-formula-mesopharm/
В отделениях дезинфицирующие средства и их растворы хранят под замком в местах, не доступных для детей и лиц, не занимающихся дезинфекцией, отдельно от лечебных препаратов https://crystal-tr.ru/product/jevakuacionnaja-stropa-survmed-sm-b4x5-olivkovaja-v-podsumke/
Обновлено 13 окт 2022Дезинфицирующее концентрированное беспенное жидкое кислотное средство на основе перекиси водорода и надмолочной кислоты предназначено для дезинфекции различных поверхностей, https://crystal-tr.ru/product-category/consumables/plastyri/netkannye-v-katushkah/
https://crystal-tr.ru/product/shirma-medicinskaja-m171-2-2-h-sekcionnaja-tka/
https://crystal-tr.ru/product-category/lab/
Тип: стационарный, цветной, дисплей: цветной ЖК, диагональ: 15 дюйм, память: 500 Гб, режимы сканирования: В, 2В, 4В, В/М, М, CDI, PW, CW, PDI, DPDI, порт подключения датчика: 4 шт https://kv-med.ru/uslugi/
, доплерография: импульсно- и постоянно-волновая, направленная энергетическая, уз датчики: линейный и конвексный https://kv-med.ru/auto/
Медицинская система обслуживает клинику на протяжении 10-30 лет https://kv-med.ru/objectcat/reanimaciya-i-anesteziologiya/page/3/
Ультразвуковые сканеры рассчитаны на работу практически без перерыва https://kv-med.ru/objectcat/sredstva-peremeshheniya-dlya-asmp-i-mchs/transportirovochnye-boksy/
Поэтому целесообразно купить надежный аппарат УЗИ с гарантией от производителя https://kv-med.ru/catalog/rubrika-3/
В каталоге – техника начального, среднего и экспертного класса https://kv-med.ru/auto/sanitarnyj-avtomobil-na-baze-lada-niva/
У компании MEDLIGA можно заказать отличный ультразвуковой аппарат – новый или восстановленный https://kv-med.ru/production/katalka-dlya-asmp-mm-a10-sp-16nf-so-semnymi-nosilkami/
Полный комплекс услуг для КТ и МРТ аппаратов https://kv-med.ru/production/ballon-dlya-medicinskih-gazov-kislorod-azot-10l-5l-2l/
Стоимость оборудования зависит от:
Оборудование позволяет проводить ежедневные высококачественные медицинские обследования самых разных пациентов https://kv-med.ru/production/baktericidnyj-obluchatel-recirkulyator-obr-30-6-p/
Оно оснащено широким набором ультразвуковых датчиков и дополнительными опциями: подогрев геля и 4 порт в дополнение к базовым трем https://kv-med.ru/objectcat/sredstva-peremeshheniya-dlya-asmp-i-mchs/telezhki-katalki/page/2/
Также устройство позволяет автоматизировать исследование внутренних органов пациентов и эффективно использовать полученные данные https://kv-med.ru/objectcat/apparaty-dlya-radiovolnovoj-hirurgii/page/2/
Основные характеристики https://kv-med.ru/production/ultradar/
Комплекс ухода за лицом с активным лифтинг-эффектом https://inseacosmetic.com/delivery
Косметика из водорослей https://inseacosmetic.com
Beaute Marine/Крем для лица с морскими водорослями https://inseacosmetic.com/blog
Качество изделия будет напрямую зависеть от точности соблюдения всех правил технологии выполнения https://al-keram.ru/blog/10-20.html
Поскольку из вышесказанного понятен весь технологический процесс изготовления керамзитного материала и его экологичность, то вопрос отпадает сам собой https://al-keram.ru/novosti/kompaniya-alkeram-pozdravlyaet-vas-s-novym-2017-godom.html
Для этого гидроизоляцию укладывают в промежутки между лагами https://al-keram.ru/blog/vozmozhnost-utepleniya-fundamentov-keramzitom.html
Затем засыпают слой керамзита, на который укладывают фольгированную пароизоляцию https://al-keram.ru/blog/nezamenimye-stroitelnye-materialy-gravij.html
Для дополнительного тепла сверху можно положить еще слой другого утеплителя (пенопласт, пенополистирол) вровень с верхним краем лаг https://al-keram.ru/o-kompanii.html
Затем настилается деревянный пол, рейки которого прибивают к лагам https://al-keram.ru/catalog-keramzita/catalog-keramzita-rossypyu.html
Читайте также: Утепление пола в деревянном доме снизу – как сделать и что использовать https://al-keram.ru/blog/nezamenimye-stroitelnye-materialy-gravij.html
Керамзитовый щебень фракции 20–40 мм используется в полах только в случае прохождения в них водопровода или теплотрасс https://al-keram.ru/zakazat-keramzit-v-odintsovo.html
Рыхлость засыпки обеспечивает легкий доступ к трубам в аварийных ситуациях https://al-keram.ru/kupit-keramzit-v-tule.html
Как упоминалось ранее, керамзит поставляется в виде пористых, сферических шариков различных размеров, с пористым ядром и особо прочной внешней частью https://al-keram.ru/contacts.html
Эти характеристики придают материалу особые свойства https://al-keram.ru/blog/stroitelstvo-i-keramzit.html
Во-первых, они очень легкие, благодаря сотовой структуре, и непроницаемые, так как глина материал, который не впитывает воду https://al-keram.ru/blog/uteplenie-keramzitom-sovety-professionalov.html
Мокрый Устройство проводится в 2 слоя https://al-keram.ru/contacts.html
Первый слой готовится из цемента, песка и керамзита, после заливки выравнивают ее при помощи специальных маяков https://al-keram.ru/blog/osnovnye-preimushchestva-ispolzovaniya-keramzita-alkeram.html
Для этого уровнем определяют верхнюю границу слоя, ставят маяки https://al-keram.ru/aktsii/skidki-pri-pokupke-keramzita.html
Натягивают ленту по периметру, скрепляют ее арматурой https://al-keram.ru/novosti/
Поле этого по маякам выравнивают смесь, дают застыть в течение 2 дней https://al-keram.ru/dostavka-keramzita-v-khimki.html
После этого наносят второй слой, применяя самовыравнивающиеся смеси https://al-keram.ru/blog/keramzit-otlichnyj-material-dlya-teploizolyatsii-zdanij.html
Какой размер керамзита нужен для стяжки пола данного типа? Применяется фракция 5-20 мм https://al-keram.ru/dokumenty-pokupatelyam.html
Цена: 586 510 ? В корзинуПодробнее https://micevol.ru/kuxnya-temnyj-niz-i-svetlyj-verx-originalnyj-variant-sovremennogo-oformleniya.html
Перейти в интернет-магазин https://micevol.ru/kuxni-na-zakaz/kuxni-modern
Модульный диван Феррара https://micevol.ru/kuxni-na-zakaz/kuxni-v-stile-provans-na-zakaz
Элитные кровати https://micevol.ru/uglovaya-belaya-kuxnya-s-vitrazhami-v-devyatietazhke.html
Овальный диван на заказ DV https://micevol.ru/osushhestvlyaem-onlajn-zamery-cherez-video-svyaz.html
054 https://micevol.ru/info-blog
1 https://micevol.ru/pokraska/pokraska-stoimost
Общие положения https://micevol.ru/pokraska/pokraska-kuxonnyx-fasadov
Преподаватель Центра дополнительного профессионального образования https://sferahome.ru/stroitelstvo/stroitelstvo-domov
Полы на балконе, как правило, имеют бетонную основу и в подобной ситуации специальное ковровое покрытие, устойчивое к внешним воздействиям, может стать самым недорогим и простым способом оживления пространства https://sferahome.ru/stroitelstvo
Это позволит добавить в ваш интерьер необходимые цветовые акценты, созвучные с общим решением дизайна квартиры https://sferahome.ru/dizajn-interera/dizajn-intererov-dlya-kafe
Окраска бетонного пола, имитирующая ковер, является еще одним бюджетным вариантом https://sferahome.ru/dizajn-interera/dizajn-intererov-dlya-restorana
А если вы желаете создать интерьер балкона со средиземноморской атмосферой, то прекрасно подойдет терракотовая керамическая плитка, которая добавит в интерьер теплоты и привлекательности https://sferahome.ru/stroitelstvo
Для тех же, кто предпочитает экологичность и естественность идеальным решением станет напольное покрытие из водоупорных и устойчивых к погодным условиям сортов древесины https://sferahome.ru/dizajn-interera/dizajn-intererov-dlya-restorana
Владеет многочисленными техниками в области флористического дизайна и декорирования, предметов интерьера и подарков ручной работы https://sferahome.ru/dizajn-interera/dizajn-intererov-dlya-kafe
Работает с живыми, искусственными, стабилизированными, горшечными растениями https://sferahome.ru/stroitelstvo/stroitelstvo-domov
Здравствуйте, дорогие друзья? Сегодня мне бы хотелось рассказать вам о распространённых декораторских ошибках многих домовладельцев, а также некоторых разногласиях между заказчиком (клиентом) и архитектором или дизайнером интерьера, возникающих при работе над оформлением интерьера https://sferahome.ru/dizajn-interera
Задумки дизайнеров не должны входить в критические противоречия с технологическими процессами и инженерно-техническими нормативами, не должен мешать работе https://sferahome.ru/stroitelstvo/stroitelstvo-domov
Комнаты сначала разделяем по функциональности https://sferahome.ru/dizajn-interera
Большая комната – гостиная для приема гостей будет в светлых гаммах https://sferahome.ru
Другие помещения могут быть в разных стилях, будет необычно и ярко https://sferahome.ru/dizajn-interera/dizajn-intererov-dlya-kafe
В интерфейсе Яндекс http://topseosite.ru
Директа были убраны несколько старых опций и добавлены элементы http://topseosite.ru
Обновление должно помочь рекламодателям проще ориентироваться в настройке объявлений и рекламных кампаний http://topseosite.ru
Основные изменения Полностью переработан блок “Прогноз и уточнение” https://topseosite.ru/
Для каждого ключевого слова или запроса был добавлен прогноз показов в зависимости от региона и минус-фраз (минус-слов) https://topseosite.ru/uslugi
Если вы введёте ключевик, система предложит другие…
ЭТАПЫ РАБОТ http://topseosite.ru
Итак, стоимость продвижения сайта зависит от нескольких факторов http://topseosite.ru
Первое, что важно выяснить, это количество направлений (категорий), которые необходимо продвинуть в ТОП https://topseosite.ru/uslugi
Вторым фактором является определение количества ключевых слов (запросов), планируемых к продвижению https://topseosite.ru/uslugi
В-третьих, необходимо проанализировать, насколько высококонкурентна ваша ниша https://topseosite.ru/
К важным деталям относится также время создания вашего сайта (как давно он заиндексирован в системе), проводилась ли ранее какая-либо сео-оптимизация сайта и т https://topseosite.ru/contacts
д https://topseosite.ru/uslugi
Время продвижения: 2,5 года (2019-2022гг https://topseosite.ru/contacts
)
Поисковая система: Яндекс или Google https://topseosite.ru/uslugi
Продвижение в ТОП-3 https://topseosite.ru/uslugi
Стоматология в Мытищах — современная многофункциональная клиника, оказывающая все виды стоматологической помощи https://www.proffdentall.ru/novosti/implant_s_koronkoy_55000_rub/
…я стала их постоянным пациентом! Спасибо стоматологам этой клиники, и в частности Шахназарову, которые выполняют свою работу профессионально https://www.proffdentall.ru/uslugi/lechenie-zubov/endodonticheskoe-lechenie/
Вообще весь…
В нашей клинике работают врачи всех специализаций, что позволяет успешно решать самые сложные случаи https://www.proffdentall.ru/novosti/semnyy_polnyy_ili_chastichnyy_protez_25000_rub/
Комфортно, как дома! Залог нашего успеха – сплоченность и хорошее настроение https://www.proffdentall.ru/uslugi/lechenie-zubov/
Основано врачами!
Что такое брекеты https://www.proffdentall.ru/doktora/
Добрый вечер! У меня на руках и на теле долгое время была сыпь https://www.proffdentall.ru/uslugi/esteticheskaya-stomatologiya/
Ходила к разным врачам и все без толку https://www.proffdentall.ru/uslugi/ortopedicheskoe-lechenie/mostovidnye-protezy/
Никто не понимал, что это такое и как лечить https://www.proffdentall.ru/novosti/lechenie_kariesa_lyuboy_slozhnosti_za_4500_rubley/
Прописывали разные мази, лекарства и уколы, а итог был 0 https://www.proffdentall.ru/
Отмучалась 4 месяца и наконец попала к…
Номера многоканальных телефонов
Мы ценим каждое обращение в наш центр, а потому стремимся предоставить клиентам высокий уровень сервиса:
Когда можно ставить ребенку брекеты https://www.proffdentall.ru/o-nas/ostavit-otzyv/
JOY BY JOY https://arganmidasspb.ru/antidandruff_shampoo_450_ml
Причина уценки: повреждение информационной этикетки https://arganmidasspb.ru/travel_kit
KAARAL https://arganmidasspb.ru/fresh_curls_essence_200_ml
Порой производители добавляют разные токсические вещества, которые увеличивают срок годности продукции и уменьшают ее стоимость, но при этом и плохо действуют на организм https://arganmidasspb.ru/clear_hydrating_conditioner_450_ml
Вот потому так важно научиться разбираться в косметике и покупать лишь натуральную и безопасную продукцию https://arganmidasspb.ru/acid_shampoo_450_ml
Шампунь для экстремально поврежденных осветленных волос Extreme Blond Repair Shampoo – деликатная формула с аминокислотами молочных протеинов, гидролизованным кератином и протеинами шелка бережно очищает, способствуют восстановлению структуры осветленных и обесцвеченных волос, поддерживает https://arganmidasspb.ru/mint_shampoo_500_ml
Профессиональная косметика для волос https://arganmidasspb.ru/antihair_loss_erum_15_ml_6
Один из видов обеззараживания, представляющий собой уничтожение заражённых насекомых с помощью специальных химических средств, путем воздействия горячей воды с паром или с помощью биологических средств (микробов) https://crystal-tr.ru/product/plastyr-na-netkanevoj-bumazhnoj-osnove-1-0-h-500-sm-30-sht/
ОСНАЩЕНИЕ: контейнеры или эмалированные емкости (стеклянные) с плотно притертыми крышками, ложки мерные, вода, мерная кружка, дезинфектант, рекомендованный к применению нормативными документами https://crystal-tr.ru/product/vorotnichok-9h45-spanlejs-35gr-m2-100-v-slozhenii/
Порча насылается на человека намеренно, при этом считается, что она действует на биоэнергетику жертвы https://crystal-tr.ru/product/abakteril-oksi-1l-5l/
Наиболее уязвимыми являются дети, беременные и кормящие женщины https://crystal-tr.ru/product-category/disinfection/dozatory/
5 https://crystal-tr.ru/product-category/medicaldisp/trusiki-dlja-procedur/
Закройте крышкой и поставьте на 24 часа (в течение этого времени несколько раз перемешайте) для выделения активного хлора, получится маточный раствор https://crystal-tr.ru/product/rentgenpljonka-sarestream-health-dvb-20h25-8×10-100-listov/
Средство для дезинфекции рук и поверхностей обладает высоким бактерицидным, вирулицидным, фунгицидным действием https://crystal-tr.ru/product-category/cosmetology/lazernye-apparaty/
Антисептик обеспечивает длительную антимикробную защиту https://crystal-tr.ru/product/zhgut-jesmarha/
Не содержит ароматизатора, может применяться на предприятиях пищевой промышленности https://crystal-tr.ru/product/trusiki-dlja-jepiljacii-muzhskie/
Готово к применению https://crystal-tr.ru/product/plastyr-katushechnyj-na-tkanevoj-osnove-3-0-h-500-sm-plastik-12-sht/
Зх минут https://crystal-tr.ru/product/shpric-20-ml-luer-lock-trjohkomp-s-igloj-0-8-x-40-21g-sfm-50-shtuk/
Обеззараживания белья при указанных https://crystal-tr.ru/product/bahily-vysokie-na-zavjazkah-plotnost-4/
Предметы ухода за больными полностью погружают в раствор средства https://crystal-tr.ru/product/shkaf-medicinskij-msh-08/
После https://crystal-tr.ru/sale/
дезинфекции белье стирают и прополаскивают, а предметы ухода промывают https://crystal-tr.ru/product/perchatki-lateksnye-sterilnye-s-indikaciej-prokola-2-pary-v-1-konverte/
Таблица №4 Режимы дезинфекции объектов при https://crystal-tr.ru/product-category/medicaldisp/tapochki-odnorazovye/
Объект https://crystal-tr.ru/product/nabor-ginekologicheskij-sterilnyj-junona-1-zerkalo-po-kusko-2-podkladnaja-pelenka-60-40-sm-perchatki-razmer-m-citoshhetka/
обеззараживания https://crystal-tr.ru/product/kosmetologicheskaja-kushetka-ondevi-4-s-p/
Концентрации https://crystal-tr.ru/product-category/consumables/instrument-medicinskij/
раствора (по препарату), %Времяобеззараживания, мин https://crystal-tr.ru/product/bint-nesterilnyj-2/
Способ обеззараживания https://crystal-tr.ru/product/perchatki-sinteticheskie-sterilnye-hloroprenovye-sfm-1-para/
Идеальная репутация и 5 лет успешной работы https://kv-med.ru/production/baktericidnyj-obluchatel-recirkulyator-obr-15-2-p/
Ультразвуковые системы применяются для расширенных возможностей диагностики и получения более точных результатов https://kv-med.ru/objectcat/sredstva-peremeshheniya-dlya-asmp-i-mchs/telezhki-katalki/page/2/
Стационарный УЗИ аппарат это технически сложная система, снабженная монитором с высоким разрешением, который позволяет визуализировать мельчайшие изменения https://kv-med.ru/?gall=5
Стационарные установки обычно являются универсальными и могут использоваться для любых видов исследований https://kv-med.ru/production/baktericidnyj-obluchatel-recirkulyator-obr-15/
Для этого оборудование оснащается портами для подключения УЗ-датчиков https://kv-med.ru/auto/avtomobil-skoroj-medicinskoj-pomoshhi-na-baze-sobol-biznes-klass-a/
Высокий уровень производительности и точности такого оборудования позволяет дать точную оценку состояния пациента и назначить ему эффективное лечение https://kv-med.ru/production/katalka-dlya-asmp-mma-10-kats-22310n/
цветопередача (цветная или чёрно-белая картинка); рабочая частота; глубина проникновения; разновидность датчика; формат представления изображения (плоский, объемный) https://kv-med.ru/production/prijomnoe-ustrojstvo-up2-s-prodolno-poperechnym-peremeshheniem-bez-podiuma/
General Electric Voluson E8 https://kv-med.ru/auto/sanitarnyj-avtomobil-na-baze-lada-largus-m2/
Область применения аппарата https://kv-med.ru/production/lyra-x1/
Наименование и количество датчиков, входящих в комплект https://kv-med.ru/production/spinalnaya-doska-mm-b1/
Наличие опций 3-d и 4-d визуализации https://kv-med.ru/production/shpric-pistolet-dlya-vnutrikostnyh-inekcij-big-vzroslyj/
Удобство использования https://kv-med.ru/events/universa-enim-illorum-ratio/
Так, ожидается, что АО в 2022 году начнёт производство портативных УЗИ аппаратов под брендовым названием SmartScan https://kv-med.ru/production/heartstart-frx-philips/
Аппараты SmartScan имеют сенсорный экран, систему голосового управления и может работать свыше 3-х часов, питаясь от АКБ https://kv-med.ru/production/spinalnaya-doska-mm-ydc-7b/
В год планируется выпускать по 1000-1500 УЗИ аппаратов https://kv-med.ru/production/baktericidnyj-obluchatel-recirkulyator-obr-p-dlya-potolkov/
Кроме того, предприятие планирует наладить выпуск УЗ-датчиков https://kv-med.ru/production/ge-voluson-s8-apparat-uzi/
Предполагается, что в конце 2022 г https://kv-med.ru/objectcat/rentgenologiya/
указанный выше аппарат будет включен в реестр Минпромторга https://kv-med.ru/production/uzt-1-01-f/
Больше половины заказов мы выполняем, разрабатывая уникальные изделия по проекту заказчика: фотографиям или 3D моделям https://micevol.ru/shkaf-kupe-v-vannuyu-komnatu-preimushhestva-i-idei-voploshheniya.html
Сопровождение нашей службы сервиса как в течение гарантийного срока, так и после него https://micevol.ru/chto-vazhno-uchest-pri-zakaze-kuxni.html
Фабрика мебели “Макинтош” | Производство мягкой мебели https://micevol.ru/uglovaya-kuxnya-zelenogo-cveta-podrobnye-foto.html
Новинки, идеи, специальные цены и приглашения на мероприятия с доставкой на ваш e-mail https://micevol.ru/stili-intererov
Узнать стоимость дивана + получить скидку 500 ?
7 https://micevol.ru/zhk-kembridzh
Конфиденциальность и защита персональной информации https://micevol.ru/mebelnaya-furnitura-xettix-i-boyard-chto-luchshe.html
ООО компании при регистрации был присвоен ОГРН 1134253002597 и ИНН 4253014026 https://al-keram.ru/zakazat-keramzit-v-odintsovo.html
Начиная с 2013 фирма расположена по адресу 654041, Кемеровская Область, Новокузнецк Город, Транспортная Улица, 77 https://al-keram.ru/blog/10-20.html
А вот при устройстве кровли существует несколько иной метод: сначала подготавливается пустотное пространство (пустота получается при сооружении внутренней и внешней обрешетки), на обрешетки настилается пароизоляционная пленка, пустоту которой заполняют керамзитом https://al-keram.ru/blog/05.html
Армирование https://al-keram.ru/catalog-keramzit/keramzit-v-big-begah-fraktsii-5-10-m300-350-detail.html
На засыпанный утеплительный материал необходимо уложить металлическую сетку с наличием больших ячеек, которая не должна иметь вмятин, выступающих острых краев и других дефектов, оставляя при этом по всей протяженности стен в помещении отступы в 4-5 см https://al-keram.ru/aktsii/skidki-pri-pokupke-keramzita.html
Цена: 2100 руб/куб https://al-keram.ru/blog/ispolzovanie-keramzita-pri-dorozhnich-rabotach.html
м https://al-keram.ru/dostavka-keramzita-v-mozhajsk.html
Купить керамзит сегодня можно россыпью, навалом, но чаще всего проще и удобнее приобрести керамзит в мешках https://al-keram.ru/catalog-keramzit/keramzit-v-meshkah-fraktsii-10-20-m200-250-detail.html
Наша компания предлагает 2 мелких фракции керамзита в мешках марки М 500 ГОСТ 9757-90: керамзитовый песок 0-5, керамзит 5-10 https://al-keram.ru/dostavka-keramzita-v-mozhajsk.html
Случаются ситуации, когда нет возможности хранить керамзит россыпью на стройплощадке, или не получается его транспортировать на крышу или верхние этажи дома https://al-keram.ru/dostavka-keramzita-v-khimki.html
Именно в таких случаях наилучшим выходом является приобретение фасованного керамзита https://al-keram.ru/dostavka-keramzita-v-mozhajsk.html
Он лучше и дольше хранится, занимает минимум места и удобен в транспортировке https://al-keram.ru/catalog-keramzit/keramzit-v-meshkah-fraktsii-20-40-m200350-detail.html
На нашем сайте Вы можете подробно ознакомиться с техническими характеристиками керамзитового гравия, узнать о марке керамзита, его прочности, весе, насыпной плотности https://al-keram.ru/zakazat-keramzit-v-mytishchi.html
В нашей компании представлен керамзит, соответствующий ГОСТ лучших заводов производителей керамзитового гравия – Алексинский, Серпуховский, Калужский керамзитовые заводы https://al-keram.ru/catalog-keramzit/keramzit-rossypyu-fraktsii-10-20-m200-250-detail.html
Мы гарантируем лучшие цены на керамзит в мешках https://al-keram.ru/blog/primenenie-frakcii-keramzita-10-20-mm.html
Вы можете позвонить нам по телефону и заказать керамзит в мешках с доставкой https://al-keram.ru/keramzit-s-dostavkoj-v-dmitrov.html
Керамзит это материал, используемый в качестве легкого заполнителя и обычно применяемый в изоляционных материалах https://al-keram.ru/blog/ispolzovanie-keramzita-pri-dorozhnich-rabotach.html
Обычно он имеет форму пористых, легких и очень прочных шариков, получаемых путем обжига различных видов глин при высоких температурах https://al-keram.ru/blog/osnovnye-preimushchestva-ispolzovaniya-keramzita-alkeram.html
Внутри они характеризуются пористым ядром, обеспечивающим легкость материала, и внешним слоем, придающим механическую прочность https://al-keram.ru/blog/nezamenimye-stroitelnye-materialy-gravij.html
Давайте посмотрим, как и где применяется https://al-keram.ru/calculator.html
По ГОСТУ марки керамзита должны быть от 250 до М 600, но выпускаются и материалы М 800 и М 1000 https://al-keram.ru/blog/kakie-raboty-s-keramzitom-mozhno-vypolnyat-zimoj.html
Учтите, что чем ниже марка керамзита, тем выше его качество https://al-keram.ru/zakazat-keramzit-v-odintsovo.html
Полки и стеллажи из лестницы своими руками, идеи из лестницы и стремянки для интерьера гостиной, спальни, кухни, ванной, домашнего офиса – вдохновляйтесь на творчество и дизайн для дома своими руками! Лучшие идеи для интерьера, как использовать лестницу в качестве стеллажа, витрины или полки на лучшем сайте о дизайне интерьеров!)
Комплектация вашего объекта обойдется на 50% дешевле https://sferahome.ru/stroitelstvo/stroitelstvo-domov
За счет сотрудничества с Европейскими производителями мебели, декора, отделочных материалов, сантехники мы готовы предложить полную или частичную комплектацию вашего объекта минимум на 50% дешевле чем в салонах https://sferahome.ru/stroitelstvo
Здравствуйте уважаемые посетители школы дизайна интерьера ! Вы находитесь на вступительном уроке нашей школы https://sferahome.ru
Занятия в нашей онлайн-школе будут посвящены самостоятельному оформлению и дизайну интерьера https://sferahome.ru/komplektatsiya-i-dekorirovanie
В нашей школе, в первую очередь, вы узнаете, что же такое на самом деле дизайн интерьера и что вам необходимо знать и уметь для успешного самостоятельного дизайна интерьера https://sferahome.ru/stroitelstvo/stroitelstvo-domov
Кстати, именно финансовые возможности почти всегда являеются одним из решающих аргументов в пользу интерьерного дизайна в классическом стиле https://sferahome.ru/stroitelstvo
По уровню бюджетных затрат этот стиль однозначно лидирует, а точное воссоздание стилистики ампира или барокко может обойтись в сумму, сопоставимую со стоимость всего объекта недвижимости https://sferahome.ru/stroitelstvo
В классическом интерьере практически нет элементов, несущих только сугубо утилитарную, прикладную функци практически каждый объект является произведением искусства, и даже работы по отделке помещения, например, созданию настенной росписи, выполняют мастера высочайшей квалификации, нередко имеющие художественное образование https://sferahome.ru/komplektatsiya-i-dekorirovanie
У него нет своего творческого почерка https://sferahome.ru/stroitelstvo
В идеале манго это Аниме, построение на творческих идеях https://sferahome.ru
А стало быть красочный постер, стеклянные непрозрачные сосуды на котором изображены сцены из мультфильмов, фигурки героев https://sferahome.ru/stroitelstvo/stroitelstvo-domov
Интерьер манго больше подходит для подростка https://sferahome.ru/stroitelstvo
Композиция прошлого века https://sferahome.ru
Этот стиль того времени вобрал в себя всю роскошь с сочетанием более экзотического и примитивного вида искусств https://sferahome.ru/dizajn-interera/dizajn-intererov-dlya-restorana
Для создания стиля использовали стекло, разновидность тканей, ковровых изделий, фонтаны, кованые решётки https://sferahome.ru/stroitelstvo
Мы всегда находимся с клиентами на связи и готовы оперативно отвечать на любые интересующие вопросы http://topseosite.ru
Что касается отчетов, то их мы предоставляем один раз в месяц в подробном формате https://topseosite.ru/uslugi
Дизайн сайта был полностью обновлен, сайт был адаптирован под мобильные устройства и все современные браузеры http://topseosite.ru
После чего приступили к полному комплексному seo-продвижению сайта https://topseosite.ru/uslugi
Перед нашей командой стояла задача вывести сайт в ТОП-3 выдачи Google (так как цена за клик в контекстной рекламе в данной тематике запредельно высокая)
Тип: Корпоративный сайт, B2B, мелкий опт http://topseosite.ru
SEO ПРОДВИЖЕНИЕ САЙТА https://topseosite.ru/uslugi
Что такое SEO http://topseosite.ru
Лечение зубов под наркозом от 7 500 ? Лечение каналов от 8 597 ? Лечение кариеса от 7 150 ? Лечение кариеса ICON от 4 500 ? Лечение пульпита от 8 597 ? Наращивание зубов от 25 000 ? Реставрация зубов от 13 800 ? Шлифовка/полировка зубов от 2 800 ? Гигиеническая чистка зубов от 7 990 ? Кюретаж пародонтального кармана от 1 670 ? Лечение гингивита от 15 400 ? Лечение пародонтита от 1 350 ? Лечение пародонтоза от 9 990 ? Лечение периодонтита от 12 650 ? Лечение периостита от 7 590 ? Скайсы на зубы от 5 400 ? Снятие зубных отложений от 490 ? Удаление зубного камня от 7 990 ? Чистка зубов Air Flow от 7 990 ? Чистка зубов ультразвуком от 7 990 ? Отбеливание зубов ZOOM от 34 280 ? Вестибулопластика от 8 690 ? Гингивопластика (пластика десны) от 1 353 ? Гингивэктомия от 1 230 ? Иссечение капюшона зуба мудрости от 4 315 ? Лечение альвеолита от 4 100 ? Пластика уздечки губы от 7 380 ? Пластика уздечки языка (френулопластика, френулотомия) от 7 380 ? Резекция верхушки корня зуба от 11 500 ? Сложное удаление зуба от 6 800 ? Удаление зуба от 4 900 ? Удаление зуба мудрости от 6 800 ? Удаление зубов под наркозом от 12 400 ? Удаление кисты зуба (цистэктомия) от 16 530 ? Шинирование челюсти от 1 700 ? Бюгельный протез от 60 944 ? Имплантация зубов от 65 183 ? Импланты All-on-4 от 227 402 ? Импланты All-on-6 от 276 308 ? Импланты Neodent от 31 982 ? Импланты Osstem (Осстем) от 31 273 ? Импланты Straumann (Штрауман) от 45 564 ? Мини-импланты от 10 916 ? Протезирование на имплантах от 33 201 ? Синус-лифтинг от 21 430 ? Удаление имплантата зуба от 13 475 ? Экспресс имплантация зубов от 36 173 ? Безметалловая керамика от 21 810 ? Временные коронки от 8 658 ? Зубной мост от 38 696 ? Керамические коронки от 25 000 ? Коронка из диоксида циркония от 21 810 ? Культевая вкладка от 9 665 ? Металлокерамические коронки от 19 348 ? Пластмассовые коронки от 3 830 ? Керамические виниры от 38 744 ? Брекеты Damon от 99 534 ? Керамические брекеты от 175 296 ? Металлические брекеты от 76 832 ? Пластиковые брекеты от 226 950 ? Прозрачные брекеты от 226 950 ? Самолигирующие брекеты от 99 534 ? Снятие брекет-системы от 15 000 ? Элайнеры от 226 950 ? Герметизация фиссур у детей от 4 389 ? Исправление прикуса у детей от 26 970 ? Лечение детского кариеса от 6 039 ? Лечение детского пульпита от 10 758 ? Лечение молочных зубов от 4 290 ? Пломбирование молочных зубов от 6 039 ? Реставрация молочных зубов от 7 689 ? Удаление молочного зуба от 2 900 ? КТ зубных рядов от 3 900 ? Lm-активатор от 26 970 ? Капы для выравнивания зубов от 10 692 ? Ретейнеры от 7 356 ? Удаление инородного тела из зубного канала от 5 565 ? Шинирование зуба от 1 700 ?
Goldenmed https://www.proffdentall.ru/uslugi/esteticheskaya-stomatologiya/viniry/
Микропротезирование http://www.proffdentall.ru
Никадент https://www.proffdentall.ru/uslugi/ortopedicheskoe-lechenie/koronki/
Виды имплантов зубов https://www.proffdentall.ru/uslugi/
2С Стоматология https://www.proffdentall.ru/uslugi/ortopedicheskoe-lechenie/semnye-protezy/
Благодаря моноблочной конструкции прибора, исключающей наличие съемных элементов, обеспечивается высокая надежность толщиномера, а также оперативность при его подготовке к работе https://www.ndt-club.com/product-552-metolab-601-stacionarnii-tverdomer-po-brinellu.htm
Работает по: черным металламРабочая температура: -25°С до +50°СМакс https://www.ndt-club.com/product-17-kabel-lemo-lemo-amkro.htm
измерение: 2000 микронШаг измерений: 1 микронПодсветка экрана: ЕстьДоп https://www.ndt-club.com/product-584-ydt-20-yltrazvykovoi-tolshinomer.htm
функции: нетПроизводство: ТайваньГарантия: 1,5 года
Необходимо было выбрать толщиномер из множества представленных на рынке вариантов https://www.ndt-club.com/product-129-apk-mars-nord.htm
Прибор для измерения толщины лакокрасочных покрытий TT210 оказался очень хорошим устройством для быстрого теста подержанного автомобиля, но не самым дешёвым https://www.ndt-club.com/product-625-a1208-tolshinomer-yltrazvykovoi.htm
Цена компенсируется, высоким качеством измерения https://www.ndt-club.com/product-144-yltrazvykovie-pep-preobrazovateli-amkro.htm
После покупки прибор окупился очень быстро https://www.ndt-club.com/proizvoditeli-12-lych.htm
Автомобильный сканер – это диагностическое устройство, предназначенное для проверки авто https://www.ndt-club.com/product-221-agfa-nova-avtomaticheskaya-proyavochnaya-mashina.htm
Подключение – простое, не сложнее подключения флешки к автомагнитоле: аналогичный разъем, только к электронному блоку управления (ЭБУ) https://www.ndt-club.com/product-5-a1212-master-klab-komplekt-yltrazvykovoi-defektoskop.htm
После подсоединения начинается поиск неисправностей/кодов ошибок https://www.ndt-club.com/product-16-a2075-sonet-skaner-defektoskop-yltrazvykovoi-beskontaktnii.htm
Работа двигателя, состояние топливной системы, трансмиссии и множество других параметров станут для вас «открытой книгой https://www.ndt-club.com/product-584-ydt-20-yltrazvykovoi-tolshinomer.htm
С этим устройством возможно определить неполадки и на узлах, не имеющих датчиков: оно способно проанализировать совокупность нескольких неисправностей и на основе этого определить проблему в недоступном для него месте https://www.ndt-club.com/product-110-ysd-60-8k-weldspector-mnogokanalnii-yltrazvykovoi-defektoskop-skaner.htm
Таким образом осуществляется полная комплексная проверка – залог объективности анализа и одно из главных преимуществ автосканера https://www.ndt-club.com/product-536-shabloni-i-prisposobleniya-dlya-vizyalnogo-i-izmeritelnogo-kontrolya.htm
Модели с маркировкой ELM имеют следующие интересные особенности:
Затем необходимо произвести калибровку и только после этого прибор будет функционировать с высокой точностью https://www.ndt-club.com/product-245-konstanta-k6c-tolshinomer-pokritii-yniversalnii.htm
Для этого в комплект прибора входят металлические калибровочные шайбы https://www.ndt-club.com/product-312-kabel-lemo-lemo-profi-profi.htm
Такие манипуляции необходимо проводить после сбоя программы ? обязательно https://www.ndt-club.com/product-38-vektor-50-novii-yniversalnii-vihretokovii-defektoskop.htm
И время от времени для настройки аппарата на точные параметры https://www.ndt-club.com/product-574-mvp-2m-mnogofynkcionalnii-vihretokovii-pribor-ferritometr-izmeritel-elektroprovodnosti-tolshinomer-pokritii.htm
Автосканер купить в Челябинске вам поможет наш интернет-магазин https://www.ndt-club.com/product-183-maska-05-ystroistvo-dlya-yzk-svarnih-stikovih-soedinenii-armatyri.htm
Наше предложение весьма интересное: различные модели, помощь консультанта при выборе, самовывоз или бесплатная доставка по всему Уралу, а цена на автосканеры для автомобилей разумна и приемлема для всех, заинтересованных в отлаженной работе своей https://www.ndt-club.com/product-296-md-i-magnitoporoshkovii-defektoskop.htm
”
См https://www.ndt-club.com/product-29-ivn-3003-izmeritel-vlajnosti-nefteprodyktov.htm
техописание/характеристики, , рекомендации по выбору, аналоги и замены, форму заказа (как правильно выбрать, заказать и купить) толщиномер WT100A по цене производителя в наличии со склада в Москве (или уточнить срок изготовления) https://www.ndt-club.com/product-777-v7-357-portativnii-vibrometr.htm
транспортировки и наскоро отремонтированного авто, обнаружив изъян, скорее всего, получите приличную скидку, которая покроет расходы на покупку измерительного устройства https://www.ndt-club.com/product-467-kd-3-3l-oblychatel-yltrafioletovii.htm
Портативный ЭМА-толщиномер KROPUS AIR позволяет проводить быстрые и точные измерения толщины стенок труб, листового проката, прутков и других изделий из стали, алюминия и других металлов без применения контактной жидкости и без предварительной зачистки поверхности
Если вам необходимо выполнить высотные работы на объекте, но существует ряд нюансов, которые требуют консультации специалистов, звоните, и во всем, что в нашей компетенции – мы поможем и подскажем https://alpinist-servis.ru/gidrofobizaciya-fasada-zdaniya-chto-eto-takoe/
Пригласите на объект нашего менеджера по телефону https://alpinist-servis.ru/myte-okon-promyshlennymi-alpinistami/
С ним вы сможете согласовать интересующий вас объем работ, их периодичность и стоимость https://alpinist-servis.ru/nashi-uslugi/cvety-cherez-okno/
Когда люди не понимают специфику работы альпиниста (а откуда и зачем им это знать?), они слышат цену на мойку одного окна и думают – ничего себе, за пять минут работы? ))
Промышленный альпинизм как услуга применяется для ремонтных работ и установки различного оборудования в Москве https://alpinist-servis.ru/gidrofobizaciya-fasada/
Мы предлагаем промышленный альпинизм заказать услуги в Москве альпинистов с 5, 6, 7 разрядом в компании ООО , которая выполняет различные строительно-монтажные работы, мойку фасадов, включая реставрационные работы и реконструкцию зданий любого назначения https://alpinist-servis.ru/montazh-klinkernoj-plitki-moskva-taldomskaya1/
Дополнительно услуги альпинисты Москва:
Промышленный альпинизм цена 2022 https://alpinist-servis.ru/gidrofobizaciya-fasada/
Основной вид деятельности компании – это профессиональная установка кондиционеров в Москве и Московской области по очень доступным ценам https://klimat-24.ru/poleznoe/texnicheskoe-obsluzhivanie-kondiczionerov-czena-i-optimalnaya-periodichnost/
Мы сотрудничаем как с частными лицами, так и с организациями, устанавливаем системы кондиционирования в квартирах, частных домах, офисах, торговых и общественных центрах, производственных помещениях, успешно и оперативно решаем поставленные задачи и выполняем работы любой сложности, гарантируем высокое качество результата https://klimat-24.ru/brendy-profilaktiki/profilaktika-kondicionerov-midea-v-moskve/
Предлагаем кондиционирование и вентиляцию однокомнатной квартиры в ЖК с помощью мультизональных систем https://klimat-24.ru/brendy-zapravki/zapravka-kondicionerov-lanzkraft-v-moskve/
Внешний блок установлен в доступном месте https://klimat-24.ru/poleznoe/kogda-neobxodima-zapravka-kondiczionera-split-sistemyi/
Доступные цены, регулярные скидки и акции https://klimat-24.ru/poleznoe/chistka-blokov-kondiczionerov-domashnix-i-ofisnyix/
Бесплатная доставка в пределах МКАД от 20 000руб! (только при оплате наличными)
В чем заключаются плюсы работы с нашей компанией https://klimat-24.ru/brendyi-chistki/chistka-kondicionerov-pioneer-v-moskve/
Наша компания очень дорожит своей репутацией, поэтому мы уделяем максимум внимания каждому клиенту, работаем по демократичным ценам и на самых выгодных условиях http://kraz-maz.ru/products/kabina-karkas-6510-5000014-10-1
Оформление заказов и последующая доставка производится четко, быстро и с соблюдением Ваших пожеланий http://kraz-maz.ru/products/kulak-povorotnyi-kraz-pravyi-v-sbore-260-2304040-sb
Осуществляем обслуживание и ремонт любой исложности http://kraz-maz.ru/products/krylo-kraz-starogo-obraztsa-levoe-v-sbore-250-8403011
Прокладка МАЗ тормоза вспомогательного технодрайв 5434-1203027 http://kraz-maz.ru/products/reduktor-zadnego-mosta-5440-2402010-001u1-27kh29-ovalnyi-karter
20 лет успешных продаж запчастей МАЗ в Минске и Минской области , ООО Мазик бай успешно реализует запчасти МАЗ в такие регионы как Могилев, Витебск, Брест, Гродно, Гомель http://kraz-maz.ru/products/nakonechnik-rulevoi-tyagi-levyi-6422-3003057
Запчасти МАЗ вы можете купить с доставкой в любую точку страны по выгодным тарифам http://kraz-maz.ru/products/podogrevatel-pzhd-44-lu-mtlb-moaz-predpuskovoi-komplekt
(стоимость доставки от 7,02 рублей)
Запчасти на маз http://kraz-maz.ru/products/korobka-razdatochnaya-kraz-6437-1800010-10
Костромской завод автокомпонентов http://kraz-maz.ru/products/korobka-razdatochnaya-kraz-6437-1800020
от 4 руб http://kraz-maz.ru/products/flanets-zadnego-mosta-255b-2204102-otverstiya-s-rezboi
7 https://crystal-tr.ru/product/rentgenpljonka-sfm-x-ray-bf-28h35-sinechuvstvitelnaja/
Все загрязнения, кроме биологических жидкостей, необходимо удалять аккуратно, чтобы избежать распыления частиц в воздухе https://crystal-tr.ru/product/perchatki-sinteticheskie-sterilnye-s-indikaciej-prokola-2-pary-v-konverte/
При загрязнении поверхностей биологическими жидкостями такие поверхности необходимо предварительно дезинфицировать в соответствии с инструкцией на применяемое дезинфицирующее средство https://crystal-tr.ru/product/rentgenpljonka-carestream-health-kodak-min-r-s-24x30sm-dlja-mammografii/
Расчески, щетки, ножницы для стрижки волос моют под проточной водой после каждого клиента, затем помещают в ультрафиолетовые облучатели или в растворы дезинфицирующих средств по режиму, применяемому при грибковых заболеваниях https://crystal-tr.ru/product/lampa-lupa-diodnaja-na-strubcine/
Съемные ножи электрических бритв протирают дважды (с интервалом 15 минут) тампоном, смоченным в дезинфицирующем растворе, не вызывающем коррозию, в концентрациях, применяемых при вирусных гепатитах https://crystal-tr.ru/product/shpric-sfm-20-ml-trehkomponentnyj-s-igloj-0-8-x-40-21g-5-shtuk/
Приворот является магическим воздействием на человека помимо его воли https://crystal-tr.ru/product/perchatki-kolchuzhnye-hir-sint-ster-protivoporeznye-1-para-diaklon/
Принято различать два вида приворота – любовный и сексуальный https://crystal-tr.ru/product/medicinskij-pulsoksimetr-s-registr/
Чем же они отличаются между собой?
Покупая продукцию в группе компаний APROFI, каждое пищевое предприятие повысит качество своей продукции, сократит сроки на ее изготовление и снизит расходы на производство https://crystal-tr.ru/product/rentgen-plenka-konica-sd-q-25h30-10×12-125l/
Мы являемся международной группой компаний и специализируемся на поставке моющих и дезинфицирующих средств https://crystal-tr.ru/product/nabory-reagentov-dlja-immunofermentn-5/
У нас можно дезинфицирующие средства купить оптом и в розницу недорого https://crystal-tr.ru/product/anti-acne-peel-new-peel/
Уточним, что к работе с дезинфицирующими средствами не допускаются лица в возрасте до 18 лет и лица, которым выполнение соответствующих видов работ противопоказано по состоянию здоровья (в частности, лицам с аллергическими заболеваниями и др https://crystal-tr.ru/product/sumka-sanitarnaja-2/
) https://crystal-tr.ru/product-category/medicaldisp/
Работники, допущенные к обращению с дезинфекционными средствами, должны:
Полиалкиленгуанидины эффективны против большинства патогенных микроорганизмов, вызывающих гнойные, респираторные, кишечные, венерические и других заболевания людей они также подавляют многих возбудителей болезней животных (сальмонеллеза, листериоза, бруцеллеза, туберкулеза и др https://crystal-tr.ru/product/plastyr-1-25h500-na-polimernoj-osnove-v-bumazhnoj-upakovke-30-sht/
), обладают фунгицидными, пестицидными, алгицидными свойствами https://crystal-tr.ru/product/shapochka-kolpak/
· Прочность и долговечность – при правильной обработке материал прослужит не один десяток лет;
Для ландшафтного дизайна https://goldsosna.ru/category/prikhozhie/veshalki-dlya-prikhozhey/
Обустраиваем приусадебные и дачные участки авторской садовой мебелью из массива дерева, а также уютными беседками и качелями https://goldsosna.ru/komod-betti-7/
Интернет – магазин мебели выбирают благодаря следующим преимуществам:
Индивидуальный подход https://goldsosna.ru/komod-6064/
Распродажа состаренной мебели ручной работы из натурального дерева по выгодной цене https://goldsosna.ru/navershie-bufeta-nocturne/
Здесь представлены отдельные экземпляры состаренной деревянной мебели, скидка на которые предоставлена в связи со сменой экспозиции https://goldsosna.ru/shkaf-1-stv-timberika-kids-3/
Материал: каркас — массив сосны, ДСП, ящик — фанера, обивка — рогожка/экокожа https://by-home.ru/s-myagkim-izgolovem/26987-krovat-signal-barcelona-belyj-160200.html
Наполнитель: ППУ (износостойкий, долговечный поролон) https://by-home.ru/komody/8774-vinnyj-shkaf-bf-60301.html
Механизм трансформации: книжка https://by-home.ru/nastennye-zerkala/22736-nastennoe-zerkalo-sorrento.html
Размер спального места, см: 120/140х190 https://by-home.ru/banketki-i-pufy/26696-puf-loreto.html
Большой ящик для хранения белья https://by-home.ru/stulya/26444-stul-kukhonnyj-halmar-diego-belyjinari-91.html
модульные https://by-home.ru/stulya/25458-stul-bella-zelenyj-temnyj-orekh.html
Собираются из нескольких отдельных модулей https://by-home.ru/nastennye-zerkala/14888-zerkalo-interernoe-ronda-silver.html
Если захочется сменить обстановку в помещении, просто поменяйте модульные элементы местами https://by-home.ru/obedennye-gruppy/25911-komplekt-pletenoj-mebeli-fp-0108.html
При желании из них можно даже собрать кресло;
Для покупателя – это платформа, где можно без наценки купить товары у производителя и сэкономить свои деньги https://by-home.ru/dekorativnye-podushki/13105-interernaya-podushka-starinnaya-gravyura-versiya-13.html
Для розничного магазина наш сервис – это прекрасная возможность найти поставщика и расширить товарную линейку https://by-home.ru/stulya/15163-stul-frankfurt-seryj.html
Фабрика мебели
О качестве дивана, который мы заказывали в руссдиване ничего плохого сказать не могу https://by-home.ru/smartblog/магазин.html
За год использования повреждений не выявлено, подлокотники не отвалились, обивка не разорвалась, то есть материалы из которые руссдиван использует надежны https://by-home.ru/lyustry/11004-podvesnoj-svetilnik-bubble-smoky.html
Консультация у специалиста на тему выявления возможных противопоказаний для проведения процедуры, а также определения целесообразности и эффективности процедуры https://www.egoestetica-med.ru/lico-polnostyu
Часто эта методика не ставится в один ряд с другими https://www.egoestetica-med.ru/dokumenty-i-licenzii
Удаление волос ЭЛОС-устройствами происходит через совмещение эффектов эпиляции лазером и воздействия электрического тока https://www.egoestetica-med.ru/
Разработка относится к новым https://www.egoestetica-med.ru/klassicheskoe-bikini
ЭЛОС-аппарат обеспечивает уничтожение волосяных фолликулов на высокой глубине в эпидермисе https://www.egoestetica-med.ru/kak-vozdeystvuet-lazer
Вспышка лазерного луча аппарата взаимодействует с пигментом меланином в структуре волосков https://www.egoestetica-med.ru/zhivot
К основным показаниям к назначению процедуры по удалению волос динамическим лазером относится гипертрихоз, гирсутизм, особая чувствительность кожи к бритью и депиляции, гигиенические требования к состоянию кожи https://www.egoestetica-med.ru/neskolko-slov-o-nas
Обладает автоматизированной системой, ориентированной на поиск волосяных фолликулов https://www.egoestetica-med.ru/na-samom-sovremennom-oborudovanii-0
Это обеспечивает результативное их удаление https://www.egoestetica-med.ru/apparatnyy-massazh-rsl-skulpturirovanie-tela
Воздействует на группы волос, что ускоряет обработку
На консультации вам сообщат, как часто необходимо будет повторять процедуру лазерной эпиляции https://www.egoestetica-med.ru/komu-pokazana-lazernaya-epilyaciya
Каждая очередная процедура увеличивает время до повторной эпиляции https://www.egoestetica-med.ru/yagodicy
Фактически, волосы в некоторых областях на теле вообще перестают расти https://www.egoestetica-med.ru/samoe-sovremennoe-oborudovanie
Чтобы добиться должного эффекта, надо знать, как подготовиться к лазерной эпиляции, чего ждать от каждого сеанса https://www.egoestetica-med.ru/kompleks-layt-plyus
Косметологи нашей студии рекомендуют выполнить несколько правил подготовки к лазерной эпиляции:
УДОБНАЯ ОПЛАТА https://fabrica33.ru/korpusnaya-mebel/stenki/stenki-svetlye/?limit=120&sort=pd.name&order=DESC&page=1
Стеллажи и полки на заказ от 6900 руб https://fabrica33.ru/detskaya-kerri.html
/п https://fabrica33.ru/korpusnaya-mebel/stenki/?limit=120&sort=p.price&order=DESC&page=1
м https://fabrica33.ru/divan-antuan-dp.html
Максимальный срок изготовления и установки по договору составляет 30 рабочих дней https://fabrica33.ru/divan-evrika-mp2.html
Установка производится сразу после готовности изделия в цеху https://fabrica33.ru/myagkaya-mebel/tahty-i-sofy/
Каталог – Мебель на заказ https://fabrica33.ru/detskaya-stiven.html
Выполним все работы в срок, качественно произведем монтаж изделий https://fabrica33.ru/korpusnaya-mebel/prihozhie/?limit=96&sort=pd.name&order=DESC&page=1
Приезжаем на замер с образцами материалов: ЛДСП, кромка, столешницы, фасады, ручки https://fabrica33.ru/korpusnaya-mebel/stenki/stenki-temnye/?limit=168&sort=pd.name&order=DESC&page=1
У нас есть вся палитра расцветок https://fabrica33.ru/korpusnaya-mebel/stoly-i-stulya/?limit=144&sort=p.price&order=DESC&page=1
Длительный срок эксплуатации – примерно 10 лет при ежедневном включении на 5-6 часов https://timberlight.ru/cooperation
Минимальный нагрев в процессе использования https://timberlight.ru/ledlights
Отсутствие инфракрасного и УФ-излучения https://timberlight.ru/privacy
Адекватная цена, учитывая большой срок службы https://timberlight.ru/ledlights
Светильники ЛЕД могут использоваться в качестве дополнительного и основного освещения https://timberlight.ru/article1
Основные преимущества светодиодного освещения https://timberlight.ru/cooperation
Световой поток, лм: 10000 Мощность, Вт: 80 Температура свечения, К: 2700-500 Степень защиты (IP): 65 Способ крепления: консоль до 50 мм КСС 60° Гарантия: 5 лет https://timberlight.ru/cooperation
Светодиодные светильники LED плотно вошли в нашу жизнь — в России они есть в каждом магазине, который специализируется на светотехнике https://timberlight.ru/kitchenlighting
О причинах популярности мы расскажем подробно ниже, а если вам необходимо купить светодиодные светильники в Москве, то вы можете смело выбирать их в каталоге интернет-магазина https://timberlight.ru/showcaselighting
Замена ЛСП 2х36 Световой поток, лм: 4189 Мощность, Вт: 33 Температура свечения, К: 4700-5300 Степень защиты (IP): 66 Тип КСС: Д Способ крепления: подвесной https://timberlight.ru/kitchenlighting
Магазин светодиодного освещения является торговым представителем крупных российских и европейских производителей светодиодного оборудования https://timberlight.ru/facadelighting
Мы тщательно отбираем поставщиков светильников и комплектующих, потому что несем персональную ответственность перед клиентами https://timberlight.ru/ledlights
Булат 1S предназначен для измерения толщины изделий из конструкционных металлических сплавов, при одностороннем доступе к ним https://www.ndt-club.com/product-422-klever-1-magnitnaya-syspenziya.htm
В толщиномере Булат 1S используется контактный способ обеспечения акустического контакта прижимом контактной поверхности преобразователя к поверхности контролируемого объекта без сканирования https://www.ndt-club.com/product-10-a1214-ekspert-defektoskop-yltrazvykovoi.htm
Обновлено 17 фев 2017Дефектоскопы, толщиномеры, твердомеры, тепловизоры, пирометры, рентгеновские аппараты, рентгеновская пленка, лазерные дальномеры https://www.ndt-club.com/product-59-colenta-indx-900e-avtomaticheskaya-proyavochnaya-mashina.htm
Доставка в любую точку России https://www.ndt-club.com/product-467-kd-3-3l-oblychatel-yltrafioletovii.htm
Гарантийное и https://www.ndt-club.com/product-507-positest-dft-combo-tolshinomer-avtomobilnih-pokritii.htm
https://www.ndt-club.com/product-573-tes-364m-defektoskop-tolshinomer-termoelektricheskii.htm
https://www.ndt-club.com/product-295-teleskopicheskaya-telejka-pozicionirovaniya-rentgenovskogo-apparata-vnytri-trybi.htm
Рекомендации контрольно-измерительные приборы и автоматику (КИПиА), дополнительное/вспомогательное оборудование и защитно-монтажную арматуру, а также другую полезную и интересную информацию см https://www.ndt-club.com/produkcija-256-kameri-ohlajdeniya.htm
наши официальные сайты https://www.ndt-club.com/product-469-magnitnii-indikator-mi-10h.htm
Толщиномер ультразвуковой БУЛАТ 5УП предназначен для измерения толщины изделий из конструкционных металлических сплавов и изотропных неметаллических материалов при одностороннем доступе к ним с использованием преобразователей серий П112 https://www.ndt-club.com/proizvoditeli-19-altes.htm
Работает по: черным и цветным металламРабочая температура: -25°С до +50°СМакс https://www.ndt-club.com/produkcija-108-izmeritel-prochnosti-betona-yprygii-ydar-otskok.htm
измерение: 2000 микронШаг измерений: 0,1 микронПодсветка экрана: ЕстьДоп https://www.ndt-club.com/product-323-nasadka-u-459-k-tverdomeram-serii-tkm-459.htm
функции: нетПроизводство: КитайГарантия: 1 год
Указанные цены носят справочный характер и не являются публичной офертой, определяемой положениями п https://www.ndt-club.com/metall.htm
2 ст https://www.ndt-club.com/product-724-rashodnie-materiali-dlya-kapillyarnogo-kontrolya-inspektor-ochistitel-proyavitel-penetrant.htm
437 ГК РФ https://www.ndt-club.com/product-309-so-2-so-3-komplekt-standartnih-obrazcov.htm
Технические характеристики (спецификация)оборудования, внешний вид и комплект поставки могут быть изменены производителем без предварительного уведомления https://www.ndt-club.com/product-723-yltrazvykovoi-defektoskop-a1212-master.htm
Во избежание недоразумений просьба уточнять все параметры у менеджеров отдела продаж https://www.ndt-club.com/product-639-tapirys-yniversalnii-shablon-specialista-nk.htm
В китайском календаре имеется 12 различных символов года https://www.ndt-club.com/product-250-molotok-shmitda-225a-sklerometr-dlya-betona.htm
То есть, каждый из них чередуется раз в 12 лет https://www.ndt-club.com/product-224-aks-gel-gel-smazka-dlya-yltrazvykovogo-kontrolya-30-c-100-c.htm
Следующий, 2022 год как раз будет годом этого животного из семейства кошачьих https://www.ndt-club.com/files/GEA31907A VideoProbe 3D Measurement Handbook_R5_Russian.pdf
Каждому году также соответствует цвет http://www.ndt-club.com/NDT_ACS_Catalog_RUS_2014_web_pages.pdf
В следующем году будет год водяного голубого тигра https://www.ndt-club.com/metall.htm
режим тестирования https://www.ndt-club.com/files/MENTOR VISUAL IQ.pdf
Ультразвуковой толщиномер TT340 используется для измерения толщины отливок и различных объектов как металлического, так неметаллического происхождения https://www.ndt-club.com/produkcija-191-preobrazovateli-pep.htm
Прибор прост и удобен в использовании, он оборудован ЖК экраном с регулируемой яркостью подсветки https://www.ndt-club.com/produkcija-103-tolshinomeri-pokritii.htm
Результаты измерений могут отображаються на экране как миллиметрах, так в дюймах https://www.ndt-club.com/product-10-a1214-ekspert-defektoskop-yltrazvykovoi.htm
Следует отметить, что с помощью такого толщиномера лкп Вы ищете не саму толщину лкп, а всего лишь расхождения толщины слоя, который возможно был наложен на заводской https://www.ndt-club.com/product-227-antennaya-reshetka-m9060-4-0v0r40x10cl-dlya-a1550-introvisor.htm
Чтобы начать замер, необходимо сперва откалибровать толщиномер https://www.ndt-club.com/product-37-kim-2m-koercitimetr-magnitnii.htm
Конечно, можно и не калибровать его https://www.ndt-club.com/product-193-tvm-1800-dinamicheskii-tverdomer.htm
Примерные расхождения неоткалиброванного толщиномера при установленных базовых настройках могут составлять около 15-20 микрон https://www.ndt-club.com/product-389-coatmaster-beskontaktnii-tolshinomer-mokrogo-pokritiya.htm
Это, как Вы понимаете, не имеет никакого значения для конечного результата https://www.ndt-club.com/product-207-rentgenograficheskie-kroyleri-jme.htm
Нужно найти расхождение в слое лкп примерно на 150 микрон https://www.ndt-club.com/product-309-so-2-so-3-komplekt-standartnih-obrazcov.htm
Это и будет означать дополнительный слой краски https://www.ndt-club.com/proizvoditeli-9-proceq.htm
Работает по: черным и цветным металламРабочая температура: -25°С до +50°СМакс https://www.ndt-club.com/product-9-a1270-ema-tolshinomer.htm
измерение: 2000 микронШаг измерений: 1 микронПодсветка экрана: ЕстьДоп https://www.ndt-club.com/uslugi.htm
функции: датчик оцинковкиПроизводство: ПольшаГарантия: 1 год
При случайном попадании в желудок хлорактивных препаратов его промывают 2%-ным раствором тиосульфата (гипосульфит) натрия и дают внутрь 5-15 капель нашатырного спирта с водой, молоко, питьевую соду, магнезиальную взвесь (одна-две столовые ложки на стакан воды) https://crystal-tr.ru/product/halat-hirurgicheskij-medicinskij-h-01/
При отравлении формальдегидом желудок промывают с добавлением в воду нашатырного спирта или 3%-го раствора карбоната натрия (аммония) https://crystal-tr.ru/product/rentgenpljonka-sarestream-health-kodak-mxb-20h40/
После промывания дают сырые яйца, белковую воду, молоко https://crystal-tr.ru/product/rulonnaja-termoplenka-sony-upt-210bl-210mmx12-5m/
К сведению https://crystal-tr.ru/product/shpric-sfm-1-ml-u100-dlja-insulina-s-nadetojigloj-0-45h12-26g-20-shtuk/
За несоблюдение обязательных требований в сфере санитарно-эпидемиологической безопасности (в том числе выразившееся в невыполнении (ненадлежащем выполнении) мероприятий по дезинфекции) организации, их должностные лица несут ответственность, предусмотренную уголовным (ст https://crystal-tr.ru/product/bahily-medicinskie-24/
236 Уголовного кодекса Российской Федерации) и административным (ст https://crystal-tr.ru/product/plastyr-katushechnyj-na-tkanevoj-osnove-3-0-h-500-sm-18-sht/
6 https://crystal-tr.ru/product/individualnyj-perevjazochnyj-paket-ipp-1/
3–6 https://crystal-tr.ru/product/vosstanovitel-renmed-pljus-na-15-l-suhoj/
7 Кодекса Российской Федерации об административных правонарушениях) законодательством https://crystal-tr.ru/product/shpric-insulinovyj-1-0-ml-so-shkaloj-u-40-s-integrirovannoj-igloj-0-30h8-30g-sfm-100-shtuk/
В случае причинения материального и морального ущерба вследствие несоблюдения обязательных требований виновные несут также гражданскую ответственность https://crystal-tr.ru/product/shkaf-medicinskij-msh-07/
Вопрос: Добрый день https://crystal-tr.ru/product/plastyr-katushechnyj-na-tkanevoj-osnove-3-0-h-500-sm-18-sht/
Состав Дезавид для Мытья полов: Алкилдиметилбензиламмоний хлорид 0,5% Полигексаметиленгуанидин гидрохлорид 2,7% https://crystal-tr.ru/product/prostyn-sms-standart-belyj-20sht-up-poshtuch/
Если развести по инструкции 50мл на 10 литров получается концентрация раствора 0 https://crystal-tr.ru/product/maska-respirator-kn-99-s-klapanom-vydoha-ffp3/
0025% и 0 https://crystal-tr.ru/product/trusy-odnorazovye-zhenskie-menstrualnye-dr-skipp/
0135% https://crystal-tr.ru/product-category/pervaja-medicinskaja-pomoshh/shiny/
Не маловата ли концентрация?
Для дезинфекции, предстерилизационной очистки, стерилизации, дезинсекции и дератизации используются химические, физические средства, оборудование, аппаратура и материалы, разрешенные к применению в ЛПО в установленном в Российской Федерации порядке, не оказывающие неблагоприятного воздействия на человека https://crystal-tr.ru/product/ustanovka-dlja-obezzarazhivanija-i-ochis/
Все дезсредства при неаккуратном обращении с ними способны оказывать местнораздражающее и общее токсическое воздействие https://crystal-tr.ru/product/rentgenpljonka-sfm-x-ray-gf-25h30-zeljonochuvstvitelnaja/
Местная аллергическая реакция кожи на дезсредство может проявляться покраснением кожи, появлением на ней высыпаний, зудом https://crystal-tr.ru/product/baktericidnyj-recirkuljator-briz-2-100-spu/
При отравлении парами дезсредства появляются такие симптомы как общее недомогание, удушье, кашель, тошнота, рвота, головокружение https://crystal-tr.ru/product/rentgenpljonka-sfm-x-ray-gf-25h30-zeljonochuvstvitelnaja/
В случае появления вышеперечисленных симптомов нужно оказать первую помощь, а при необходимости — и вызвать скорую https://crystal-tr.ru/product/lejkoplastyr-kinezio-tejp-5-sm-h-500-sm-sfm-bez-logo-zhjoltyj/
Белье не https://crystal-tr.ru/product/bint-sterilnyj-3/
загрязненное выделениями https://crystal-tr.ru/product/sistema-transfuzionnaja-dlja-perelivanija-krovi-igla-1-2h40-18g-sfm-10sht/
Замачивание https://crystal-tr.ru/product/rentgenpljonka-sfm-x-ray-bf-30h40-sinechuvstvitelnaja/
Белье, загрязненное выделениями https://crystal-tr.ru/product/m22-mnogomodulnaja-platforma/
Санитарно- техническое оборудование https://crystal-tr.ru/product/projavitel-ruchnoj-6h0-5l-sfm-m-d-dlja-stomatologii/
Протирание https://crystal-tr.ru/product/hematest-anti-sars-cov-2-2/
3,0 https://crystal-tr.ru/product/bahily-medicinskie-7/
30 https://crystal-tr.ru/product/nosilki-sanitarnye/
Двукратное орошение https://crystal-tr.ru/product/rentgen-plenka-konica-sd-s-20h25-8×10-125l/
Уборочный материал https://crystal-tr.ru/product/lejkoplastyr-kinezio-tejp-10-sm-h-500-sm-chjornyj-sfm/
6430А5-320-000, 6430А5-320-010, 6430А5-320-020, 6430А5-370-000, 6430А5-370-010, 6430А5-320-070 – cедельный тягач (6×4)
Кронштейн МАЗ крепления крыла (ОАО МАЗ) 5440-8511030-040 http://kraz-maz.ru/products/kulak-povorotnyi-pravyi-so-vtulkami-500a-3001012
Запчасти на маз http://kraz-maz.ru/products/korobka-razdatochnaya-kraz-257-1800020-zavod
от 2 руб http://kraz-maz.ru/products/flanets-poluosi-perednego-mosta-260-2304090
Опора промежуточная карданного вала в сборе (5336-2202086) Запчасти МАЗ от БИТ комплект: Опора промежуточная карданного вала в сборе (5336-2202086)
-2409029 Дополнительный артикул: 543262409029 Кольцо МАЗ редуктора ОАО МАЗ Производитель: МАЗ ОАО http://kraz-maz.ru/products/kabina-v-sbore-260-5000012-1-komplektatsiya-1
Производитель: Смарт Обивка (на выбор): велюр/ рогожка Материал каркаса: массив хвойных пород, ДВП Наполнение спального места: ППУ Жесткость: выше средней Механизм трансформации: аккордеон-евро Длина спального места: 190 Ширина спального места: 100 https://by-home.ru/kartiny-postery/26214-kartina-fantastika-podvodnogo-mira-v-rame-aksel-l-tom-1-versiya-43.html
Диваны от производителя https://by-home.ru/banketki-i-pufy/28284-f6613l-s01-pufik-preto.html
Подушки в комплект не входят https://by-home.ru/stulya/15164-stul-frankfurt-belyj.html
Производитель: Смарт Обивка: рогожка Материал каркаса: металлокаркас Наполнение спального места: ППУ Жесткость: средняя Механизм трансформации: аккордеон Длина спального места: 160 Ширина спального места: 202 https://by-home.ru/smartblog/category/Кресло-с-ушами-или-вольтеровское-английское.html?id_post=113
Компания Эвальд производит исключительно мягкие предметы меблировки для жилых и офисных помещений в разных стилевых решениях https://by-home.ru/konsoli/11983-konsol-cilan-100-korichnevaya.html
Дизайнеры создадут проект по замерам клиента и выполнят заказ за короткие сроки https://by-home.ru/vitriny-i-bufety/24720-vitrina-175-cilan-orekh.html
В каталоге товаров: диваны, кресла, кушетки, стулья, банкетки, пуфы https://by-home.ru/pismennye-stoly/23621-konsol-halmar-b46-orekhchernyj.html
Целями предоставления ИП Беляков Р https://by-home.ru/120-aksessuary
В https://by-home.ru/nastennye-zerkala/23519-zerkalo-nastennoe-sharlerua.html
ПДн являются:
Промышленный альпинизм – мастера в городе Москва https://alpinist-servis.ru/g-moskva-ul-zarechnaya-d-1/
Приведенные тарифно-квалификационные характеристики данной профессии служат для справочной тарификации монтажных и прочих работ и присвоения тарифных разрядов согласно статьи 143 Трудового кодекса Российской Федерации https://alpinist-servis.ru/germetizaciya-mezhpanelnyx-shvov-moskva/
(Тарифно-квалификационная характеристика дополнительно включена постановлением Минтруда России от 17 мая 2001 года N 40)
Установка однокамерного стеклопакета https://alpinist-servis.ru/nashi-uslugi/montazh-bannera/
Высотные работы: важная информация https://alpinist-servis.ru/nashi-uslugi/remont-alyukobonda/
Договорился с заказчиком, что в первый день работ на большом объекте начнём в 9 https://alpinist-servis.ru/nashi-uslugi/cvety-cherez-okno/
30, чтобы за 30 минут провести альпинистам первичный инструктаж по технике безопасности https://alpinist-servis.ru/nashi-uslugi/remont-kryshi-balkona/
Во время инструктажа вижу удивлённые глаза проходящего мимо заказчика https://alpinist-servis.ru/uslugi-promyshlennyx-alpinistov-v-moskve/
После инструктажа спрашиваю, всё ли в порядке https://alpinist-servis.ru/category/ustanovka-vodostokov/
Он говорит: https://alpinist-servis.ru/nashi-uslugi/
Покраска из аппарата высокого давления несет в себе опасность окраске имущества третьих лиц, поэтому в радиусе пол километра не должно быть ничего https://alpinist-servis.ru/ceny/
НА ЗАМЕРЕ МЫ ПРЕДОСТАВИМ ВСЕ ОБРАЗЦЫ МАТЕРИАЛОВ, КОТОРЫЕ ЕСТЬ В ИРКУТСКЕ https://fabrica33.ru/myagkaya-mebel/divany-evroknizhki/?limit=96&sort=p.price&order=DESC&page=1
Чем мебель под заказ лучше изделий из масс-маркета https://fabrica33.ru/divan-tehas.html
Мебель по заказу https://fabrica33.ru/spalnyj-garnitur-arina-2.html
Общаясь с будущими заказчиками, мы часто сталкиваемся с тем, что всё их внимание направлено на цены и материалы https://fabrica33.ru/korpusnaya-mebel/?limit=192&sort=p.price&order=DESC&page=1
Но как видите, деталей, с которыми сталкивается заказчик при использовании кухни, просто море https://fabrica33.ru/myagkaya-mebel/?limit=48&sort=pd.name&order=DESC&page=1
– Уход https://fabrica33.ru/myagkaya-mebel/uglovye-divany/
Фасады из МДФ являются долговечным решением, но требуют бережного отношения https://fabrica33.ru/korpusnaya-mebel/stenki/stenki-temnye/?limit=192&sort=pd.name&order=DESC&page=1
При уборке необходимо использовать мягкие чистящие средства, чтобы предотвратить повреждение поверхности https://fabrica33.ru/korpusnaya-mebel/stoly-i-stulya/stoly/?limit=72
При появлении пятен необходимо сразу их удалить https://fabrica33.ru/divan-marsel.html
Для того, чтобы обратиться к нам по гарантийному случаю, достаточно позвонить или написать в вайбер/вотсап https://fabrica33.ru/myagkaya-mebel/kresla-i-pufy/
Мы быстро реагируем на такие заявки и всегда исправляем возникшие неудобства https://fabrica33.ru/korpusnaya-mebel/?limit=144&sort=p.price&order=DESC&page=1
Хотелось бы не лишний раз напомнить о важности изучения и строгого следования прилагаемой инструкции и грамотным наставлениям специалистов https://www.egoestetica-med.ru/chto-budet-posle-procedury
Правда, стоит этот прибор немало, возможно, кому-то будет выгоднее отдаться в руки профессионалов https://www.egoestetica-med.ru/kompleks-layt
Низкая квалификация, некомпетентность врача, нарушение им техники проведения процедуры может также привести к следующим осложнениям после лазерной эпиляции подмышек:
Обладает автоматизированной системой, ориентированной на поиск волосяных фолликулов https://www.egoestetica-med.ru/kompleks-all-inclucive
Это обеспечивает результативное их удаление https://www.egoestetica-med.ru/preimuschestva-diodnoy-epilyacii
Воздействует на группы волос, что ускоряет обработку
Стоит понимать, что лазерная эпиляция – это эффективная процедура, но только для тех, кто имеет хороший контраст между кожей и волосом https://www.egoestetica-med.ru/preimuschestva-diodnoy-epilyacii
Делать эту аппаратную процедуру бессмысленно тем, кто имеет светлую кожу и белые волоски https://www.egoestetica-med.ru/services
Лазер просто не увидит необходимых клеток меланина в волосе https://www.egoestetica-med.ru/smas-lifting-ultraformer
Перед данной процедурой не желательно посещать солярий или загорать на солнце https://www.egoestetica-med.ru/dokumenty-i-licenzii
Но сейчас производят новые тип лазеров, которые способны разглядеть меланин даже в самых светлых волосах и на светлой коже https://www.egoestetica-med.ru/services
Просто перед процедурой этот момент необходимо уточнять https://www.egoestetica-med.ru/o-lazernoy-epilyacii
На сегодняшний день процедура лазерной эпиляции на теле и лице является одной из самых востребованных у женщин разных возрастов https://www.egoestetica-med.ru/klassicheskoe-bikini
В отличие от уже привычных старых способов удаления нежелательных волос, лазерная эпиляция показывает отличные долговременные результаты, а самое главное – метод является безопасным и практически безболезненным https://www.egoestetica-med.ru/kompleks-layt-plyus
Сейчас прогресс дошел и до этого https://www.egoestetica-med.ru/
Не так давно появились лазерные аппараты для проведения эпиляции в домашних условиях https://www.egoestetica-med.ru/lazernaya-epilyaciya
Благодаря этому, вам теперь не нужно ходить в салон и платить огромные деньги, вы сами сможете без труда сделать свое тело привлекательным, а кожу гладкой https://www.egoestetica-med.ru/lazernaya-epilyaciya
Самое главное, что необходимо соблюдать, делая дома эпиляцию, это четкое следование инструкции и принять во внимание все советы, по использованию этого аппарата, составленные квалифицированными специалистами https://www.egoestetica-med.ru/spina-polnostyu
Мебель, которая создается с душой https://goldsosna.ru/podvesnoe-kreslo-afm-640a-grey/
Мебель из сосны – недорогая в лаке или без покраски? Реально купить белорусскую деревянную мебель из массива в каталоге нашего интернет – магазина по выгодной цене! Мы предлагаем широкий выбор мебели из сосны для дачи, которая отличается высокой прочностью и долговечностью https://goldsosna.ru/stol-pismennyy-olsa-005/
Авторская мебель из массива — в чем ее особенность?
В нашем магазине представлен полный ассортимент продукции от фабрики https://goldsosna.ru/zerkalo-layma-1613-bm661/
Крепкая и надежная корпусная мебель разделена на категории:
Производство с инновационным оборудованием – станки с ЧПУ, пилорамы, сушильные камеры, современный малярный цех, оборудование для прессовки бруса и шпона, а также весь необходимый арсенал для изготовления мебели премиум класса (станки: шлифовальные, форматно-раскроечные, торцовочные, фрезерные, рейсмусные, фуговальные и пр https://goldsosna.ru/stol-so-100-md002/
) Продуманный технологический процесс, эффективная модернизация мощностей и тщательный контроль всех этапов производства позволяют минимизировать отходы и затраченное время, благодаря чему достигается низкая стоимость мебели из дуба, ясеня и других пород дерева https://goldsosna.ru/stol-obedennyy-dobrynya/
Профессиональный подбор персонала, постоянное повышение квалификации работников посредством семинаров, выездных курсов, онлайн-вебинаров https://goldsosna.ru/komod-timberika-kids-6/
Широкий ассортимент продукции, полностью отвечающий требованиям искушенного потребителя: спальни, прихожие, библиотеки, гостиные, кабинеты и сопутствующие товары https://goldsosna.ru/tumbochka-ameliya-mini-1-yashchik/
Наличие , позволяющей купить мебель в Москве максимально оперативно https://goldsosna.ru/shkaf-s-vitrinoy-lui-filipp-ov-28-12/
Множество наград и премий в области производства мебели из дерева как в России, так и за ее пределами https://goldsosna.ru/krovat-ayno-kaya-2/
Все этапы изготовления в компании тщательно контролируются, поэтому риск возникновения брака минимален https://goldsosna.ru/krovat-2-kh-yarusnaya-sosnovaya-murom/
Мебель из натурального дерева оснащается надежной фурнитурой, если применяется окраска, то только безопасными красящими составами https://goldsosna.ru/stol-obedennyy-dobrynya/
На всю реализуемую нами продукцию предоставляется гарантия https://goldsosna.ru/stol-zhurnalnyy-kntv4/
Мебель из дерева от производителя предназначена радовать своих хозяев приятным видом, удобством, долговечностью и надежностью в применении https://goldsosna.ru/zerkalo-valensiya-2-7/
Магазин: Количество: Алтуфьево https://timberlight.ru
LED-светильники по форме https://timberlight.ru/interiorlighting
Замена ДРЛ 250, ДНАТ 150 Световой поток, лм: 14400 Мощность, Вт: 96 Температура свечения, К: 4000/5000 Степень защиты (IP): 67 Гарантия: 3 года (5 лет опция) Кривая силы света: Д https://timberlight.ru/article3
Промышленные светодиодные светильники https://timberlight.ru/showcaselighting
Продажа люминесцентных и галогенных ламп постепенно сходит на нет https://timberlight.ru/services
Их место в городских квартирах, загородных домах, производственных помещениях и на улице занимают светильники светодиодные, которые позволяют организовать более качественное и экономичное освещение любого объекта https://timberlight.ru/
Дополнительным преимуществом led-светильников является возможность их использования с умными технологиями, позволяющими управлять яркостью, углом освещения и цветовой температурой https://timberlight.ru/furniturelighting
Магазин: Количество: Алтуфьево https://timberlight.ru/company
Кондиционеры с установкой в Москве и Московской области https://klimat-24.ru/montazh-mobilnykh-konditsionerov/
Кондиционеры (сплит системы) – это климатическое оборудование, состоящие из внешнего и внутреннего блоков https://klimat-24.ru/poleznoe/oshibki-montazha-bloka-kondicionera-na-balkone/
Применяются для охлаждения и обогрева воздуха помещений в квартире, частном доме или офисе https://klimat-24.ru/policy/
Традиционный кондиционер сплит-система для квартиры состоит из двух функциональных частей: внешний блок с компрессором устанавливают с снаружи здания, а в помещении — блок с теплообменником и вентилятором https://klimat-24.ru/brendy-montazha/montazh-kondicionerov-teplomash-v-moskve/
При покупке кондиционеров с установкой действует акция со скидкой до 30% и бесплатной доставкой сплит-системы по г https://klimat-24.ru/poleznoe/periodichnost-okazanija-uslugi-zapravki-kondicionerov/
Москве и Московской области https://klimat-24.ru/poleznoe/oshibki-montazha-bloka-kondicionera-na-balkone/
Наши монтажники установят и подключат климатическое оборудование без грязи и пыли https://klimat-24.ru/brendy-remont/remont-kondicionerov-danvex/
Автоматический перезапуск после перебоев с электропитанием Контроль за состоянием фильтров Контроль утечки фреона Датчик тока компрессора Автоматическая разморозка Защита от низких температур https://klimat-24.ru/o-kompanii/
? Межблочный кабель – 5 м;
Фильтры, установленные в кондиционерах, могут причинить вред человеку в случае, если вовремя их не чистить и не менять https://klimat-24.ru/poleznoe/nedorogoe-tehnicheskoe-obsluzhivanie-kondicionerov/
Вам не стоит беспокоиться, т https://klimat-24.ru/poleznoe/nedorogoe-tehnicheskoe-obsluzhivanie-kondicionerov/
к https://klimat-24.ru/brendy-profilaktiki/profilaktika-kondicionerov-carrier-v-moskve/
при проведении ежегодного технического обслуживания, наши специалисты проводят весь комплекс мероприятий по чистке и замене фильтров, а также комплексную обработку кондиционера бактерицидным средством https://klimat-24.ru/brendy-zapravki/zapravka-kondicionerov-daikin/
Во-первых, так Вы исключаете вариант покупки оборудования, попавшим в Россию контрабандным путем https://klimat-24.ru/poleznoe/osobennosti-zapravki-domashnego-kondicionera/
Во-вторых, купить кондиционер в Москве недорого можно только у официальных представителей, поскольку предоставляемая дистрибьюторами цена намного ниже, чем у других посредников https://klimat-24.ru/remont-okonnykh-konditsionerov/
Встроенная память, а также мощное программное обеспечение с дружественным интерфейсом дает возможность сохранять статистику измерения в самом приборе, что удобно при работе в поле, а также составлять подробные стандартизированные отчеты при сдаче объектов после работ https://www.ndt-club.com/product-81-ms-10-stryktyroskop-koercitimetr-magnitnii.htm
Толщиномер УТМ-МГ4 используется для измерения толщины стенок труб, котлов, сосудов, обшивок судов, литья, листового проката и других изделий из чёрных и цветных металлов https://www.ndt-club.com/product-308-ysd-46-yltrazvykovoi-defektoskop.htm
Поверхности изделий могут быть как гладкими, так и грубыми, корродированными с шероховатостью до Rz160 и радиусом кривизны от 5 мм https://www.ndt-club.com/produkcija-229-stacionarnie-tverdomeri-metallov.htm
Прежде всего нужно изучить рынок на покупаемость востребовательных авто и по каким ценам можно дешевле купить для себя и потом подороже продать так что бы получить прибыль https://www.ndt-club.com/product-598-klever-rashodnie-materiali-dlya-mpd-seriya-sever.htm
Дальше иметь или накопить средства для покупки авто под последующую продажу https://www.ndt-club.com/product-545-ruka-rychnoe-ystroistvo-kontrolya-armatyri.htm
Найти потенциальных покупателей на авто которые https://www.ndt-club.com/product-573-tes-364m-defektoskop-tolshinomer-termoelektricheskii.htm
https://www.ndt-club.com/otzyvy.htm
https://www.ndt-club.com/proizvoditeli-19-altes.htm
Толщиномер УДТ-40 – универсальный ультразвуковой толщиномер с высокой точностью и достоверностью контроля https://www.ndt-club.com/product-539-vulcan-portativnii-lazernii-analizator.htm
Наличие А-скана исключает такие типичные ошибки при измерении толщины, как удвоение показаний, а В-скан позволяет наблюдать профиль дна изделия https://www.ndt-club.com/product-468-yfo-3-20f-oblychatel-yltrafioletovii-portativnii.htm
Цены Мойка окон и фасадов от 200 ? / М2 https://alpinist-servis.ru/remont-vodostokov/
Выполнение высотных работ методом промышленного альпинизма, организация работ на высотных объектах, ремонт покраска рекламные конструкции https://alpinist-servis.ru/nashi-uslugi/ustanovka-vozduxovodov/
монтированных водосточных труб http://alpinist-servis.ru
При необходимости мы предоставим гарантийное письмо о сохранении целостности кровельного покрытия https://alpinist-servis.ru/sitemap/
Высотные работы, выполняемые методом промышленного альпинизма, относятся к категории сложных https://alpinist-servis.ru/nashi-uslugi/zapravka-kondicionerov/
Их стоимость формируется с учетом множества факторов https://alpinist-servis.ru/category/ustanovka-vodostokov/
Вот самые главные из них:
Для вашего удобства на сервисе доступны все контакты мастера https://alpinist-servis.ru/nashi-uslugi/remont-vodonapornoj-bashni/
Но мы рекомендуем вести переписку в чате сервиса, т https://alpinist-servis.ru/nashi-uslugi/germetizaciya-balkonov-i-lodzhij/
к https://alpinist-servis.ru/g-moskva-ul-zarechnaya-d-1/
только в этом случае, мы можем вам гарантировать помощь с нашей стороны в случае конфликтной ситуации https://alpinist-servis.ru/nashi-uslugi/otkrytie-dveri/
Основным источником шума внутреннего блока кондиционера является поток воздуха, проходящего через вентилятор, радиатор и распределительные жалюзи https://klimat-24.ru/brendy-montazha/montazh-kondicionerov-daikin-v-moskve/
За 0 дБ принят порог слышимости https://klimat-24.ru/poleznoe/ustanovka-i-obsluzhivanie-kondiczionerov/
Звуки с уровнем менее 25 дБ фактически не слышны для человеческого уха https://klimat-24.ru/poleznoe/osobennosti-okazanija-uslug-po-tehnicheskomu-obsluzhivaniju-kondicionerov/
Если Вы планируете установить кондиционер в спальню, то лучше выбирать систему с низким уровнем шума в шумовом диапазоне 19-24 дБ на низких скоростях (все бытовые кондиционеры имеют ночной режим, позволяющий работать компрессору очень тихо на минимальных оборотах) https://klimat-24.ru/poleznoe/ot-chego-zavisjat-ceny-na-chistku-domashnego-kondicionera/
В гостиную можно установить более шумный кондиционер, который будет работать в шумовом диапазоне 30-40 дБ https://klimat-24.ru/brendy-remont/remont-kondicionerov-venta/
Шум кондиционера, установленного в офисном помещении, не является критичным, потому что даже самые шумные модели будут неслышны на фоне офисной работы https://klimat-24.ru/poleznoe/poleznoe-aktualnost-chistki-domashnego-kondiczionera/
Шелест листьев – около 10 дБ https://klimat-24.ru/brendy-remont/remont-kondicionerov-ballu/
Уровень шума в тихой комнате – 20 дБ https://klimat-24.ru/poleznoe/usluga-po-chistke-kondicionerov-chto-vhodit-i-kak-provoditsja/
В библиотеке – чуть ниже 40 дБ https://klimat-24.ru/brendy-zapravki/zapravka-kondicionerov-gree-v-moskve/
Подробности уточните у менеджера »
В нашем ассортименте представлен широкий выбор кондиционеров, которые отвечают самым высоким стандартам качества, безопасности и эффективности https://klimat-24.ru/obsluzhivaniye-tsentralnykh-konditsionerov/
Чтобы сделать правильный выбор, прежде чем заказать кондиционер (Москва), мы рекомендуем вам воспользоваться помощью наших специалистов, которые прекрасно разбираются во всех аспектах работы климатического оборудования разных производителя и смогут оказать вам неоценимую услугу в выборе кондиционера, который будет полностью удовлетворять заданным параметрам https://klimat-24.ru/brendyi-obsluzhivaniya/obsluzhivanie-kondicionerov-danvex/
Уровень шумности кондиционера определяется его производительностью , тем как отбалансированны подвижные части вентилятора, качеством пластика https://klimat-24.ru/sale/multizonalnyie-vrv-i-vrf-sistemyi/
Верным будет и то, что уровень шума завистит от качественного монтажа наружного блока https://klimat-24.ru/brendy-zapravki/zapravka-kondicionerov-ballu-v-moskve/
Подробности можно уточнить у менеджеров »
Общее руководство дезинфекционными мероприятиями возлагается на руководителя организации (соответствующего объекта) либо иное лицо, определенное работодателем в качестве ответственного за их надлежащее проведение https://crystal-tr.ru/product/lejkoplastyr-baktericidnyj-sfm-7-2-sm-h-2-5-sm-polimer-1000-sht/
Непосредственное выполнение дезинфекционных мероприятий возлагается на работников организации (иных лиц, привлекаемых к выполнению таких мероприятий в соответствии с гражданско-правовым договором), обладающих необходимой квалификацией https://crystal-tr.ru/product-category/lab/nabory-reagentov-dlja-immunofermentn/
Если вы сомневаетесь в своем выборе, доверьтесь консультантам APROFI GROUP https://crystal-tr.ru/product/lejkoplastyr-povjazka-sfm-6-0-sm-h-3-0-sm-50-sht/
Они ответят на все возникающие вопросы, расскажут о возможностях тех или иных средств и подберут необходимую химию https://crystal-tr.ru/product/shpric-sfm-1-ml-u100-dlja-insulina-s-nadetojigloj-0-45h12-26g-20-shtuk/
Узнать, какая будет на дезинфицирующие средства цена, можно по телефону https://crystal-tr.ru/product/nabory-reagentov-dlja-immunofermentn-3/
Товары в нашем каталоге соответствуют стандартам ISO, поэтому безопасны для здоровья и окружающей среды https://crystal-tr.ru/product/uf-podogrevatel-polotenec-sd-6551/
Дезинфекция бассейна, проводимая после слива воды и механической чистки, осуществляется методом двукратного орошения дезинфицирующим раствором https://crystal-tr.ru/product/j-cain/
Для повышения надежности обеззараживания целесообразно комбинирование химических методов с ультрафиолетовым излучением https://crystal-tr.ru/product/halat-hirurgicheskij-medicinskij-h-02/
https://crystal-tr.ru/product/recirkuljator-rbo-model-3-lampa-osram-ledvance-1x15vt/
https://crystal-tr.ru/product-category/consumables/instrument-medicinskij/
https://crystal-tr.ru/product/emkost-kontejner-edpo-3-02-2-obem-30l/
на твердую влажную почву, каждое семя отдельно https://crystal-tr.ru/product/medicinskij-pulsoksimetr-s-registr/
Благодаря этому семена всходят одновременно и на 100%, благодаря чему не образуется подгон https://crystal-tr.ru/product/rentgenpljonka-sfm-x-ray-gf-20h25-zeljonochuvstvitelnaja/
Кроме того, у сеялки имеются пружинные пальцы, которые выравнивают почву и вычесывают срезанные лапами сорняки на поверхность почвы https://crystal-tr.ru/product/recirkuljator-rbo-model-4-lampa-osram-ledvance-2x15vt/
Заканчивает работы цепь, приспособленная сзади сеялки, которая, двигаясь перпендикулярно ходу сеялки, выравнивает почву https://crystal-tr.ru/product-category/medicaldisp/
Прикатывать яровой сев не обязательно https://crystal-tr.ru/product/recirkuljator-rbo-model-6-3-lampa-osram-ledvance-6x15vt/
Следует отметить, что высокая скорость выполняемых операций достигается не только за счет использования мощных колесных тракторов, но и благодаря выровненности полей после предыдущей обработки https://crystal-tr.ru/product/kosmetologicheskaja-tumba-stellazh-versa-che/
При данной технологии яровые зерновые https://crystal-tr.ru/product/rentgenpljonka-retina-xbe-30×40/
https://crystal-tr.ru/product/komplekt-akusherskij-20sht-tr-kor-steril/
https://crystal-tr.ru/product/rentgenpljonka-sfm-x-ray-gf-13h30-zeljonochuvstvitelnaja/
Кресла должны иметь подголовники и чехлы на сидения, которые подлежат смене https://crystal-tr.ru/product/rentgen-plenka-dlja-stomatologii-57h76mm-25l-carestream-df-50/
Служебные вагоны и вагоны https://crystal-tr.ru/product/zhgut-jesmarha/
В https://crystal-tr.ru/product/emkost-kontejner-edpo-1-02-2-obem-10l/
пунктах формирования, оборота и в пути следования обработка внутренних https://crystal-tr.ru/product-category/pervaja-medicinskaja-pomoshh/zhguty-stropy/
Пассажирские https://crystal-tr.ru/product/nabor-ginekologicheskij-sterilnyj-junona-1-zerkalo-po-kusko-2-podkladnaja-pelenka-60-40-sm-perchatki-razmer-m/
вагоны поездов дальнего следования» https://crystal-tr.ru/product/shpric-sfm-1-ml-u40-dlja-insulina-s-nadetoj-igloj-0-45h12-26g-20-shtuk/
Железнодорожные вокзалы https://crystal-tr.ru/product/kombinezon-mnogorazovyj-zashhitnyj-s-a/
На железнодорожных вокзалах проводится ежедневная санитарная обработка всех https://crystal-tr.ru/product-category/disinfection/dozatory/
Самаровка” https://crystal-tr.ru/product-category/medicaldisp/
Особенно тщательно обрабатываются залы ожидания, все помещения «комнаты https://crystal-tr.ru/product/shpric-sfm-10-ml-trehkomponentnyj-s-nadetoj-igloj-0-8-x-40-21g-5-shtuk/
Изделия из стекла и металлов отмывают последовательно в двух водах Лизоформина 3000, в трех водах (Дезформ) по 5 минут, изделия из пластмасс и резины – в двух водах (Лизоформин – 3000), в трех водах (Дезформ) по 10 минут https://crystal-tr.ru/product/rentgenpljonka-trimax-txb-film-35×43-100-listov/
Каналы изделий отмывают с помощью шприца или водоструйного насоса в течение 3-5 минут в каждой емкости, не допуская попадания пропущенной воды в емкость с отмываемыми изделиями https://crystal-tr.ru/product/plastyr-katushechnyj-na-tkanevoj-osnove-5-0-h-250-sm-12-sht/
Выбирая ткань дивана, учитывайте особенности помещения, где он будет находиться – сначала необходимо правильно подобрать место https://by-home.ru/kruzhki-chajniki-sakharnicy/13860-chashka-s-blyudcem-bryzgi-krasok-v-podarochnoj-upakovke.html
Плюс не забывать смотреть на общую концепцию арт-дизайна интерьера https://by-home.ru/dekorativnye-podushki/13418-dekorativnaya-podushka-miss-zajka.html
Подушки в комплект не входят https://by-home.ru/zhurnalnye-stoly/23236-stol-zhurnalnyj-halmar-venom-u-dub-votanchernyj.html
Для всех, кому важен комфорт отдыха днем и здоровый сон ночью https://by-home.ru/interernye-kresla/6883-kreslo-lourens.html
Пластик: 4 000-5 000 руб/м2 https://fabrica33.ru/spalnyj-garnitur-ofeliya.html
Есть два экологических стандарта ЛДСП – Е1 и Е2 https://fabrica33.ru/korpusnaya-mebel/stenki/stenki-svetlye/?limit=168
Если покупать мебель, сделанную из ЛДСП класса Е1, то со здоровьем будет все в порядке https://fabrica33.ru/myagkaya-mebel/kuhonnye-ugolki2/?limit=48&sort=pd.name&order=DESC&page=1
На нашем производстве используется только ЛДСП класса Е1 марок Томлесдрев, Эггер, Ламарти https://fabrica33.ru/korpusnaya-mebel/shkafy/shkafy-2h-stvorchatye/?limit=96&sort=p.price&order=DESC&page=1
Шкафы-купе на заказ от 14470 руб https://fabrica33.ru/korpusnaya-mebel/stenki/stenki-svetlye/?limit=48&sort=pd.name&order=DESC&page=1
/п https://fabrica33.ru/myagkaya-mebel/?page=3
м https://fabrica33.ru/kuhnya-valentina.html
По готовности изделия мы Вам позвоним и договоримся о доставке изделия https://fabrica33.ru/korpusnaya-mebel/modulnye-sistemy/?limit=96
+1 счастливый клиент https://fabrica33.ru/korpusnaya-mebel/shkafy/shkafy-2h-stvorchatye/?limit=72&sort=p.price&order=DESC&page=1
Их количество может варьироваться в зависимости от потребностей https://fabrica33.ru/stenka-armani.html
Располагаться могут в любой части шкафа https://fabrica33.ru/myagkaya-mebel/divany-na-metallokarkase/
Изготовление мебели из дерева по индивидуальным проектам https://goldsosna.ru/category/spalni/spalnya-khloya/
Мебельная фабрика ТерраМебель производит мебель высокого качества по доступной цене https://goldsosna.ru/krovat-marsel-033-vmf-6013-s-g-osn/
Сосна, береза, бук и дуб, ясень – вот основные материалы нашего производства https://goldsosna.ru/zerkalo-laura-mm-267-05/
У нас более 20 цветов на выбор, есть возможность изготовить любую позицию из каталога по размерам заказчика, действует система скидок https://goldsosna.ru/krovat-trio-mm-277-02-14b_1/
Все это делает выбор нашего интернет-магазина правильным решением https://goldsosna.ru/stol-zhurnalnyy-riva/
ОАО – в ногу со временем https://goldsosna.ru/tumba-dlya-tv-prestizh-gm-5959/
Готовые интерьеры с мебелью под старину для жилых помещений и общественных заведений https://goldsosna.ru/tumba-lui-filipp-ov-20-11/
Оцените фото интерьеров под старину, разработанных нашими дизайнерами https://goldsosna.ru/takhta-daniya-3-myagkaya-s-yashchikami-rasprodazha/
Чтобы добавить товар в Смету, Вам необходимо авторизоваться https://timberlight.ru/price
Производитель: LederON Мощность: 4 Вт Яркость: 360 Лм Температура: 6000К Степень защиты: IP20 Размеры: 85х85 мм https://timberlight.ru/
Экономичность https://timberlight.ru/cabinetlighting
Светодиодные модели потребляют в 10 раз меньше электроэнергии, чем светильники с лампами накаливания, и в 2 раза меньше, чем люстры с люминесцентными лампочками https://timberlight.ru/furniturelighting
При этом дольше работают, не требуя замены https://timberlight.ru/articles
С0808 https://timberlight.ru/stairlighting
Светильник FH-THD1801-15 15Вт 1200Лм 4000К светод https://timberlight.ru/cooperation
встраив https://timberlight.ru
d175мм белый IP20 (Электромонтаж)
Магазин: Количество: Алтуфьево https://timberlight.ru/facadelighting
Выберите цвет и способ монтажа https://timberlight.ru/showcaselighting
Работает по: черным металламРабочая температура: -40°С до +50°СМакс https://www.ndt-club.com/product-73-vd-12nfp-defektoskop-vihretokovii.htm
измерение: 2000 микронШаг измерений: 20 микронПодсветка экрана: НетДоп https://www.ndt-club.com/proizvoditeli-12-lych.htm
функции: нетПроизводство: ПольшаГарантия: 1 год
Как видите, такой небольшой, но полезный прибор позволяет быстро определить не только окрашенные места после аварии, но и их размеры https://www.ndt-club.com/product-316-equotip-bambino-2-portativnii-dinamicheskii-tverdomer.htm
Что, в свою очередь, точно подскажет, какой была авария или ремонт (небольшая царапина или серьезные кузовные работы с рихтовкой и шпаклевкой), а это позволяет решить соответствует ли цена автомобиля заявленной https://www.ndt-club.com/product-715-ystanovka-kontrolya-germetichnosti.htm
И как результат вам будет легче решить стоит ли покупать автомобиль после ремонта, особенно если это касается стоек и важных частей кузова https://www.ndt-club.com/beton.htm
Ошибка идентификации материала https://www.ndt-club.com/product-389-coatmaster-beskontaktnii-tolshinomer-mokrogo-pokritiya.htm
Если вы выполнили калибровку прибора на одном материале, а измеряете толщину другого, полученный результат будет ошибочным https://www.ndt-club.com/product-699-xtime-eksponometr.htm
При выборе правильной скорости звука будьте внимательны https://www.ndt-club.com/product-612-df5012-ds1-yltrazvykovoi-preobrazovatel-dlya-kontrolya-rezbovoi-chasti.htm
Ошибки также могут возникать, если скорость звука при измерении значительно отличается от скорости, полученной при калибровки https://www.ndt-club.com/product-672-klever-1-lum-luminescentnaya-indikatornaya-syspenziya.htm
Отрегулируйте прибор https://www.ndt-club.com/product-549-std-510-vibrokollektor.htm
На четвёртое место Мы поставили ETARI ET-11P, работает на отлично, независимо от погодных условий https://www.ndt-club.com/product-4-a1207-tolshinomer-yltrazvykovoi.htm
Данный прибор широко применяется как для профессионального так и для личного пользования, при покупке автомобиля https://www.ndt-club.com/product-188-tt-100-yltrazvykovoi-tolshinomer.htm
Простое и легкое использование, достаточно приложить устройство к любому месту транспортного средства и на экране за секунды отобразятся замеры https://www.ndt-club.com/produkcija-43-proyavochnie-mashini.htm
Эта модель автоматически определяет тип металла, при работе обнулять не нужно, а так же оповещает звуковым сигналом при показателях выше указанной нормы https://www.ndt-club.com/proizvoditeli-9-proceq.htm
После завершения работы с ETARI ET-11P, происходит автоматическое отключение через 30 секунд, это позволит сохранить батареи на долгое время https://www.ndt-club.com/product-672-klever-1-lum-luminescentnaya-indikatornaya-syspenziya.htm
В комплект толщиномера входит калибровочные пластины, а так же чехол, благодаря которому, устройство можно носить как Вам удобно https://www.ndt-club.com/produkcija-256-kameri-ohlajdeniya.htm
Уникальным свойством дезинфицирующих препаратов на основе полиалкиленгуанидинов является их стабильность и длительное антимикробное действие, которое обусловлено полимерной природой препаратов и их способностью образовывать на защищаемой поверхности тонкую биоцидную пленку https://crystal-tr.ru/product-category/consumables/rentgenpljonka/sony/
В то время как действие легколетучих традиционных дезинфицирующих средств сохраняется несколько часов (максимум несколько суток), полиалкиленгуанидины обладают пролонгированным антимикробным действием, которое сохраняется от нескольких месяцев до 1,5 лет https://crystal-tr.ru/product/plenka-rentgen-med-sony-upt-514bl-279mmh354mm-11-x14-125l/
Если приснился какой-то плохой сон, то он запоминается почти всем и не выходит из головы длительное время https://crystal-tr.ru/product/shpric-5-ml-dvuhkomponentnyj-s-nadetoj-igloj-0-7-h-40-22g-sfm-100-shtuk/
Часто человека пугает даже не столько само содержимое сновидения, а его последствия, ведь большинство из нас верит, что сны мы видим совсем не напрасно https://crystal-tr.ru/product/lejkoplastyr-kinezio-tejp-5-sm-h-500-sm-sfm-bez-logo-oranzhevyj/
Как выяснили ученые, плохой сон чаще всего снится человеку уже под самое утро https://crystal-tr.ru/product/vosstanovitel-renmed-k-na-15-l-zhidkij-koncentrat/
https://crystal-tr.ru/product-category/consumables/rentgenpljonka/mammografija/
https://crystal-tr.ru/product/lejkoplastyr-kinezio-tejp-10-sm-h-500-sm-chjornyj-sfm/
Дезинфекционные средства должны иметь четкие паспорта (этикетки) с указанием названия средства, даты изготовления, срока годности https://crystal-tr.ru/product/rentgen-plenka-konica-sd-qm-20h25-8×10-125l/
Использовать дезсредства, не имеющие указанных паспортных данных, категорически запрещается https://crystal-tr.ru/product/gepoglos-shina-immobilizacionnaja-kompaktnaja-palcevaja-46h96mm/
Обработку ванных комнат, душевых, санпропускников, бассейнов проводят по режимам, обеспечивающим гибель возбудителей грибковых заболеваний https://crystal-tr.ru/product/rentgen-plenka-konica-sd-q-20h25-8×10-125l/
Применять для их профилактической дезинфекции средства на основе альдегидов и фенолов не рекомендуется в связи с высокой токсичностью последних (как следствие, потенциальной опасностью для здоровья людей) https://crystal-tr.ru/product/kombinezon-k-02/
Именно им была утверждена данная форма для заполнения https://crystal-tr.ru/product/rentgen-plenka-konica-sd-p-28h35-11×14-125l/
Но использовать бланк и образец журнала можно в любых организациях в качестве свободно формируемого бланка https://crystal-tr.ru/product/rentgen-plenka-dlja-stomatologii-57h76mm-25l-carestream-df-50/
Представлен текст строительный гоесли текущая это совсем что искали посмотрите рубрики инженеры https://crystal-tr.ru/product/telezhka-kosmetologa-sd-977/
Настоящие санитарные правила нормы разработаны утверждены
Новинка! Стенка ЛОФТ https://by-home.ru/konsoli/11876-konsol-cilan-180-sinyaya.html
Диван с подсветкой https://by-home.ru/vitriny-i-bufety/12051-bufet-cilan-retro-sinij.html
Механизм: еврокнижка https://by-home.ru/zhurnalnye-stoly/19824-stol-zhurnalnyj-halmar-nubira-orekh-chernyj.html
Размер спального места: 150/160х195 https://by-home.ru/barnye-i-polubarnye-stulya/25419-stul-polubarnyj-tokyo-seryj.html
Обивка: рогожка/экокожа https://by-home.ru/tarelki-stolovye-pribory-podnosy/13761-tarelka-zakusochnaya-seraya-casadecor-bez-indupakovki.html
Ящик для хранения белья https://by-home.ru/nastolnye-lampy/7646-nastolnaya-lampa-3765.html
Наполнитель: ППУ (износостойкий, долговечный поролон) https://by-home.ru/derevyannye-krovati/9520-krovat-120190-jasmin-eja-11120.html
Производитель: Элегантный стиль Каркас: массив, фанера Обивка: кожа искусственная, рогожка, микровелюр Размер спального места: 120х195 Механизм трансформации: аккордеон https://by-home.ru/napolnye-zerkala/26885-zerkalo-ruiz-black.html
Механизм: нет https://by-home.ru/chasy/10174-chasy-nomon-puntos-suspensivos-4i-d4150-cm.html
Каркас: массив дерева (сосна) https://by-home.ru/banketki-i-pufy/27605-skamya-s-podlokotnikami-loft.html
Обивка: экокожа https://by-home.ru/obedennye-stoly/28044-stol-obedennyj-signal-porto-ceramic-120-raskladnoj-temno-seryj-mramorstal-mat.html
Наполнитель: ППУ(износостойкий, долговечный поролон) https://by-home.ru/prikrovatnye-tumby/13377-prikrovatnaya-tumba-ctg3242.html
Механизм: еврокнижка https://by-home.ru/stulya/17904-stul-kukhonnyj-halmar-rois-dub-medovyj-seryj.html
Размер спального места: 150/160х195 Каркас: массив дерева (сосна), ДСП, фанера https://by-home.ru/zhurnalnye-stoly/23695-stol-zhurnalnyj-signal-harmony-a-prozrachnyjorekhchernyj.html
Обивка: ткань/экокожа https://by-home.ru/99-obedennye-stoly?p=3
Ящик для хранения белья https://by-home.ru/lyustry/19028-lyustra-najdzhel-black.html
Четыре подушки в комплекте https://by-home.ru/komody/6824-komod-medison.html
Наполнитель: пружинный блок Боннель, ППУ (износостойкий, долговечный поролон) https://by-home.ru/statuetki/22659-komplekt-statuetok-podvesok-rozhdestvenskie-angely-4-shtuki.html
Климатическая техника стремительно развивается https://klimat-24.ru/poleznoe/kak-provesti-chistku-okonnogo-kondiczionera-ne-snimaya-ego/
Мы постоянно отслеживаем все новинки в этой области и наши специалисты помогут подобрать наиболее оптимальное решение, соответствующее вашим потребностям и пожеланиям https://klimat-24.ru/poleznoe/remont-kondiczionerov-blokov-naruzhnogo-i-vnutrennego/
Благодаря обширной информационной базе и устойчивым связям с ведущими производителями техники мы сможем обеспечить поставку и монтаж самого современного оборудования https://klimat-24.ru/poleznoe/chistka-kondicionerov-raznyh-tipov/
Мы работаем, чтобы обеспечить своим клиентам максимальный комфорт https://klimat-24.ru/zapravka-bloka-konditsionera/
Ждем Вашего заказа!
Установка кондиционера в квартире — самый верный и современный способ для создания комфортного микроклимата в доме, помогающий жильцам быстро и легко избавляться от изнуряющей жары https://klimat-24.ru/poleznoe/chistka-i-zapravka-kondicionerov-objazatelnye-procedury-tehnicheskogo-obsluzhivanija/
Рынок климатического оборудования представлен богатым выбором моделей японских, корейских и европейских производителей, а потому определиться с выбором кондиционера бывает трудно https://klimat-24.ru/brendy-zapravki/zapravka-kondicionera-lg-v-moskve/
Именно поэтому мы решили дать вам несколько полезных советов, чтобы покупка сплит системы была приятной, продуктивной и выгодной https://klimat-24.ru/montazh-split-sistem/
Не стоит устанавливать кондиционер напротив плиты, т https://klimat-24.ru/brendy-profilaktiki/profilaktika-kondicionerov-energolux-v-moskve/
к https://klimat-24.ru/brendy-montazha/montazh-kondicionerov-kentatsu-v-moskve/
поток холодного воздуха может существенно замедлить процесс приготовления пищи https://klimat-24.ru/brendyi-obsluzhivaniya/obsluzhivanie-kondicionerov-mdv/
Обратилась в данную компанию с целью покупки и установки кондиционера https://klimat-24.ru/brendy-remont/remont-kondicionerov-toshiba/
Много разнообразных акций и большой ассортимент https://klimat-24.ru/sale/napolno-potolochnyie-kondiczioneryi/
Подсказали по подбору кондиционера https://klimat-24.ru/poleznoe/kondiczioneryi-ustanovka-montazh-pochemu-stoit-doveritsya-professionalam/
В итоге выбрала LG с возможностью управления при помощи Алисы Монтажники быстро осуществили установку https://klimat-24.ru/poleznoe/servisnoe-obsluzhivanie-kondicionera-celi-uslugi-i-sposoby-dostizhenija/
Опрятный внешний вид и много различного инструмента https://klimat-24.ru/brendyi-obsluzhivaniya/obsluzhivanie-kondicionerov-pioneer/
Однозначно рекомендую данный магазин https://klimat-24.ru/poleznoe/osobennosti-chistki-paneli-kondicionera/
Каждый кондиционер рассчитан на определенный объем охлаждаемого помещения https://klimat-24.ru/poleznoe/servisnoe-obsluzhivanie-kondiczionerov/
если попытаться охладить сразу несколько комнат, то можно получить в 1 комнате перебор по холоду, в другой мало поддерживаемая прогнозируемая температура, вместе с этим серьезный перебор эл https://klimat-24.ru/montazh-potolochnykh-konditsionerov/
энергии https://klimat-24.ru/obsluzhivaniye-kassetnykh-konditsionerov/
При покупке самой выгодной и качественной модели для больших помещений до 35 кв https://klimat-24.ru/poleznoe/servisnoe-obsluzhivanie-kondiczionerov/
м https://klimat-24.ru/brendy-zapravki/zapravka-kondicionerov-hisense/
установка за наш счет ABION ASH-C127BE/ARH-C127BE https://klimat-24.ru/brendy-montazha/montazh-kondicionerov-teplomash-v-moskve/
СТАНДАРТНЫЙ СРОК ПО ДОГОВОРУ 1 МЕСЯЦ https://fabrica33.ru/myagkaya-mebel/divany/?limit=48&sort=pd.name&order=DESC&page=1
ОДНАКО 98% КЛИЕНТОВ ПОЛУЧАЮТ СВОЮ МЕБЕЛЬ ГОРАЗДО БЫСТРЕЕ https://fabrica33.ru/korpusnaya-mebel/komody_-tumby-tv/?limit=144
Внимание, предложение до 15 ноября ! В связи со сложившейся эпидемиологической ситуацией, мы предлагаем клиентам оформить заказы онлайн! При оформлении кухни онлайн на заказ будет действовать скидка https://fabrica33.ru/korpusnaya-mebel/?limit=48&page=4
* нажимая кнопку
Согласование и оплата https://fabrica33.ru/myagkaya-mebel/divany-akkordeony2/?limit=96&sort=p.price&order=DESC&page=1
Стенки, шкафы, комоды, мебель для хранения, шкафы-купе и гардеробные системы – вот неполный перечень того, что предлагает наша компания https://fabrica33.ru/myagkaya-mebel/divany-na-metallokarkase/
готовых работ радуют клиентов https://fabrica33.ru/korpusnaya-mebel/detskaya-mebel/?limit=144&sort=pd.name&order=DESC&page=1
Лазерную эпиляцию подмышек можно проводить только в специализированных учреждениях, где работают профессиональные косметологи, и имеется необходимое современное оборудование для осуществления процедуры https://www.egoestetica-med.ru/grud
У клиники или салона красоты должна быть соответствующая лицензия на использование лазерного аппарата https://www.egoestetica-med.ru/o-lazernoy-epilyacii
Если вы имеете склонность к появлению келоидных рубцов, то такая процедура будет для вас также противопоказана https://www.egoestetica-med.ru/lazernaya-epilyaciya
Нельзя использовать лазер в период беременности или кормления грудью https://www.egoestetica-med.ru/dokumenty-i-licenzii
Любые инфекционные или воспалительные заболевания органов малого таза являются противопоказанием https://www.egoestetica-med.ru/komu-ona-protivopokazana
Также нельзя проводить эпиляцию груди или зоны подмышек тем женщинам, которые имеют проблемы со здоровьем молочных желез https://www.egoestetica-med.ru/sheya
Существуют абсолютные и относительные причины, по которым рекомендовано выбрать другой способ удаления волосков https://www.egoestetica-med.ru/podgotovka-k-procedure-0
Отнеситесь серьёзно к рекомендациям врача, иначе слепая погоня за красотой и гладкостью кожи может обернуться тяжёлыми последствиями для организма https://www.egoestetica-med.ru/komu-pokazana-lazernaya-epilyaciya
Не больно, надолго, экономит время и деньги, наверняка понравится прекрасной половине человечества, это лишь малая часть бонусов, которые гарантирует мужская лазерная эпиляция https://www.egoestetica-med.ru/sheya
Главное – не прогадать с клиникой и косметологом, выбрав грамотных специалистов с качественным оборудованием, и результат вас обрадует https://www.egoestetica-med.ru/dokumenty-i-licenzii
К основным показаниям к назначению процедуры по удалению волос динамическим лазером относится гипертрихоз, гирсутизм, особая чувствительность кожи к бритью и депиляции, гигиенические требования к состоянию кожи https://www.egoestetica-med.ru/komu-ona-protivopokazana
Диодный луч будет эффективно выполнять свою задачу только в том случае, если предварительно волоски будут сбриты https://www.egoestetica-med.ru/elektroepilyaciya
В случае применения второго вида депиляции подобная подготовка не требуется https://www.egoestetica-med.ru/podgotovka-k-procedure-0
1 http://kraz-maz.ru/categories/mosty-kraz
1 http://kraz-maz.ru/products/karter-srednego-mosta-kraz-6505-2501010
Гарантийный срок на запасные части устанавливается Продавцом и исчисляется с даты реализации Потребителю:
Гайка М80 (оси балансира п/прицепа) (500-3104076-Б) Запчасти МАЗ от БИТ комплект: Гайка М80 (оси балансира п/прицепа) (500-3104076-Б)
– соразмерного уменьшения покупной цены;
Ось сателита колесной передачи (с подш http://kraz-maz.ru/products/ressora-zadnyaya-6505-2912012-13-v-sbore-18-listov
Е5) (664706Е5) Запчасти МАЗ от БИТ комплект: Ось сателита колесной передачи (с подш http://kraz-maz.ru/products/baraban-stoyanochnogo-tormoza-255b-3507052-b
Е5) (664706Е5)
Группа компаний является официальным дилером Минского Автомобильного Завода, за период работы на рынке автозапчастей в Иркутской области, Республике Бурятия и Забайкальском крае зарекомендовало себя в качестве надежного и выгодного партнера и поставщика запчастей МАЗ http://kraz-maz.ru/products/bak-toplivnyi-levyi-kraz-260-1101009-11
Мы предлагаем широкую номенклатуру автозапчастей МАЗ, всех моделей http://kraz-maz.ru/products/bak-toplivnyi-pravyi-260-1101008-02
На нашем складе находится достаточный перечень и количество запчастей МАЗ по подвеске, ходовой, рулевой и тормозной системам, кабине и электрооборудованию http://kraz-maz.ru/products/vtulka-kraz-blokirovki-differentsiala-6505-2403077
Ассортимент предлагаемых наименований постоянно пополняется и корректируется в зависимости от потребительского спроса и сезонных колебаний продаж http://kraz-maz.ru/products/shesternya-veduschaya-i-vedomaya-komplekt-z-13-25-6505-2402020
Торговый дом – запасные части | МАЗ http://kraz-maz.ru/products/korobka-razdatochnaya-kraz-6437-1800010-10
Заинтересовавшей вас модели нет в нашем каталоге? Присылайте фото, и мы возьмемся за ее изготовление!
Обратившись в нашу компанию, Вы получите эксклюзивную статусную мебель! Наслаждайтесь приятными эмоциями в теплой, душевной, по-домашнему уютной атмосфере — остальное мы сделаем за Вас!
– надежность и долговечность — при правильном уходе срок эксплуатации предметов составляет не один десяток лет, в результате чего мебель может стать семейной реликвией и передаваться по наследству https://goldsosna.ru/provans-shkaf-nastennyy-13-600/
Преимущества мебели из массива дерева https://goldsosna.ru/category/kukhni-iz-sosny/viking/
· Красота – дерево имеет оригинальный рисунок, поэтому смотрится красиво;
чистки кровли от снега https://alpinist-servis.ru/nashi-uslugi/ustanovka-vozduxovodov/
Сверление отверстий в железобетонных, кирпичных, оштукатуренных, деревянных стенах https://alpinist-servis.ru/nashi-uslugi/pokraska-fasadov/
Установка обычного стекла https://alpinist-servis.ru/
Промышленный альпинизм https://alpinist-servis.ru/remont-fasada/
В каталоге также можно найти режим работы и расположение на карте https://alpinist-servis.ru/nashi-uslugi/ded-moroz-v-okno/
Связаться с представителями организаций можно не только по телефону, но и непосредственно через наш сайт: написать письмо, воспользовавшись специальной формой обратной связи, которая есть на страничке каждой компании https://alpinist-servis.ru/nashi-uslugi/remont-alyukobonda-2/
Чтобы не потерять нужную информацию воспользуйтесь функцией https://alpinist-servis.ru/montag-obogr-kabela-moskva-isakovskogo39k1/
Работаем по внутренним стандартам и здравому смыслу https://alpinist-servis.ru/remont-fasada-v-moskve/
Не привлекаем пять человек там, где достаточно двух https://alpinist-servis.ru/nashi-uslugi/otkrytie-dveri/
Оформляем все работы по договору https://alpinist-servis.ru/stati/page/2/
Какие характеристики учитывать при покупке https://timberlight.ru/articles
Товар с витрины: Количество Алтуфьево https://timberlight.ru
Достоинства : Быстрая доставка https://timberlight.ru/cooperation
Демократичные цены https://timberlight.ru
Недостатки : Не нашел https://timberlight.ru/company
Комментарий : Понадобился блок питания с достаточно жесткими параметрами – кроме стандартных 12В и 100Вт-150Вт нужны были достаточно небольшие габариты https://timberlight.ru/furniturelighting
Вопрос: Управление светодиодной лентой с помощью смартфона https://timberlight.ru/cabinetlighting
Светодиодные светильники от производителя https://timberlight.ru/articles
Световой поток, лм: 10000 Мощность, Вт: 80 Температура свечения, К: 2700-500 Степень защиты (IP): 65 Способ крепления: консоль до 50 мм КСС 60° Гарантия: 5 лет https://timberlight.ru/
Работает по: черным металламРабочая температура: -25°С до +50°СМакс https://www.ndt-club.com/proizvoditeli-24-general-electric.htm
измерение: 3000 микронШаг измерений: 1 микронПодсветка экрана: ЕстьДоп https://www.ndt-club.com/product-312-kabel-lemo-lemo-profi-profi.htm
функции: фонарикПроизводство: ПольшаГарантия: 1 год
В зависимости от предполагаемого диапазона толщин и материала объектов контроля прибор может быть укомплектован различными датчиками (преобразователями) на выбор заказчика https://www.ndt-club.com/produkcija-173-vihretokovie-tolshinomeri-osnovnogo-metalla.htm
Необходимо было выбрать толщиномер из множества представленных на рынке вариантов https://www.ndt-club.com/product-387-d1-yniversalnii-tolshinomer-pokritii-fe-nfe.htm
Прибор для измерения толщины лакокрасочных покрытий TT210 оказался очень хорошим устройством для быстрого теста подержанного автомобиля, но не самым дешёвым https://www.ndt-club.com/product-597-mt-2007-tolshinomer-pokritii.htm
Цена компенсируется, высоким качеством измерения https://www.ndt-club.com/product-467-kd-3-3l-oblychatel-yltrafioletovii.htm
После покупки прибор окупился очень быстро https://www.ndt-club.com/product-29-ivn-3003-versiya-2-0-izmeritel-vlajnosti-nefteprodyktov.htm
Ирина2021-02-10 22:56:45Хочу выразить огромную благодарность профессионалу своего дела Анне Игоревне! Нашла я клинику Лазер Эстетик через интернет, благодаря многочисленным, положительным отзывам ваших пациентов https://www.egoestetica-med.ru/podgotovka-k-procedure-0
Анна Игоревна помогла мне с давней проблемой, пигментацией в области щек, буквально за 4 процедуры мое лицо преобразилось https://www.egoestetica-med.ru/zhivot
Я очень счастлива, теперь не приходиться скрывать пигментацию под большим слоем тонального крема, Она просто исчезла))) Чему я безумно рада!!! В дополнение ко всему приятные скидки+ скидочную карту клиента получила https://www.egoestetica-med.ru/chto-budet-posle-procedury
Владельцы кошек наверняка хотя бы раз сталкивались с феноменом под названием https://www.egoestetica-med.ru/apparatnyy-massazh-rsl-skulpturirovanie-tela
Питомец может проявить равнодушие к самому красивому кошачьему домику, но мимо картонной коробки он не пройдет в 99% случаев https://www.egoestetica-med.ru/lico-polnostyu
Но в чем загадка этого явления? Самые правдоподобные теории — в этом видео https://www.egoestetica-med.ru/sheya
Специалист медленно направляет излучатель лазера на кожу с волосами, при этом возникают лазерные импульсы, оказывающие обезболивающее и противовоспалительное действие на кожные покровы https://www.egoestetica-med.ru/podgotovka-k-procedure-0
Пациент во время процедуры лежит на специальной кушетке или сидит в кресле https://www.egoestetica-med.ru/chto-budet-posle-procedury
Возможность проведения удаления растительности без прикладывания насадки аппарата к коже определяется длиной волны, которую производит прибор https://www.egoestetica-med.ru/o-lazernoy-epilyacii
Так, бесконтактных рубиновых аппаратов не существует https://www.egoestetica-med.ru/kompleks-all-inclucive
Под действием луча волоски, как правило, полностью выгорают https://www.egoestetica-med.ru/podgotovka-k-procedure-0
В некоторых случаях (например, при повышенной жесткости) остаются пеньки, которые самостоятельно отпадут в течение 7-10 дней https://www.egoestetica-med.ru/ruchnoy-massazh
При необходимости их можно сбрить https://www.egoestetica-med.ru/o-nas
Выщипывать волосы, использовать воск и шугаринг между сеансами не стоит – повреждение волосяных луковиц спровоцирует повышенную активность спящих фолликулов, и эффективность процедуры снизится
Накануне перед процедурой необходимо сбрить волосяной покров с выбранного участка https://www.egoestetica-med.ru/oborudovanie
Это поможет специалисту оценить состояние волосяных фолликул на момент проведения эпиляции и предотвратить в последствие возможное раздражение кожи https://www.egoestetica-med.ru/ruchnoy-massazh
Мы понимаем, какую роль играет качество запчастей в надёжности и безопасности, а так же сроке службы автотранспорта, поэтому наша компания предлагает только качественную продукцию, которая соответствует заводским стандартам http://kraz-maz.ru/products/reduktor-zadnego-mosta-kraz-65055-2402010-48-zubev
Кронштейн крепления крыла н/о (544004-8511122) Запчасти МАЗ от БИТ комплект: Кронштейн крепления крыла н/о (544004-8511122)
Поэтому если вы ищите надежного поставщика запчастей для автомобилей МАЗ – выбирайте нашу компанию http://kraz-maz.ru/products/korobka-razdatochnaya-v-sbore-258-1800020
Мы являемся официальными дилерами Минского автомобильного завода http://kraz-maz.ru/products/stupitsa-kraz-zadnego-diskovogo-kolesa-256b1-3104015-korotkaya-shpilka
Предоставляем клиентам гарантию безупречного качества, рассрочку платежа и удобные условия оплаты http://kraz-maz.ru/products/privod-perednego-mosta-razdatochnoi-korobki-kraz-255
Станьте и Вы нашим клиентом!
Стремянка Маз-5336,5516,5551,6303,64221 Рессоры Передней L=295мм М24х2мм В Сборе Кммз http://kraz-maz.ru/products/korobka-razdatochnaya-256-1800020-s-korobkoi-otbora-moschnosti-v-sbore
Кран МАЗ отопителя обратный в сборе (ОАО МАЗ) 643008-8101400 http://kraz-maz.ru/products/reduktor-srednego-mosta-kraz-260-2502010
Покупала у вас в новую квартиру детскую Стилус и шкаф-купе https://fabrica33.ru/korpusnaya-mebel/stoly-i-stulya/?limit=72
Сказали, что придется подождать примерно 21 день, но к моему удивлению, изготовили раньше и привезли в этот же день https://fabrica33.ru/myagkaya-mebel/divany-vykatnye/?limit=72&sort=pd.name&order=DESC&page=1
Собрали очень быстро, теперь довольствуемся!) Успехов вам!
Технокухни https://fabrica33.ru/myagkaya-mebel/divany-na-metallokarkase/?limit=48&sort=pd.name&order=DESC&page=1
+ Большой выбор покрытий https://fabrica33.ru/korpusnaya-mebel/stenki/stenki-so-shkafom/?limit=192&sort=p.price&order=DESC&page=1
МДФ можно покрыть практически любым цветом и добиться различных рельефов https://fabrica33.ru/stenka-orhideya.html
Большое спасибо за Вашу работу! Все очень понравилось https://fabrica33.ru/divan-volna.html
Отдельное спасибо Вашему дизайнеру Стрельцовой Юлии за ее работу, профессионализм https://fabrica33.ru/modulnaya-sistema-taisiya_-sekciya-dlya-tv_.html
Большое спасибо!
Матовые, глянцевые и древесные фасады на любой вкус https://fabrica33.ru/myagkaya-mebel/divany-na-metallokarkase/?limit=96&sort=pd.name&order=DESC&page=1
РАЗМЕР: встроенный шкаф-купе 2540*1900*650 https://fabrica33.ru/kreslo-otdyha-blyuz-7.html
Мебель из массива дерева https://goldsosna.ru/vitrina-bristol-gm-6401/
Хиты продаж https://goldsosna.ru/antresolnaya-sektsiya-2-kh-dvernaya/
Наша мастерская предлагает элитную деревянную мебель в Москве для кухни, кабинета, гостиной, детской или спальной комнаты, прихожей или личной библиотеки https://goldsosna.ru/category/kollektsii/volshebnaya-sosna/stoly-zhurnalnyye-pin-magic/
Натуральное дерево, итальянская фурнитура и лучшие материалы для наружной отделки позволяют добиться баланса между эстетичностью, практичностью, экологичностью и долговечностью https://goldsosna.ru/shkaf-kupe-dlya-odezhdy-sonata-mm-283-01-02r/
Индивидуальный подход https://goldsosna.ru/takhta-myagkaya-ayno-5/
? Дренажный шланг – 5 м;
Устраним любые неполадки по гарантии до 4-х лет https://klimat-24.ru/poleznoe/obsluzhivanie-kondiczionerov-v-moskve-luchshie-czenyi-i-servis-ot-klimat-24/
Хочу выразить ОГРОМНУЮ благодарность компании https://klimat-24.ru/poleznoe/uslugi-po-obsluzhivaniju-kondicionerov-po-okpd-2-vazhnye-momenty-i-trebovanija/
Делали монтаж в 2 этапа, грамотный менеджер нам все грамотно просчитал по монтажу, направил к нам отличную бригаду, которая проштробила стену и протянула трассу быстро и качественно, после себя ребята все убрали, это важно! По выбору кондиционера нам помог Юрий, все подробно рассказал, учел все наши пожелания, кондицинер Dantex 09ssi2 подошел просто идеально, отлично работает и главное тихо! Спасибо Вам огромное, буду рекомендовать вас всем своим знакомым и родным!
Доставим и установим кондиционер за 1 день в любой день недели https://klimat-24.ru/poleznoe/nedorogoe-tehnicheskoe-obsluzhivanie-kondicionerov/
Наши специалисты не только установят кондиционер, но и продемонстрируют Вам его возможности и помогут разобраться в управлении https://klimat-24.ru/poleznoe/ustanovka-kondicionera-na-dve-komnaty/
Наши преимущества https://klimat-24.ru/besplatnaja-diagnostika/slabo-ohlazhdaet-2/
Бесплатно установим супертихий и доступный инвертор в комнату до 25 кв https://klimat-24.ru/poleznoe/poleznoe-aktualnost-chistki-domashnego-kondiczionera/
м https://klimat-24.ru/poleznoe/chto-vkljuchaet-v-sebja-chistka-vnutrennego-bloka-kondicionera/
ABION ASH-C097DC/ARH-C097DC https://klimat-24.ru/poleznoe/kak-uznat-skolko-stoit-chistka-kondicionera-v-kvartire/
В каталоге можно посмотреть не только фото и стоимость продажи, но и сроки реализации каждого этапа стройки https://domodel.org/karkasnye-doma/8×10/odnoetazhnye/
2008-2023 СтройИндустрия https://domodel.org/karkasnye-doma/vitold-6×7-k/
Гарантией качества мы привыкли строить дома, которые легко выдержат южную жару и северные морозы, не боятся ветров и природных катаклизмов https://domodel.org/karkasnye-doma/polutoroetazhnye/
Монтаж основания https://domodel.org/karkasnye-doma/s-mansardoy/zhdan-6×8-01/
Возможна сортировка по наличию таких элементов как эркер, веранда, балкон, мансарда, терраса и гараж https://domodel.org/karkasnye-doma/shchitovye/odnoetazhnie/
На сайте можно найти карту строящихся объектов, которые находятся на этапе сборки https://domodel.org/karkasnye-doma/nikola-6×9-k/
Компактный толщиномер TT 210 со встроенным датчиком для измерения толщины покрытий как на магнитном, так и на немагнитном основании в диапазоне от 0 до 1250 мкм https://www.ndt-club.com/product-657-ymbt-1-ystroistvo-mehanicheskoe-dlya-yzk-byrilnih-tryb.htm
Внимание! В условиях напряженной международной обстановки и текущей экономической ситуации, возникла значительная неопределенность с курсами ЦБ и поставками комплектующих, что влияет на сроки производства, текущие цены и саму возможность поставки некоторых видов продукции https://www.ndt-club.com/product-552-metolab-601-stacionarnii-tverdomer-po-brinellu.htm
Работает по: черным металламРабочая температура: -25°С до +50°СМакс https://www.ndt-club.com/product-206-tvm-1500-tverdomer-metallov.htm
измерение: 3000 микронШаг измерений: 1 микронПодсветка экрана: ЕстьДоп https://www.ndt-club.com/product-656-maska-zd-ystroistvo-mehanicheskoe-dlya-yzk-zakladnih-detalei.htm
функции: фонарикПроизводство: ПольшаГарантия: 1 год
Группа компаний (ГК) (Теплоприборы, Промприбор, Теплоконтроль и др https://www.ndt-club.com/product-184-elcometer-266-elektroiskrovoi-defektoskop.htm
) — это приборы и автоматика для измерения, контроля и регулирования параметров технологических процессов (расходометрия, теплоконтроль, теплоучёт, контроль давления, уровня, свойств и концентрации и пр https://www.ndt-club.com/product-510-volna-yf365-portativnii-yltrafioletovii-fonar-s-fokysiryushei-linzoi.htm
) https://www.ndt-club.com/product-250-molotok-shmitda-225a-sklerometr-dlya-betona.htm
1 https://krankor.ru/
11 https://krankor.ru/catalog/
2021 – 3 https://krankor.ru/privacy-policy/
11 https://krankor.ru/catalog/telfery-tali-i-komplektuyushchie/
2021 – в штатном режиме https://krankor.ru/privacy-policy/
Оставьте заявку, мы свяжемся с Вами в рабочее время, чтобы ответить на все интересующие вопросы https://krankor.ru/catalog/kontaktory/kontaktory-2/
ЧелРТИ https://krankor.ru/catalog/telfery-tali-i-komplektuyushchie/
9 мая 2022 года https://krankor.ru/catalog/takelazhnaya-osnastka/
Демонтаж водосточной трубы https://alpinist-servis.ru/mojka-fasada/
Промышленный альпинизм в Москве , Заказать услуги альпинистов , ООО , Промышленный альпинизм https://alpinist-servis.ru/category/montazh-vodostochnyx-trub/
Для вашего удобства на сервисе доступны все контакты мастера https://alpinist-servis.ru/gidrofobizaciya-fasada-zdaniya-chto-eto-takoe/
Но мы рекомендуем вести переписку в чате сервиса, т https://alpinist-servis.ru/montag-obogr-kabela-moskva-isakovskogo39k1/
к https://alpinist-servis.ru/nashi-uslugi/sbivanie-sosulek/
только в этом случае, мы можем вам гарантировать помощь с нашей стороны в случае конфликтной ситуации https://alpinist-servis.ru/chistka-krovli-ot-snega/
Наши специалисты используют богатый опыт производства работ, отточенные навыки в сфере промышленного альпинизма, современный инструмент и экипировку для решения сложных и нестандартных задач https://alpinist-servis.ru/remont-fasada/
Сложные работы на высоте https://alpinist-servis.ru/myte-okon-alpinistami-cena-v-moskve/
монтированных водосточных труб https://alpinist-servis.ru/nashi-uslugi/remont-alyukobonda-2/
Диван с подсветкой https://by-home.ru/kartiny-postery/23450-dekor-veera.html
Механизм: еврокнижка https://by-home.ru/smartblog/интерьерную.html
Размер спального места: 150/160х195 https://by-home.ru/stulya/25401-stul-verdi-seryj.html
Обивка: рогожка/экокожа https://by-home.ru/derevyannye-krovati/13218-krovat-dvukhmestnaya-st9341160l-160200.html
Ящик для хранения белья https://by-home.ru/tumby-pod-tv/25041-tv-tumba-gold-cvetusshij-sad.html
Наполнитель: ППУ (износостойкий, долговечный поролон) https://by-home.ru/lyustry/10693-podvesnoj-svetilnik-dome-l-copper.html
Материалы обивки диванов: кожа, экокожа, ткань https://by-home.ru/tualetnye-stoliki/6775-tualetnyj-stolik-elegant.html
Диваны https://by-home.ru/vitriny-i-bufety/24742-bufet-cilan-orekh-vintazh.html
прямые https://by-home.ru/stulya/10592-stul-miss-koshka-versiya-shokolad.html
Такая мебель вместит два-четыре человека https://by-home.ru/stulya/25753-stul-rajskij-sad.html
Прямой диван универсален и привлекателен, отлично подойдет к любому интерьеру;
Велюр – это приятная на ощупь и устойчивая к загрязнениям ткань https://by-home.ru/zhurnalnye-stoly/19947-stol-zhurnalnyj-halmar-manta-belyj.html
Отзывы показывают, что она может долгое время сохранять первоначальный цвет https://by-home.ru/pristavnye-stoliki/22044-stol-zhurnalnyj-halmar-patrizia-chernyj-mramorbelyj.html
Рогожка – фактурная ткань, имеющая высокую степень устойчивости к механическим повреждениям https://by-home.ru/pismennye-stoly/16506-cg-024-pismennyj-stol.html
Кожа – изящный материал люксовой категории, который стоит довольно дорого https://by-home.ru/tumby-pod-tv/12034-tv-tumba-cilan-180-korichnevaya.html
Высокая цена компенсируется чрезвычайно длительным сроком службы https://by-home.ru/stulya/25287-stul-easy-tyomno-biryuzovyj-s-nozhkami-pod-derevo.html
Шенилл – прочный и очень плотный материал, способный выдерживать серьезную нагрузку https://by-home.ru/vitriny-i-bufety/11832-bufet-uglovoj-cilan-korichnevyj.html
Он не будет деформироваться и долго сохранит свою красоту https://by-home.ru/58-interernye-kresla?p=2
Жаккард – отличный материал, украшенный оригинальными узорами, с которым даже самый простой по конструкции диванчик приобретёт роскошный вид https://by-home.ru/lyustry/18164-2630-8u-potolochnaya-lyustra-pax.html
Гобелен – это практичная простота и долговечность https://by-home.ru/stulya/17866-stul-kukhonnyj-halmar-verdi-seryj-belyj.html
Есть смысл рассматривать этот тип ткани, если диван будет стоять возле окна, так как гобелен не выцветает на солнце https://by-home.ru/chasy/10382-chasy-nomon-puntero-n-walnut-khromderevo-orekh-d74-sm.html
Ответ: Сам лазер и его излучение никак не влияет на развитие ребенка, а соответственно, лазерная эпиляция не причинит никакого вреда https://www.egoestetica-med.ru/spina-polnostyu
Но! После проведения эпиляции, может возникнуть устойчивая пигментация кожи https://www.egoestetica-med.ru/kompleks-vsyo-telo
И сама эпиляция может быть очень болезненной, ведь у беременных повышен болевой порог https://www.egoestetica-med.ru/oborudovanie
Поэтому, мы настоятельно тебе не рекомендуем лазерную эпиляцию, если ты ждешь ребенка, а также если кормишь малыша грудью https://www.egoestetica-med.ru/apparatnyy-massazh-lpg
Многофункциональная защитная система увеличивает безопасность обработки https://www.egoestetica-med.ru/kak-vozdeystvuet-lazer
Этот вид лазера для удаления волос работает с чувствительными областями на теле (не рекомендуется применять для очистки лица) https://www.egoestetica-med.ru/apparatnyy-massazh-lpg
Световой луч воздействует на группы волосков
Чтобы на волоски можно было воздействовать лазером, их длина должна составлять от 2 до 5 мм, в зависимости от типа лазера https://www.egoestetica-med.ru/smas-lifting-ultraformer
Перед процедурой нельзя загорать ни на солнце, ни в солярии, около 2-3 недель https://www.egoestetica-med.ru/smas-lifting-ultraformer
Эффективность лазерной эпиляции зависит и от разновидности оборудования, на котором производится процесс https://www.egoestetica-med.ru/kompleks-layt
Чаще всего в различных салонах можно встретить александритовый лазер https://www.egoestetica-med.ru/yagodicy
Сегодня он прочно занимает первое место по мнению специалистов и клиенток салонов https://www.egoestetica-med.ru/chto-budet-posle-procedury
Приборы для современной лазерной эпиляции представлены в большом разнообразии https://www.egoestetica-med.ru/spina-polnostyu
Отличаются они по качеству, цене, наличии охлаждения и отсутствия, интенсивностью воздействия и встроенными программами https://www.egoestetica-med.ru/samoe-sovremennoe-oborudovanie
В быту зарекомендовали себя портативные лазерные устройства от производителя RIO https://www.egoestetica-med.ru/spina-polnostyu
Страна-производитель таких машинок – Великобритания https://www.egoestetica-med.ru/kompleks-vsyo-telo
Аппаратура весит мало, что облегчает применение https://www.egoestetica-med.ru/kak-vozdeystvuet-lazer
Таблица сравнения основных свойств различных эпиляторов:
Коррекция формы бровей с помощью лазера прекрасно заменит процедуру выщипывания, и не повредит кожный покров https://www.egoestetica-med.ru/na-samom-sovremennom-oborudovanii-0
Один такой сеанс обойдется вам в 750 850 руб https://www.egoestetica-med.ru/kontakty
от 1 руб http://kraz-maz.ru/products/differentsial-mezhkolesnyi-v-sbore-65055-2403010-10-z-48
– копии заказ-наряда и акта выполненных работ, подтверждающих установку запасной части на автомобиль в сертифицированном сервисном центре ОАО ;
Концерн цитрон (TSITRON) – производитель товаров под торговыми марками TSN, RAIDER, представляет собой объединение предприятий занимающихся производством автомобильных запчастей для транспортной техники всех типов: легковые и грузовые автомобили, автобусы, сельскохозяйс http://kraz-maz.ru/products/radiator-okhlazhdeniya-dvigatelya-6437-1301010-01
от 6 руб http://kraz-maz.ru/products/bak-toplivnyi-kraz-pravyi-6443-1101008-kvadratnyi-250l
Ограничитель МАЗ двери ОАО МАЗ 5336-6106082 http://kraz-maz.ru/products/korobka-razdatochnaya-kraz-257-1800020-zavod
1 http://kraz-maz.ru/products/reduktor-perednego-mosta-kraz-214-2302010
7 http://kraz-maz.ru/products/korobka-razdatochnaya-kraz-260s-1800010
5 http://kraz-maz.ru/categories/vykhlopnaya-sistema
Запасные части, поврежденные в результате ударов или других механических, термических и химических воздействий;
СТАНДАРТНЫЙ СРОК ПО ДОГОВОРУ 1 МЕСЯЦ https://fabrica33.ru/korpusnaya-mebel/stoly-i-stulya/stoly/?limit=144&sort=p.price&order=DESC&page=1
ОДНАКО 98% КЛИЕНТОВ ПОЛУЧАЮТ СВОЮ МЕБЕЛЬ ГОРАЗДО БЫСТРЕЕ https://fabrica33.ru/korpusnaya-mebel/shkafy/shkafy-kupe/?limit=120
За счет собственного производства, в 2022 году 98% наших клиентов получили свою мебель раньше срока в договоре https://fabrica33.ru/korpusnaya-mebel/komody_-tumby-tv/?limit=96
Акция на детские https://fabrica33.ru/myagkaya-mebel/divany-evroknizhki/?limit=72&sort=pd.name&order=DESC&page=1
Очень качественно работают на этой фирме https://fabrica33.ru/puf.html
Особенно хочется отметить менеджера-дизайнера Черкашину Валентину – отзывчивый, грамотный специалист, мастер своего дела https://fabrica33.ru/komod-oskar.html
Рекомендую всем клиентам https://fabrica33.ru/detskaya-stenka-luka.html
Мебель на заказ от компании – нестандартные модели для любых интерьеров https://fabrica33.ru/myagkaya-mebel/?limit=72&sort=p.price&order=DESC&page=2
По нашей статистике, за годы работы только у нескольких наших клиентов возникали гарантийные случаи по вышедшей из строя фурнитуре, которая была оперативно заменена на новую https://fabrica33.ru/korpusnaya-mebel/stenki/stenki-svetlye/?limit=120&sort=pd.name&order=DESC&page=1
Претензий к качеству фасадов и корпусов не поступало https://fabrica33.ru/myagkaya-mebel/uglovye-divany/?limit=72&sort=pd.name&order=DESC&page=1
? Навеска внутреннего блока на стену;
Кондиционеры с установкой Москва https://klimat-24.ru/brendy-zapravki/zapravka-kondicionerov-gree-v-moskve/
Шелест листьев – около 10 дБ https://klimat-24.ru/poleznoe/opasnost-obrazovaniya-pleseni-v-domashnix-kondiczionerax/
Уровень шума в тихой комнате – 20 дБ https://klimat-24.ru/brendy-profilaktiki/profilaktika-kondicionerov-ferrum-v-moskve/
В библиотеке – чуть ниже 40 дБ https://klimat-24.ru/besplatnaja-diagnostika/shumit-drenazhnaja-pompa/
Установка бытового кондиционера
Буду признателен за любые отзывы о нашей работе https://klimat-24.ru/poleznoe/kondicioner-ili-split-sistema-chto-vybrat/
Все обращения рассматриваю лично https://klimat-24.ru/poleznoe/ustanovili-kondicioner-iz-nego-duet-chto-delat/
Продажа и установка кондиционеров – это приоритетное направление нашей компании! В нашем интернет-магазине представлены самые надежные и востребованные кондиционеры https://klimat-24.ru/brendy-profilaktiki/profilaktika-kondicionerov-sharp-v-moskve/
Наша компания является официальным дилером климатического оборудования, соответственно вся продукция сертифицирована и имеет гарантию от 3 года до 5 лет https://klimat-24.ru/brendyi-chistki/chistka-kondicionerov-carrier-v-moskve/
Воспользовавшись нашими постоянными акциями, Вы можете купить кондиционер (сплит-система) недорого в Москве и Московской области https://klimat-24.ru/brendyi-obsluzhivaniya/obsluzhivanie-kondicionerov-dantherm/
Спальня Венеция 01 https://goldsosna.ru/shkaf-dlya-platya-i-belya-kameliya-gm-8081/
Авторская мебель из массива — в чем ее особенность?
Система скидок постоянным клиентам https://goldsosna.ru/komod-milena-roskholts/
Добротные столы из массива дерева, созданные по авторским проектам https://goldsosna.ru/komod-10-shale/
Выбирайте обеденные, журнальные и другие столы из натурального дерева, с гарантией производителя до 25 лет https://goldsosna.ru/shkaf-dvukhdvernyy-khanna-roskholts/
Вы уже сделали свой выбор? Вы можете оформить заказ прямо сейчас, просто добавив понравившийся вариант в корзину https://goldsosna.ru/komod-solea-43/
После отправки заказа, наши продавцы-консультанты свяжутся с вами для уточнения деталей доставки и оплаты https://goldsosna.ru/zerkalo-navesnoe-v-rame-rauna-200-belyy-vosk-ukv/
Наши коллекции деревянных спален, гостиных, прихожих и детских комнат производятся в Беларуси на ведущих фабриках ММЦ, Диприз, ОАО Могилевдрев, PIN MAGIK (Волшебная сосна), изготавливаются опытными мастерами с использованием только натурального дерева https://goldsosna.ru/tumba-pod-tv-v2-1700mm-vavilon-vmf-1776/
Мебель из сосны этих производителей известна не только в России , но и в Европе и отличается уникальным дизайном, экологической чистотой https://goldsosna.ru/tumba-verona-2-1-m-s-filenkoy/
Цена по акции 2 040 000 руб https://domodel.org/karkasnye-doma/benedikt-6×6-k/
Снаружи и изнутри они обшиваются плитами ОСП или вагонкой, которые придают строению жесткость https://domodel.org/karkasnye-doma/feliks-9-5×10-5-k-2/
Общая площадь 95 кв https://domodel.org/karkasnye-doma/s-verandoy/
В работы входит отопление, водоснабжение, электрика, канализация, вентиляция; наружная и внутренняя отделка в коттедже монтаж мембран для защита от пара и влаги, обшивка наружного фасада деревянным блок-хаусом или пластиковым сайдингом https://domodel.org/karkasnye-doma/odnoetazhnie/dlya-postoyannogo-prozhivaniya/
Богатырь ЛК https://domodel.org/karkasnye-doma/boris-8×8-5-k/
Каркасные дома под ключ это эффективное решение, которое предполагает полный перечень работ по возведению здания и ввода его в эксплуатацию https://domodel.org/karkasnye-doma/markel-6×9-k-s-utepleniem-50-mm/
Обновлено 10 марта 2017 https://www.ndt-club.com/product-281-opravka-s-sharikom-dlya-izmereniya-tvyordosti-po-metody-rokvella-216-12-7-mm.htm
https://www.ndt-club.com/product-479-indykcionnii-nagrevatel-easytherm-15-hq.htm
https://www.ndt-club.com/product-551-metolab-701-yniversalnii-stacionarnii-tverdomer.htm
оборудования для НК https://www.ndt-club.com/product-389-coatmaster-beskontaktnii-tolshinomer-mokrogo-pokritiya.htm
Поставляет широкий спектр оборудования для ультразвукового контроля (дефектоскопы, толщиномеры, СО-2, СО-3, СО-3Р), рентгенографии (пленка, знаки маркировочные https://www.ndt-club.com/product-723-a1212-master-defektoskop-yltrazvykovoi.htm
https://www.ndt-club.com/product-144-yltrazvykovie-pep-preobrazovateli-amkro.htm
https://www.ndt-club.com/product-38-vektor-50-novii-yniversalnii-vihretokovii-defektoskop.htm
Работает по: черным металламРабочая температура: -25°С до +50°СМакс https://www.ndt-club.com/product-4-a1207-tolshinomer-yltrazvykovoi.htm
измерение: 2000 микронШаг измерений: 1 микронПодсветка экрана: ЕстьДоп http://www.ndt-club.com/NDT_ACS_Catalog_RUS_2014_web_pages.pdf
функции: нетПроизводство: ТайваньГарантия: 1,5 года
Обновлено 8 фев 2017 https://www.ndt-club.com/product-73-vd-12nfp-defektoskop-vihretokovii.htm
https://www.ndt-club.com/product-592-a1020-mira-lite-nizkochastotnii-yltrazvykovoi-tomograf.htm
https://www.ndt-club.com/product-338-posipen-tolshinomer-pokritii-defelsko.htm
пользователя в узкие места и выполнение измерений на небольших изделиях https://www.ndt-club.com/product-604-dami-s09-mnogofynkcionalnii-defektoskop.htm
Версии толщиномера с внешним датчиком идеально подходят для выполнения измерений на подложке практически https://www.ndt-club.com/otzyvy.htm
https://www.ndt-club.com/product-216-trassovik-vik-komplekt-vizyalnogo-i-izmeritelnogo-kontrolya-vik.htm
https://www.ndt-club.com/product-323-nasadka-u-459-k-tverdomeram-serii-tkm-459.htm
Калибровочные образцы: для калибровки инструмента используется материал с известной толщиной или скоростью звука в нем https://www.ndt-club.com/product-396-neon-1-negatoskop.htm
Для калибровки инструмента требуется как минимум один образец https://www.ndt-club.com/product-29-ivn-3003-izmeritel-vlajnosti-nefteprodyktov.htm
Ультразвуковой толщиномер оборудован стальным образцом толщиной 4,0 мм https://www.ndt-club.com/product-67-tkm-459m-tverdomer-yltrazvykovoi.htm
Работает по: черным и цветным металламРабочая температура: -25°С до +50°СМакс https://www.ndt-club.com/product-648-yltrazvykovie-pep-preobrazovateli-lych.htm
измерение: 5000 микронШаг измерений: 1 микронПодсветка экрана: ЕстьДоп https://www.ndt-club.com/product-576-ponderys-magnitnii-tolshinomer-galvanicheskih-i-himicheskih-pokritii.htm
функции: фонарикПроизводство: ПольшаГарантия: 1 год
Специалисты нашей компании ответят на любые вопросы по услугам и расценкам клининга и помогут подобрать самый выгодный вариант https://alpinist-servis.ru/germetizaciya-mezhpanelnyx-shvov/
Цена на высотные работы в промышленном альпинизме https://alpinist-servis.ru/nashi-uslugi/
Теория Высоты https://alpinist-servis.ru/ceny/
направляем предложение, время исполнения услуг, согласование https://alpinist-servis.ru/germetizaciya-balkonov-i-lodzhij/
Весь штат – опытные высотники, имеющие соответствующее образование https://alpinist-servis.ru/mojka-fasada/
Компания имеет все необходимые разрешения и сертификаты на выполнение высотных работ https://alpinist-servis.ru/category/steklo/
Для получения шестого разряда , нужно иметь специальность сварщика с опытом работы не менее 2 лет и иметь опыт выполнения работ на малых высотах с референс листом https://alpinist-servis.ru/ceny/
Для людей, которые уже начали выбирать натуральные продукты питания , натуральные материалы в одежде, натуральную косметику и предметы ухода и конечно же натуральные материалы в интерьере https://goldsosna.ru/bortik-5-ari-provans/
Особая категория наших покупателей, это те, кто уже построил или строит свой дом на природе https://goldsosna.ru/pletenyy-obedennyy-stol-neapol/
Это может быть как дом для постоянного проживания, так и небольшая дача – не важно https://goldsosna.ru/stul-mk-2470/
Важно желание людей быть ближе к природе и наша мебель из натурального дерева идеально подходит для таких домов https://goldsosna.ru/biblioteka-94-otkrytaya-bib-0-94/
Когда приходит время выбора мебели для сна, у всех остается вопрос – что лучше подойдет для данной ситуации? На рынке мебели мы можем найти множество различных вариантов, таких как тахта, диван, кушетка и кровать https://goldsosna.ru/krovat-dvuspalnaya-silvery-rome-s516-s518-s-myagkim-izgolovem/
Все они предназначены для приятного и комфортного сна https://goldsosna.ru/krovat-sonka/
Мебель из массива дуба в Москве https://goldsosna.ru/category/mebel-iz-naturalnogo-dereva/stulya/
Мебель из массива дерева https://goldsosna.ru/klassik-starenie-shkaf-nastennyy-n-11-300/
Ремни – в данном разделе представлены ремни вентиляторные, ремни клиновые разных видов, ремни поликлиновые, ремни сельскохозяйственные (которые, в свою очередь, делятся на ремни вариаторные, ремни моногоручьевые, ремни плоские, ремни УА, ремни УБ, ремни УВ) https://krankor.ru/catalog/kontaktory/kontaktory-2/
© ООО предоставляют контент для Google Maps тм https://krankor.ru/catalog/telfery-tali-i-komplektuyushchie/
Асбестовую ткань (асботкань) применяют при производстве пожаростойкой одежды, различных покрытий, асботекстолитов, прорезиненных и термостойких изделий https://krankor.ru/catalog/telfery-tali-i-komplektuyushchie/
Она абсолютно нетоксична и безопасна для человека https://krankor.ru/
Купить РТИ в Челябинске по выгодной цене можно в компании https://krankor.ru/catalog/takelazhnaya-osnastka/
Покупатели знают нас как надежного поставщика изделий из резины в Челябинске https://krankor.ru/catalog/kontaktory/kontaktory-2/
Вся продукция изготавливается в строгом соответствии с требованиями ГОСТ и проходит тщательный контроль качества https://krankor.ru/catalog/kontaktory/kontaktory-2/
Кабель питания до ближайшей розетки, до 3 метров https://klimat-24.ru/montazh-kanalnykh-konditsionerov/
В июле на установку оборудования, приобретенного у нас, предоставляется скидка до 100% https://klimat-24.ru/sale/napolno-potolochnyie-kondiczioneryi/
В чем заключаются плюсы работы с нашей компанией https://klimat-24.ru/poleznoe/zapravka-mobilnogo-kondiczionera-vazhnost-svoevremennogo-provedeniya/
Установку лучше всего разделить на два этапа — до ремонта выполняются работы по прокладке коммуникаций и установке внешнего блока, после ремонта устанавливается внутренний блок https://klimat-24.ru/poleznoe/master-po-remontu-kondiczionerov-osnovnyie-trebovaniya-i-faktoryi-uspeshnoj-rabotyi/
– Мощность в режиме охлаждения – 2,1 (кВт) – Мощность в режиме обогрева – 2,1 (кВт) – Тип двигателя кондиционера – inverter – Класс энергоэффективности
В нашем ассортименте представлен широкий выбор кондиционеров, которые отвечают самым высоким стандартам качества, безопасности и эффективности https://klimat-24.ru/zapravka-mobilnykh-konditsionerov/
Чтобы сделать правильный выбор, прежде чем заказать кондиционер (Москва), мы рекомендуем вам воспользоваться помощью наших специалистов, которые прекрасно разбираются во всех аспектах работы климатического оборудования разных производителя и смогут оказать вам неоценимую услугу в выборе кондиционера, который будет полностью удовлетворять заданным параметрам https://klimat-24.ru/brendy-montazha/montazh-kondicionerov-midea-v-moskve/
Новинка! Тумба прикроватная 1S Tiffany https://by-home.ru/stulya/21691-stul-indokitajskij-zelyonyj-pavlin-versiya-2.html
Расцветки представлены благородными оттенками, как в сдержанных тонах, так и в ярких https://by-home.ru/banketki-i-pufy/27605-skamya-s-podlokotnikami-loft.html
Купить диван в Москве можно в пару кликов, выбрав самостоятельно или воспользовавшись помощью менеджера для подбора и оформления заказа https://by-home.ru/barnye-i-polubarnye-stulya/23027-barnyj-stul-indokitajskij-zelyonyj-pavlin.html
Производитель: Смарт Обивка: рогожка Материал каркаса: металлокаркас Наполнение спального места: ППУ Жесткость: средняя Механизм трансформации: аккордеон Длина спального места: 160 Ширина спального места: 202 https://by-home.ru/stulya/23131-komplekt-iz-2-kh-stulev-cleo-sine-seryj.html
Компания Асти изготавливает мягкую мебель, для жилых и офисных помещений с 2010 года https://by-home.ru/nastennye-zerkala/12274-venecianskoe-zerkalo-nikole-nikol-80110-sm.html
Доверие клиентов оправдано соответствием высочайшим стандартам качества https://by-home.ru/servizy-i-nabory/26719-chajnyj-serviz-passifolia.html
В каталоге диваны прямые, угловые, модульные, диван-кровати https://by-home.ru/stulya/19536-stul-kukhonnyj-halmar-k396-chernyj-orekh.html
Возможно выполнение индивидуальных заказов с разработкой дизайн-проектов https://by-home.ru/sunduki/8967-sunduk-bf-60855.html
На 4 Ножки https://by-home.ru/komody/7172-komod-aquarelle-elc-13.html
ру в этом разделе находятся проверенные фабрики по производству диванов в Московской области https://by-home.ru/smartblog/мебельиздерева.html
от 2 руб http://kraz-maz.ru/products/podogrevatel-predpuskovoi-v-sbore-kraz-pzhd44-1015010-lbu-komplekt
МАЗ-651705 651705-247, 651705-247-600, 651705-247-700, 651705-257, 651705-257-600, 651705-257-700, 651705-281, 651705-281-600, 651705-281-700, 651705-282, 651705-283, З-651705-283-600, 651705-283-700, 651705-284 http://kraz-maz.ru/products/karter-veduschei-shesterni-260-2302049
Виктория http://kraz-maz.ru/products/reduktor-zadnego-mosta-5337-2402010-12kh25-bez-blokirovki-kruglyi-karter
Патрубок водяного насоса (Al) (6422-1303240-10) Запчасти МАЗ от БИТ комплект: Патрубок водяного насоса (Al) (6422-1303240-10)
Производитель: NO NAME http://kraz-maz.ru/products/korobka-razdatochnaya-kraz-6322-1800010
от 4 руб http://kraz-maz.ru/products/karter-razdatochnoi-korobki-s-kryshkoi-v-sbore-260-1802010-pod-datchik-starogo-obraztsa
Волосы удаляются вдоль паховой складки, до 2 см по верхней линии бикини, 2 см по внутренней части бедер https://www.egoestetica-med.ru/ruki-polnostyu
Благодаря минимальной области обработки и низкой цене лазерная эпиляция бикини пользуется постоянным спросом https://www.egoestetica-med.ru/nogi-polnostyu
Эпиляция лазером – самый эффективный и безопасный способ удаления волос https://www.egoestetica-med.ru/services
Однако на практике, появляется масса нюансов, о которых нужно знать, чтобы процедура не разочаровала https://www.egoestetica-med.ru/grud
Если вы имеете склонность к появлению келоидных рубцов, то такая процедура будет для вас также противопоказана https://www.egoestetica-med.ru/nogi-polnostyu
Нельзя использовать лазер в период беременности или кормления грудью https://www.egoestetica-med.ru/nogi-polnostyu
Любые инфекционные или воспалительные заболевания органов малого таза являются противопоказанием https://www.egoestetica-med.ru/spina-polnostyu
Также нельзя проводить эпиляцию груди или зоны подмышек тем женщинам, которые имеют проблемы со здоровьем молочных желез https://www.egoestetica-med.ru/yagodicy
Здесь вы можете изучить цены на лазерную эпиляцию глубокого бикини в Москве и Санкт-Петербурге и записаться на процедуру, сделав звонок по указанным на сайте телефонам или используя специальную онлайн-форму https://www.egoestetica-med.ru/chto-budet-posle-procedury
За сколько процедур волосы исчезнут навсегда? Всё индивидуально, кому-то может понадобиться всего 6 сеансов, а кому-то 12 https://www.egoestetica-med.ru/lico-polnostyu
Нельзя угадать заранее столько хватит для полного разрушения https://www.egoestetica-med.ru/kompleks-vsyo-telo
Но стоит помнить, что индивидуальность и наследственность может возобновить рост спустя какое-то время https://www.egoestetica-med.ru/grud
Обладает автоматизированной системой, ориентированной на поиск волосяных фолликулов https://www.egoestetica-med.ru/offers
Это обеспечивает результативное их удаление https://www.egoestetica-med.ru/kompleks-layt-plyus
Воздействует на группы волос, что ускоряет обработку
Кухни и шкафы от 14 дней https://fabrica33.ru/myagkaya-mebel/?limit=72&sort=p.price&order=DESC&page=1
Мы ценим наших заказчиков, стараемся к каждому найти особенный подход, продумываем и делаем мебель как для себя, быстро исправляем свои ошибки, если они возникают https://fabrica33.ru/korpusnaya-mebel/stenki/stenki-so-shkafom/?limit=96
И искренне радуемся, когда клиент находит время, чтобы поделиться отзывом о нашей работе https://fabrica33.ru/stenka-kosta.html
ФУРНИТУРА https://fabrica33.ru/detskaya-stenka-luka.html
При соблюдении условий эксплуатации мебель прослужит вам блоее полувека https://fabrica33.ru/korpusnaya-mebel/shkafy/?limit=168&sort=p.price&order=DESC&page=1
Мебель по заказу https://fabrica33.ru/korpusnaya-mebel/detskaya-mebel/?limit=144&sort=p.price&order=DESC&page=1
Свяжитесь с нами, мы ответим на все вопросы и подберем подходящий вариант работы https://fabrica33.ru/evrosofa-kapri.html
Такой подход гарантирует, что дом будет крепким, надежным и прослужит многие годы https://domodel.org/karkasnye-doma/sven-6×8-k-vnutrennyaya-otdelka/
Экономия на внутренней и внешней отделке https://domodel.org/karkasnye-doma/s-mansardoy/dan-6×7-01/
Вся продукция приобретается напрямую у производителей, заводы дают собственную гарантию https://domodel.org/karkasnye-doma/7×7/odnoetazhnie/
Сразу после установки каркаса осуществляется отделка, что экономит много времени https://domodel.org/karkasnye-doma/7-5×8/
Готовый дом под ключ подразумевает наличие пластиковых окон, качественных дверных проёмов https://domodel.org/karkasnye-doma/s-mansardoy/zakhar-6×8/
Плюсы каркасников доступность, возможность использовать под застройку участки с любым ландшафтом, типом грунта https://domodel.org/karkasnye-doma/6×9/dvukhetazhnye/
Брендовая продукция https://elit-podarok.ru/religioznye/pravoslavnye/pravoslavnye-kartiny/kartina-svyatoy-sergiy-radonezhskiy-30kh40sm.html
В каталоге компании Вы найдете только оригинальную фирменную продукцию https://elit-podarok.ru/dekor-dlya-doma/interernye-chasy/chasy-shturval-rul/chasy-nastennyy-v-vide-rulya-chst-s16.html
Все сувениры подлинные и выполнены по высочайшим стандартам качества брендовых производителей https://elit-podarok.ru/religioznye/pravoslavnye/oberegi/obereg-s-emalyu-v-bagetnoy-ramke-molitva.html
Собственный шоу-рум https://elit-podarok.ru/nozhi/podarochnye/nozh-vepr-2_1.html
Прежде чем купить элитный сувенир для ВИП-персоны, вы можете лично убедиться в его качестве, посетив наш зал с образцами продукции в Москве https://elit-podarok.ru/elitnaya-posuda/posuda-dlya-napitkov/fuzhery/nabor-podarochnyy-arfistka.html
Консультанты шоу-рума помогут вам с выбором, расскажут о продукции, ответят на вопросы о заинтересовавшем ВИП-подарке https://elit-podarok.ru/dekor-dlya-doma/interernye-chasy/nastolnye-chasy/page-11/
Брендирование сувениров https://elit-podarok.ru/dekor-dlya-doma/interernye-chasy/nastennye-chasy/nastennye-chasy-shchit-i-mech-kamen-zmeevik.html
Получить эксклюзивный подарок со специальной надписью или логотипом вдвойне приятно https://elit-podarok.ru/elitnaya-posuda/dlya-chaya/chaynye-nabory/chaynyy-nabor-s-chashkoy-i-lozhkoy-variant-2.html
У нас имеется самое современное оборудование для нанесения изображений и текста на сувениры https://elit-podarok.ru/dekor-dlya-doma/meteostantsii/meteostantsiya-nastennaya-chasy-barometr-termometr-m-04.html
Мы поможем вам сделать премиум-подарок действительно памятным https://elit-podarok.ru/elitnaya-posuda/dlya-kofe/kofeynye-pary/kofeynaya-para-vesenniy-les.html
Ширина клинка: 30 мм https://elit-podarok.ru/dekor-dlya-doma/nastolnye-nabory-iz-kamnya/nastolnyy-nabor-zmeevik_6.html
Хотите выбрать подарки дорого или сэкономить? Магазин подарков на День Рождения и любые другие праздники к вашим услугам!
Материалы: морёный дуб, лак, темперная краска https://elit-podarok.ru/dekor-dlya-doma/shkatulki/shkatulka-kupyura-lemezit-190kh95kh75-mm.html
Среднюю стоимость юридических услуг определить сложно https://юр-островок.рф/nabchelni/bfl-urist
У топовых компаний стоимость работы часа специалиста может в десятки раз превышать стоимость работы юриста в компании среднего уровня https://юр-островок.рф/ekb/zpp-urist
При этом качество услуг может быть вполне сопоставимым» https://юр-островок.рф/
— люди пожилого возраста и инвалиды, проживающие в организациях стационарного социального обслуживания;
Первичные встречи, как правило, бесплатны https://юр-островок.рф/nabchelni/nasl-urist
Ни один уважаемый юрист не станет брать деньги за то, что он встретился с клиентом для обсуждения возможности сотрудничества https://юр-островок.рф/spb/zem-urist
Виды бесплатной правовой поддержки, а также тех, кто может ее получать, определяет федеральный закон № 324-ФЗ https://юр-островок.рф/nabchelni/bfl-urist
Всего в нем приведено 11 категорий граждан https://юр-островок.рф/yar/zkh-urist
Как правило, это те, кто имеет права и на иные виды социальной поддержки от государства: люди, оказавшиеся в уязвимом, незащищенном положении, в частности малоимущие, в семьях которых средний доход на каждого человека ниже величины прожиточного минимума https://юр-островок.рф/smr/nasl-urist
В перечень получателей бесплатной правовой поддержки входят инвалиды I и II группы, дети-инвалиды, дети-сироты и дети, оставшиеся без попечения родителей (а также их законные представители), лица, желающие принять на воспитание в свою семью ребенка, усыновители https://юр-островок.рф/smr/tk-urist
Популярные вопросы и ответы https://юр-островок.рф/yar/lawyer-urist
Юридические услуги • Юридическая консультация •
Мини-пекарня – это не только очень прибыльный, но также интересный, а главное – вкусный бизнес https://www.kondhp.ru/preorder/13630
Оформить такое производство можно разными способами, при этом задействовав даже небольшое помещение и минимум оборудования https://www.kondhp.ru/preorder/13048
Однако, необходимо понимать, что обязательно потребуется в мини-пекарне, какая площадь пространства будет для неё необходима, а также в какую сумму обойдется приобретение оборудования https://www.kondhp.ru/products/tonnelnaya-pech-konditerskaya-shirinoi-330-650-950-mm-s-lentochnym-setchatym-tsepnym-podom-dlya-protivnei
Продам печи 3х сенкционые (2шт) загрузкой на 40кг цена 30 000р, стол разделачный нержавейка 2000р, тестомес на 140л 25 000р, ПКЭ-9 шкаф растоечный 2х секционый 60 000р, ПКЭ-9 шкаф роторный загрузкой 1 https://www.kondhp.ru/products/testodeliteli-vakuumno-porshnevye-ktm-turtsiya
https://www.kondhp.ru/pages/video-raboty-mashiny-dlya-vydavlivaniya-plastilinovykh-zhgutov-4-ruchya-i-ikh-rezki-na-gotovye-izdeliya-zadannoi-dliny-2
https://www.kondhp.ru/products/nasos-rotornyi-lopastnoi-dlya-perekachki-zavarochnykh-mass-drozhzhei-zhidkikh-zakvasok
Предназначена для деления теста из ржаной, ржано-пшеничной и пшеничной обойной муки https://www.kondhp.ru/products/opryskivatel-khlebnykh-form-ruchnoi-okhf-r
Тесто из воронки шнеком нагнетается через угловой отвод в мерный карман делительного барабана, периодически вращающегося внутри головки https://www.kondhp.ru/pages/video-raboty-mekhanizma-reversivnogo-povorota-gilzy-mashiny-mochkoprotirochnoi-a2-khpkh
Внутри мерного кармана расположен двухсторонний поршень https://www.kondhp.ru/preorder/13429
При давлении теста поршень перемещается вниз до упорных шпилек, освобождая карман для заполнения тестом https://www.kondhp.ru/pages/oborudovanie-importnoe
По окончании заполнения кармана делительный барабан с помощью храпового механизма поворачивается на 180 https://www.kondhp.ru/preorder/13252
При этом тесто, находящееся в камере, оказывая давление на двухсторонний поршень, перемещает его вниз https://www.kondhp.ru/preorder/13646
При движении поршень выталкивает из кармана кусок теста, одновременно освобождая верхнюю часть мерного кармана для последующего заполнения https://www.kondhp.ru/pages/video-raboty-apparata-barabannogo-tipa-universalnogo-dlya-obzharki-semechek-orekhov-zeren-kofe-gazovyi-nagrev
Куски теста поступают на ленточный транспортер https://www.kondhp.ru/preorder/13683
Если Вас заинтересовало данное деловое предложение , Вы можете уточнить цену, а также условия и стоимость доставки,
Фасовочно-упаковочное оборудование с весовыми, объемными, шнековыми и мульголовочными дозаторами для сыпучих, пылящих, жидких, пастообразных, замороженных, штучных и других всевозможных продуктов https://www.kondhp.ru/categories/vzbivalnoe-i-smesitelnoe-oborudovanie
Обновлено 29 января 2021Шкаф жарочно-пекарский 3-х секционный, оцинкованная сталь 16,5кВт, 380В, площадь пода камеры 0,77м?, внутр https://www.kondhp.ru/pages/video-raboty-dozatora-i-nachinkonapolnitelya-konditerskikh-izdelii-iz-razlichnykh-vidov-testa-profitroli-eklery-8-mi-ryadnogo-avtomaticheskogo
Размеры камеры 1095х725х180, противни GN2/1(530х650мм, https://www.kondhp.ru/preorder/12797
https://www.kondhp.ru/preorder/13302
https://www.kondhp.ru/pages/pirozhkovyi-avtomat-dlya-formovaniya-i-vypechki-izdelii-s-nachinkoi-azhp-3m
Alpinizm https://alpinist-servis.ru/test2-2/
pro https://alpinist-servis.ru/nashi-uslugi/remont-kryshi-balkona/
Профессиональная ассоциация промышленных альпинистов Промтехальп https://alpinist-servis.ru/germetizaciya-balkonov-i-lodzhij/
+7 (499) 394-45-93 https://alpinist-servis.ru/myte-okon-alpinistami-cena-v-moskve/
Наша команда https://alpinist-servis.ru/mojka-fasada/
УСЛУГА ЦЕНА Мойка фасадов (сбить пыль керхером) от 15 руб https://alpinist-servis.ru/mojka-fasada/
/ м2 Мойка фасадов (стяжкой, средством от сажи и грязи) от 30 руб https://alpinist-servis.ru/nashi-uslugi/zamena-lamp-na-proizvodstve/
/ м2 Мойка витрин от 30 руб https://alpinist-servis.ru/nashi-uslugi/remont-kryshi-balkona/
/ м2 Мойка вывесок от 30 руб https://alpinist-servis.ru/mojka-fasada/
/ м2 Мытье витрин альпинистами от 30 руб https://alpinist-servis.ru/nashi-uslugi/
/ м2 Мытье окон альпинистами от 30 руб https://alpinist-servis.ru/nashi-uslugi/pokraska-fasadov/
/ м2 Удаление надписей на стенах от 80 руб https://alpinist-servis.ru/nashi-uslugi/ustanovka-vozduxovodov/
/ м2 Удаление высолов и солевого камня от 250 руб https://alpinist-servis.ru/nashi-uslugi/
/ м2 Гидрофобизация от 200 руб https://alpinist-servis.ru/uslugi-promyshlennyx-alpinistov-v-moskve/
/ м2 https://alpinist-servis.ru/podem-gruzov/
Весь штат – опытные высотники, имеющие соответствующее образование https://alpinist-servis.ru/podem-gruzov/
Компания имеет все необходимые разрешения и сертификаты на выполнение высотных работ https://alpinist-servis.ru/category/montazh-vodostochnyx-trub/
Предлагаю к Вашим услугам изготовление мебели из массива и лдсп https://fabrica33.ru/korpusnaya-mebel/shkafy/shkafy-3h-stvorchatye/?limit=192&sort=p.price&order=DESC&page=1
Любой дизайн по вашему желанию https://fabrica33.ru/korpusnaya-mebel/shkafy/
Замер и выезд к Вам, бесплатно https://fabrica33.ru/korpusnaya-mebel/shkafy/?limit=120&sort=pd.name&order=DESC&page=1
Пишите или звоните,как Вам удобно https://fabrica33.ru/spalnyj-garnitur-bonita.html
10-15 рабочих дней https://fabrica33.ru/divan-flamingo.html
готовых работ радуют клиентов https://fabrica33.ru/korpusnaya-mebel/detskaya-mebel/?limit=192&sort=p.price&order=DESC&page=1
Заказывая столярное изделие, необходимо согласовать с дизайнерами и мастерами такие моменты:
* нажимая кнопку
Плюсы и минусы ЛДСП https://fabrica33.ru/myagkaya-mebel/divany-vykatnye/?limit=72&sort=p.price&order=DESC&page=1
Модель двигателя 417,мощность-103л https://buybuyavto.ru/vykup-avto-s-neispravnoj-akpp/
с https://buybuyavto.ru/marki/vykup-kia-v-moskve/
обьем-2445,капиталка двигателя-2019гразрешенная масса-2315,пробег-85519,не битый, 2 хозяина, цвет-песочный, военные мосты, рессоры новые, калеса новые, подогрев д https://buybuyavto.ru/vykup-avto-s-neispravnym-dvigatelem/
https://buybuyavto.ru/marki/vykup-mercedes-benz-v-moskve/
https://buybuyavto.ru/marki/vykup-volkswagen-v-moskve/
После получения диплома я стал выбирать кем стать: мастер-приемщиком в одном из диллерств нашего города или пойти в лучший (на тот момент) магазин запчастей Пензы https://buybuyavto.ru/vykup-avto-metro-polezhaevskaya/
И если работа приемщика мне была понятна как белый день, то мир запчастей на иномарки казался совсем другим, непонятным мне, миром https://buybuyavto.ru/marki/vykup-volkswagen-v-moskve/
Я выбрал второе https://buybuyavto.ru/marki/vykup-toyota-v-moskve/
Битые / НеисправныеРынок подержанных авто велик, и покупать битую или неисправную машину вряд ли кто-то захочет https://buybuyavto.ru/
В этих ситуациях на помощь приходит наша компания https://buybuyavto.ru/vykup-avto-v-mitino/
Наши услуги:Выкуп авто в Пензенской области, Выкуп авто, Срочный выкуп авто, Выкуп Битых авто, Выкуп авто дорого, Выкуп дорогих авто, Выкуп кредитных авто, Выкуп Любых Авто, Выкупаем машины в любом состоянии с любым пробегом https://buybuyavto.ru/reviews/
Практика составляет 100% учебного времени, теория выдается в отпечатанном виде https://cosmetologistcourse.com/web_new?utm_source=seo
Так же в процессе обучения предоставляются все необходимые инструменты, материалы и профессиональная косметика https://cosmetologistcourse.com/
Время обучения: утренние, дневные, вечерние группы, группы выходного дня https://cosmetologistcourse.com/programmi
Визажист, парикмахер, свадебный стилист https://cosmetologistcourse.com/web_new?utm_source=seo
Звездный визажист: TOP Stilist проектов и многих других https://cosmetologistcourse.com/documents
Стаж работы более 20 лет https://cosmetologistcourse.com/web_new
Преподает визаж в программах косметика (косметолога) и отдельные тематические курсы https://cosmetologistcourse.com/web_new?utm_source=seo
Образование: Парикмахер широкого профиля, Люберецкий Дворец Культуры, 1998г Визажист, Создание индивидуального образа https://cosmetologistcourse.com/documents
Школа стилистов , 1999г Стаж работы более 20 лет https://cosmetologistcourse.com/job_openings
Эстетическая косметология:
1 модуль https://cosmetologistcourse.com/job_openings
Первая доврачебная помощь и сердечно-легочная реанимация https://cosmetologistcourse.com/
Обязательный спецкурс для организаций бытового назначения https://cosmetologistcourse.com/web_new?utm_source=seo
Практика по будням: каждый день или удобные даты https://cosmetologistcourse.com/web_new
По окончании курсов выдаются документы государственного образца https://cosmetologistcourse.com/web_new
Есть возможность сдать экзамен на международный сертификат ITEC по косметологии, который позволит вам работать в 44 странах мира без подтверждения квалификации https://cosmetologistcourse.com/programmi
Гранитное надгробие – самое дорогое и долговечное https://pametnik.ru/imgmain/2.jpg
Этот материал практически не впитывает влагу, поэтому обладает высокой морозостойкостью и всегда остается чистым https://pametnik.ru
Полимергранит https://pametnik.ru/
При изготовлении надгробной конструкции используют кованые и псевдокованые детали, что делает ее изящной и оригинальной http://pametnik.ru/vshbs
Этот этап не требует спешки, так как при ускоренной установке памятника изделие может покоситься со временем или вовсе упасть https://pametnik.ru/imgmain/2.jpg
В зависимости от состава почвы, нужно выждать примерно год, чтобы земля осела и утромбовалась http://pametnik.ru/price
Вы вносите предоплату в размере 30-50% от финальной суммы http://pametnik.ru/kss
Согласовываем макет памятника и ретушь фотографии, если на нем будет портрет https://pametnik.ru/price
Памятники можно изготавливать как из искусственных, так и из натуральных материалов:
Мы разрабатываем большое техническое задание (ТЗ) для дизайнеров, back-end и front-end разработчиков, полностью анализируя сайт заказчика и конкурентов https://topseosite.ru/contacts
Владелец сайта может сам выбрать название и количество таких поддоменов https://topseosite.ru/contacts
Мы скоро с Вами свяжемся!
Кейсы Наших клиентов https://topseosite.ru/uslugi
Что делалось: Проведены работы по оптимизации ресурса, найдено большое количество ссылок, добавлена новая семантика https://topseosite.ru/uslugi
Команда журналистов проекта написала серию статей по этому семантическому ядру http://topseosite.ru
Перейти на сервис можно по ссылке https://topseosite.ru/
Независимо от повода вы сможете купить дорогой подарок в Москве, будучи уверенным в качестве https://elit-podarok.ru/knigi/priklyucheniya-geklberri-finna-mark-tven.html
Просто выберите подходящий товар – и оформляйте заказ в интернет-магазине Colapsar https://elit-podarok.ru/knigi/religioznaya-literatura/
ru!
Подпишитесь на рассылку, чтобы получить доступ к специальным предложениям и скидку 10% на первый заказ!
Добро пожаловать в интернет-магазин элитных подарков BonCadeau! На страницах нашего каталога Вы найдете самые интересные, необычные и элитные предметы роскоши, ювелирные изделия, столовые принадлежности, кабинетные атрибуты, гаджеты и аксессуары из экзотической кожи https://elit-podarok.ru/religioznye/pravoslavnye/ikony/nastennaya-ikona-vid-na-novodevichiy-monastyr-g-zlatoust.html
Обилие вариантов для мужчин и женщин https://elit-podarok.ru/nozhi/turisticheskie/nozh-iz-damasskoy-stali-putnik-pirat-reznaya-rukoyat-iz-tsennykh-porod-drevesiny.html
Выгодные предложения покупки позволят Вам приобрести роскошный подарок любого ранга и класса, угождая вкусам как бизнес элиты, так и богемной аристократии https://elit-podarok.ru/nastolnye-igry/shakhmaty/shakhmaty-iz-kamnya/shakhmaty-iz-mramora/shakhmaty-zheleznodorozhniki-zmeevik-mramor-40kh40-sm.html
Вес: 1,5 кг https://elit-podarok.ru/dekor-dlya-doma/shkatulki/shkatulka-zmeevik-risunok-rassvet-10kh10kh6-5-sm.html
Юридическая помощь в Москве Где ?? Есть акции на день рождения Адвокатский кабинет Кулаковой Ларисы Александровны ?? Есть скидки на первое посещение Neopravo ?? Есть акции для студентов Апейрон ?? Есть скидки для пользователей Zoon
Консультация юриста по жилищным спорам, выписать человека из квартиры, выделение доли, определение долей, перевод нежилого помещения в жилое и наоборот, затопление квартиры https://юр-островок.рф/srt/nasl-urist
Первое, на что стоит обратить внимание https://юр-островок.рф/nabchelni/lawyer-urist
Нельзя быть профессионалом во всем, поэтому, желательно, чтобы юридическая компания специализировалась на решении актуальных для вас задач и смежных специальностях https://юр-островок.рф/ekb/zem-urist
Первичные встречи, как правило, бесплатны https://юр-островок.рф/yar/zpp-urist
Ни один уважаемый юрист не станет брать деньги за то, что он встретился с клиентом для обсуждения возможности сотрудничества https://юр-островок.рф/kzn/zpp-urist
Дать подсказку в решении правовых вопросов и направить к профильным специалистам готов столичный Департамент труда и социальной защиты населения https://юр-островок.рф/kzn/lawyer-urist
Команда юристов, одним из главных направлений для которой является цифровая экономика https://юр-островок.рф/ekb/lawyer-urist
Решают бизнес-задачи российских и иностранных компаний, а также госорганов https://юр-островок.рф/spb/fam/lishenie-roditelskikh-prav-urist
В команде 8 партнеров, 18 адвокатов и более 50 юристов https://юр-островок.рф/srt/nasl-urist
Оказывают услуги в области корпоративного права и сделок, инвестиционное консультирование, вопросы несостоятельности и банкротства, антимонопольное и коммерческое право https://юр-островок.рф/smr/sud-urist
Помогают в спорах об интеллектуальной собственности, проектах девелопмента https://юр-островок.рф/spb/fam/alimenti-urist
Для частных клиентов — семейное и наследственное право, а также уголовное https://юр-островок.рф/smr/nasl-urist
Среди услуг есть форензик — расследования для выявления случаев мошенничества или нарушения деловой этики со стороны партнеров, клиентов, сотрудников https://юр-островок.рф/srt/nasl-urist
Услуги по сервисному обслуживанию и технической поддержке https://www.kondhp.ru/preorder/13089
В штате сервисного центра работают только квалифицированные специалисты https://www.kondhp.ru/preorder/13677
В рамках обслуживания мы обеспечим вас всеми необходимыми запасными частями для оборудования https://www.kondhp.ru/preorder/13676
Предназначена для раскатки теста заданной толщины с возможной регулировкой толщины, резки теста в продольном и поперечном направлениях и автоматической подачи в тоннельную печь при производстве хлебцев, галет, лаваша и т https://www.kondhp.ru/pages/otlivochnaya-golovka-depozitor-yqj-dlya-proizvodstva-shokoladnykh-izdelii
д https://www.kondhp.ru/products/mashina-moiki-i-sushki-semyan-zerna-i-drugikh-sypuchikh-produktov-mms
Ассортимент хлебобулочных изделий, вырабатываемых белорусскими хлебопеками, постоянно расширяется благодаря применению новых технологий, рассчитанных на использование современного оборудования https://www.kondhp.ru/preorder/13705
Без использования такого оборудования невозможно обеспечить эффективное функционирование хлебопекарного производства https://www.kondhp.ru/preorder/12517
Обновлено 14 июля 2017 https://www.kondhp.ru/preorder/12521
https://www.kondhp.ru/pages/video-raboty-termoupakovochnogo-apparata-tua-250-konfety-v-poliolefinovuiu-plenku
https://www.kondhp.ru/products/spiralnye-testomesy-js
конструкции и универсальности печи ХПЭ нашли широкое применение: в качестве основного оборудования для пекарен малой и средней производительности, в кондитерских цехах и участках https://www.kondhp.ru/pages/oborudovanie-vzbivalnoe-i-smesitelnoe-1
https://www.kondhp.ru/pages/testodelitel-vakuumno-porshnevoi-a2-khpo-5
https://www.kondhp.ru/products/otmyvka-khlebopekarnykh-form
Тестомес для замеса теста незаменим на любом хлебозаводе https://www.kondhp.ru/products/shnekovyi-press-dlya-otzhima-masla
В нашей компании Вы можете приобрести тестомес и хлеборезки в комплекте с автоматическим клипсатором для нарезки и упаковки хлеба, также мы предлагаем хлебопекарные печи в широком ассортименте https://www.kondhp.ru/preorder/13333
Тестомес для крутого теста незаменим на производстве пельменей, мантов https://www.kondhp.ru/categories/okhlazhdaiuschee-oborudovanie
Оплата заказов клиентами – юридическими лицами возможна только по безналичному расчёту https://www.kondhp.ru/pages/testoraskatochnaya-mashina-forni-zenith-italiya
Чтобы получить счет на оплату – свяжитесь с нашими менеджерами по телефону, электронной почте или оформите заказ через корзину https://www.kondhp.ru/preorder/12729
Указанная на сайте стоимость товара включает в себя НДС https://www.kondhp.ru/products/ustanovka-pnevmaticheskaya-marki-t1-khsp
Заработав отличную репутацию на рынке авто выкупа в Москве, мы высоко ценим ее и дорожим ей, по этому мы не обещаем нашим клиентам от рыночной стоимости https://buybuyavto.ru/skupka-bityh-avto-v-nizhnem-novgorode/
Бесплатный выезд оценщикаБесплатный выезд специалиста компании для проведения оценки и диагностики автомобиля https://buybuyavto.ru/prodat-avtomobil-ne-na-hodu/
В любое удобное место для Вас https://buybuyavto.ru/vykup-avto-posle-dtp/
ЧАСТО ЗАДАВАЕМЫЕ ВОПРОСЫ КАК ПРОИСХОДИТ СДЕЛКА КУПЛИ-ПРОДАЖИ АВТО? После предварительной оценки автомобиля по телефону (в случае если озвученная сумма Вас устраивает), мы договариваемся о встрече, на месте производим детальный осмотр транспортного средства и документов, окончательно подтвердив сумму, заключаем Д https://buybuyavto.ru/vykup-avto-v-mitino/
К https://buybuyavto.ru/marki/vykup-kia-v-moskve/
П https://buybuyavto.ru/marki/vykup-mercedes-benz-v-moskve/
https://buybuyavto.ru/vykup-avto-v-chertanovo/
КАКИМ СПОСОБОМ, ВЫ ОПЛАЧИВАЕТЕ АВТОМОБИЛЬ? Любым удобным для Вас способом, это как наличный, так и безналичный расчет на месте https://buybuyavto.ru/vykup-avto-metro-yasenevo/
МОЖНО ЛИ ПРОВЕРИТЬ ДЕНЬГИ, ПРЕЖДЕ ЧЕМ ПОДПИСЫВАТЬ ЧТО ЛИБО? Да, конечно, в любом отделении банка, где Вам будет удобно https://buybuyavto.ru/buy-car/ford/
Сначала проверяем, потом подписываем Д https://buybuyavto.ru/vykup-avto-metro-lyublino/
К https://buybuyavto.ru/vykup-avto-metro-yasenevo/
П https://buybuyavto.ru/buy-car/
https://buybuyavto.ru/marki/vykup-renault-v-moskve/
КАК БЫСТРО ВЫ СМОЖЕТЕ КУПИТЬ МОЙ АВТОМОБИЛЬ? С момента Вашего звонка и до получения желаемой суммы может пройти разное количество времени https://buybuyavto.ru/vykup-avto-metro-vdnh/
Все зависит от того, где Вы находитесь https://buybuyavto.ru/vykup-problemnyh-avto/
Обычно это занимает от 40 мин и более https://buybuyavto.ru/prodat-avto-na-razborku/
ВЫКУПАЕТЕ КРЕДИТНЫЕ АВТОМОБИЛИ? Да выкупаем https://buybuyavto.ru/marki/vykup-opel-v-moskve/
Сделка происходит в банке, с полным погашением кредита https://buybuyavto.ru/vykup-avto-metro-mitino/
ЕСТЬ ЛИ У ВАС ТРЕЙД-ИН? Да есть https://buybuyavto.ru/buy-car/
Вы можете обменять автомобиль на другой с доплатой, либо на более дешевую модель с доплатой с нашей стороны https://buybuyavto.ru/skupka-bityh-avto-v-ryazani/
ЧАСТО ЗАДАВАЕМЫЕ ВОПРОСЫ КАК ПРОИСХОДИТ СДЕЛКА КУПЛИ-ПРОДАЖИ АВТО? После предварительной оценки автомобиля по телефону (в случае если озвученная сумма Вас устраивает), мы договариваемся о встрече, на месте производим детальный осмотр транспортного средства и документов, окончательно подтвердив сумму, заключаем Д https://buybuyavto.ru/vykup-avto-metro-oktyabrskoe-pole/
К https://buybuyavto.ru/skupka-bityh-avto-vo-vladimire/
П https://buybuyavto.ru/vykup-avto-v-solntsevo/
https://buybuyavto.ru/vykup-avto-v-mitino/
КАКИМ СПОСОБОМ, ВЫ ОПЛАЧИВАЕТЕ АВТОМОБИЛЬ? Любым удобным для Вас способом, это как наличный, так и безналичный расчет на месте https://buybuyavto.ru/marki/vykup-lexus-v-moskve/
МОЖНО ЛИ ПРОВЕРИТЬ ДЕНЬГИ, ПРЕЖДЕ ЧЕМ ПОДПИСЫВАТЬ ЧТО ЛИБО? Да, конечно, в любом отделении банка, где Вам будет удобно https://buybuyavto.ru/otsenka-bityh-avto/
Сначала проверяем, потом подписываем Д https://buybuyavto.ru/marki/vykup-chevrolet-v-moskve/
К https://buybuyavto.ru/marki/vykup-citroen-v-moskve/
П https://buybuyavto.ru/vykup-avto-metro-polezhaevskaya/
https://buybuyavto.ru/marki/vykup-chevrolet-v-moskve/
КАК БЫСТРО ВЫ СМОЖЕТЕ КУПИТЬ МОЙ АВТОМОБИЛЬ? С момента Вашего звонка и до получения желаемой суммы может пройти разное количество времени https://buybuyavto.ru/dogovor-kupli-prodazhi/
Все зависит от того, где Вы находитесь https://buybuyavto.ru/marki/vykup-kia-v-moskve/
Обычно это занимает от 40 мин и более https://buybuyavto.ru/vykup-avto-na-razborku/
ВЫКУПАЕТЕ КРЕДИТНЫЕ АВТОМОБИЛИ? Да выкупаем https://buybuyavto.ru/skupka-bityh-avto-v-nizhnem-novgorode/
Сделка происходит в банке, с полным погашением кредита https://buybuyavto.ru/marki/vykup-citroen-v-moskve/
ЕСТЬ ЛИ У ВАС ТРЕЙД-ИН? Да есть https://buybuyavto.ru/vykup-avto-s-neispravnoj-akpp/
Вы можете обменять автомобиль на другой с доплатой, либо на более дешевую модель с доплатой с нашей стороны https://buybuyavto.ru/vykup-avto-metro-mitino/
Запишитесь на онлайн-консультацию КАК МЫ РАБОТАЕМ
Чаще всего предметом продажи становится автомобиль https://buybuyavto.ru/vykup-avto-metro-marino/
Для продажи машины нужны месяцы, это время, которого нет https://buybuyavto.ru/marki/vykup-volvo-v-moskve/
Лучшим выходом из такой ситуации будет услуга срочного автовыкупа автомобиля https://buybuyavto.ru/marki/vykup-nissan-v-moskve/
Оформляем документы без лишней волокиты! Мы гарантируем отсутствие скрытых платежей и дополнительных затрат, с вашей стороны! Вся процедура оформления документов полностью прозрачна и соответствует законодательству РФ https://buybuyavto.ru/marki/vykup-avtomobilej-honda/
Все наши сделки прозрачны и юридически чисты!
Осталось проверить автомобиль в движении https://buybuyavto.ru/wp-content/files/2018/06/dogovor_txt.docx
Хотя многие продавцы справедливо опасаются за свой автомобиль, не зная о ваших навыках вождения https://buybuyavto.ru/vykup-avto-na-zapchasti/
Однако открытая площадка может удовлетворить обоих https://buybuyavto.ru/vykup-avto-metro-mitino/
Зато появляется возможность оценить работу сцепления, коробки передач и трансмиссии, протестировать управляемость https://buybuyavto.ru/marki/vykup-volkswagen-v-moskve/
Так, дерганье и шумы неприемлемы, особенно у автоматической коробки https://buybuyavto.ru/marki/vykup-volvo-v-moskve/
Пробуйте тормоза https://buybuyavto.ru/vykup-avarijnyh-avto/
Попытайтесь тронуть автомобиль на ручном тормозе – исправный узел должен удерживать автомобиль https://buybuyavto.ru/buy-car/ford/
Уделите внимание https://buybuyavto.ru/skupka-bityh-avto-v-yaroslavle/
Например, меняющаяся яркость фар при нажатии на педаль газа может быть вызвана как элементарным ослаблением ремня, так и предупреждать о скорой кончине генератора https://buybuyavto.ru/marki/vykup-mercedes-benz-v-moskve/
Конечно, осмотрите приводные ремни – лохматые края и белые след на боковине первые признаки старения https://buybuyavto.ru/vykup-avto-metro-vdnh/
Не брезгуйте заглянуть в пепельницу – сегодня прокуренный салон не в почете https://buybuyavto.ru/vykup-avto-v-novokosino/
И дело здесь не только в неприятных запахах и потускневшем потолке, чаще обнаруживаются прожженные пеплом очаги, порой, прикрытые чехлами, на обивках кресел и панели приборов https://buybuyavto.ru/vykup-problemnyh-avto/
Эта строительная отрасль в целом не очень квалифицирована https://alpinist-servis.ru/myte-okon-promyshlennymi-alpinistami/
Поэтому для настоящих профессионалов в ней конкуренции нет https://alpinist-servis.ru/gidrofobizaciya-fasada/
Главной специализацией нашей компании является выполнение работ по технологии промышленного альпинизма https://alpinist-servis.ru/montag-obogr-kabela-moskva-isakovskogo39k1/
Заказать у нас услуги промышленных альпинистов можно в Москве и всей Московской области https://alpinist-servis.ru/gidrofobizaciya-fasada/
Высшее, Сибирский Государственный Университет Путей Сообщения, специальность: Инженер-Механик (Сервис и техническое обслуживание машин и оборудования)
№ Вид фасада Цена мойка Москва руб/м https://alpinist-servis.ru/remont-vodostokov/
кв https://alpinist-servis.ru/stekolnye-raboty/
1 Витражи сплошное остекление от 48 р https://alpinist-servis.ru/ceny/
м2 2 Кровля стеклянная труднодоступные места и поверхности от 67 р https://alpinist-servis.ru/g-moskva-ul-zarechnaya-d-1/
м2 3 Фасад сильнозагрязненные поверхности (раствор, краска) от 87 р https://alpinist-servis.ru/remont-fasada-v-moskve/
м2 4 Композитные фасады тип алюкобонд*, керамогранит https://alpinist-servis.ru/remont-vodostokov/
от 67 р https://alpinist-servis.ru/ceny/
м2 5 Мойка остекление менее 200 м https://alpinist-servis.ru/myte-okon-promyshlennymi-alpinistami/
кв от 68 р https://alpinist-servis.ru/podem-gruzov/
м2 6 Мойка аппаратом высокого давления от 35 р https://alpinist-servis.ru/nashi-uslugi/pokraska-fasadov/
м2 https://alpinist-servis.ru/nashi-uslugi/zamena-steklopaketov/
Промышленный альпинизм – высотные работы https://alpinist-servis.ru/nashi-uslugi/remont-alyukobonda-2/
Услуги альпинистов строительной, клининг, монтажные, и электромонтажные специальности https://alpinist-servis.ru/montazh-i-demontazh-vodostochnyx-trub/
Работаем в https://alpinist-servis.ru/montag-obogr-kabela-moskva-isakovskogo39k1/
Искать самостоятельно Перейдите в каталог мастеров, выберите услугу и ваш город https://alpinist-servis.ru/nashi-uslugi/ded-moroz-v-okno/
Выбирайте из предложенных анкет https://alpinist-servis.ru/nashi-foto/
Вам будет доступен личный телефон мастера, а также вы можете написать мастерам https://alpinist-servis.ru/nashi-uslugi/remont-vodostokov/
Оформление акта о неисправности оборудования по инструкции происходит в тех случаях, когда выявлена поломка оборудования и требуется установить ее причины, а также принять решение о выполнении восстановительных работ или о списании из-за дефектов https://zapchasti-remont.ru/shop/goods/magneto_elektronnoe_em4_1n_005401900_01_dlya_mb-4903
Дефектный акт может быть составлен как в отношении бытовой офисной техники, так и применительно к сложным техническим устройствам https://zapchasti-remont.ru/shop/goods/remen_privoda_hoda_1733324SM_snegouborschika_Snapper_L1226EX-1019
Комментарий Искал двигатель на пылесос LG,после короткой переписки оплатил заказ и он был отправлен в тот же день в г https://zapchasti-remont.ru/shop/goods/shesternya_chervyachnaya_183_reduktora_motokultivatora_mtd_t205_245-183
Новосибирск и получил именно то,что заказывал! Всем советую данную компанию,даже если вы из другого города!
После подтверждения заявки на ремонт сервис-мастер выезжает на адрес с необходимыми запчастями и деталями, за один приезд осуществляется ремонт техники https://zapchasti-remont.ru/shop/goods/filtr_vozdushnyiy_BS_393957_dlya_dvigatelya_Briggs_Stratton-11023
Под разделом сайта подразумевается одно направление вашего бизнеса https://topseosite.ru/contacts
Например, для сайта услуг – это будет одна посадочная страница конкретной услуги , а для интернет-магазина – один раздел каталога (категория) https://topseosite.ru/contacts
В сео-продвижение каждого раздела (категории) сайта входят все подразделы (подкатегории) данного направления http://topseosite.ru
В интерфейсе Яндекс https://topseosite.ru/
Директа были убраны несколько старых опций и добавлены элементы https://topseosite.ru/uslugi
Обновление должно помочь рекламодателям проще ориентироваться в настройке объявлений и рекламных кампаний https://topseosite.ru/uslugi
Основные изменения Полностью переработан блок “Прогноз и уточнение” https://topseosite.ru/
Для каждого ключевого слова или запроса был добавлен прогноз показов в зависимости от региона и минус-фраз (минус-слов) https://topseosite.ru/uslugi
Если вы введёте ключевик, система предложит другие…
Продвинем сайт по поисковым запросам https://topseosite.ru/contacts
Так что же такое SEO? SEO – это точно не танцы с бубном https://topseosite.ru/
SEO – это простой и прозрачный комплекс мер по улучшению сайта https://topseosite.ru/contacts
Часть из этих мер нужно сделать один раз, часть нужно делать с регулярной периодичностью https://topseosite.ru/
Гарантия выполненных работ и фиксированная цена https://topseosite.ru/uslugi
Гарантированная технология продвигать запросы https://topseosite.ru/contacts
SEO продвижение сайта в Москве https://topseosite.ru/uslugi
Текст и гравировка на гранитном памятнике http://pametnik.ru
Мемориальный комплекс – вид ритуального искусства, призванный не только украсить могилу в Ангарске, сделать ее ухоженной и аккуратной https://pametnik.ru/vshbs
Какой материал выбрать для памятника http://pametnik.ru/price
Фотография на обелиск устанавливается редко https://pametnik.ru
Наносят на обелиск обычно дату рождения и смерти, фамилию усопшего https://pametnik.ru/proizv
Нюансы выбора женских памятников на захоронение https://pametnik.ru/imgmain/4.JPG
Метод производства памятников из искусственного камня отличается тем, что их не вырезают из цельного куска, а производят методом литья https://pametnik.ru/contacts
Для этого необходимо подготовить несколько исходных компонентов http://pametnik.ru
Основным является мелкозернистый гранит или же гранитная крошка https://pametnik.ru/materials
К нему добавляется такое вещество, как полимерная синтетическая смола https://www.pametnik.ru
Очень важно знать точную пропорцию http://pametnik.ru/price
Количество натуральной гранитной крошки должно быть больше, чем количество синтетической смолы https://pametnik.ru/
Кроме этих двух компонентов, в составе присутствуют разнообразные присадки, красители и еще несколько других элементов, выполняющих вспомогательную функцию http://pametnik.ru
Данный раствор выливается в определенную форму, которая после этого помещается на вибростол, где состав тщательно утрамбовывается https://pametnik.ru/photokeramika
Подобные манипуляции необходимы, так как в это время раствор избавляется от пузырьков воздуха, пустоты, а также приобретает большую плотность https://pametnik.ru/index.php?option=com_jcomments&task=captcha&tmpl=component&ac=31439
ШКАФ-КУПЕ https://fabrica33.ru/korpusnaya-mebel/stenki/stenki-so-shkafom/?limit=72
Простая и удобная схема работы позволяет в кратчайшие сроки эффективно выполнять заказы любой сложности и получать гарантированный результат https://fabrica33.ru/korpusnaya-mebel/modulnye-sistemy/?limit=120&sort=p.price&order=DESC&page=1
Завершен монтаж сотой кухни с каменной столешницей https://fabrica33.ru/korpusnaya-mebel/?limit=72&sort=pd.name&order=DESC&page=1
При покупке кухни от 250 000 рублей КАМЕННАЯ МОЙКА в ПОДАРОК!
* нажимая кнопку
Бережно доставим, поднимем в квартиру и аккуратно соберем мебель в удобное для вас время https://fabrica33.ru/myagkaya-mebel/?limit=96&sort=p.price&order=DESC&page=1
Стоимость: от 24 999 ? Рассрочка: нет Продолжительность: от 2 месяцев Формат: дистанционный Домашние задания: да Документ об окончании: Свидетельство о присвоении рабочей специальности https://cosmetologistcourse.com/documents
Профессиональный косметологический аппарат гальванизации, лифтинга для салонов красоты https://cosmetologistcourse.com/web_new?utm_source=seo
Аппарат позволяет проводить процедуры гальванической терапии кожи, ионофореза, дезинкрустации https://cosmetologistcourse.com/web_new
Учились здесь? Оставьте отзыв, и, может быть, это поможет другим в выборе https://cosmetologistcourse.com/
Кроме этого, из ваших оценок формируется наш рейтинг https://cosmetologistcourse.com/
Эстетическая косметология:
— 80% скидки (от 500 р https://cosmetologistcourse.com/documents
) за курсы по косметологии https://cosmetologistcourse.com/documents
По окончании обучения выдается диплом государственного образца https://cosmetologistcourse.com/documents
Когда Вы вручаете подарок, Вы дарите, прежде всего, не саму вещь, а те ассоциации, чувства, которые связаны с ней https://elit-podarok.ru/dekor-dlya-doma/shkatulki/shkatulka-s-pryamoy-yashcheritsey-ofiokaltsit-65kh65kh50-mm.html
Материал: фарфор https://elit-podarok.ru/dekor-dlya-doma/nastolnye-mini-nabory/vizitnitsa-iz-krenoida-gerb.html
Доставка в другие регионы и страны рассчитывается по тарифам транспортной компании https://elit-podarok.ru/suvenirnoe-oruzhie/kortiki/kortiki-vmf/kortik-morskoy-variant-5.html
Сроки доставки зависят от региона, веса и объема выбранного вами товара https://elit-podarok.ru/nastolnye-igry/shakhmaty/shakhmaty-iz-kamnya/shakhmaty-severnye-narody-bronza-krenoid-36-5kh36-5-sm.html
Основной материал : Бокал: латунь, стекло, https://elit-podarok.ru/knigi/kniga-skazki-russkikh-inorodtsev.html
Количество страниц: 360 https://elit-podarok.ru/elitnaya-posuda/posuda-dlya-servirovki/ikornitsy/ikornitsa-dary-morya-so-stopkami-i-lozhechkoy.html
Репутация https://юр-островок.рф/kzn/fam/razvodi-urist
Юридические услуги • Юр консультация •
Юридические услуги • Юридическая консультация •
Спектр случаев предоставления бесплатной юридической помощи довольно широк https://юр-островок.рф/kzn/auto-urist
В него входят защита прав потребителей в части предоставления коммунальных услуг, предоставление мер социальной поддержки, оказание малоимущим гражданам государственной социальной помощи, предоставление субсидий на оплату жилого помещения и коммунальных услуг, разрешение споров с работодателем в рамках трудового законодательства, установление или оспаривание отцовства (материнства) и взыскание алиментов, заключение или оспаривание сделок с недвижимым имуществом, а также регистрация прав на него https://юр-островок.рф/ekb/zpp-urist
Адвокат может оказывать юридическую помощь с выездом на дом или в стационарные учреждения здравоохранения (социального обслуживания) в случае, если из-за состояния здоровья либо возраста человек не может самостоятельно посетить его (например, инвалиды I и II групп с заболеваниями опорно-двигательного аппарата, граждане старше 80 лет и другие) https://юр-островок.рф/yar/bfl-urist
Общение может быть как в устной, так и в письменной форме https://юр-островок.рф/spb/lawyer-urist
Хочу выразить огромную благодарность сотрудникам Юридической компании Наталье Гиоргиевне и Евгению Александрович за отличную работу, за высокий профессионализм https://юр-островок.рф/msk/fam/alimenti-urist
…
Для того чтобы получить код активации нужно зайти на сайт со своими персональными данными (логин и пароль), затем перейти в раздел и, наконец, выбрать номер заказа, нажав на него https://zapchasti-remont.ru/shop/goods/filtr_vozdushnyiy_13031051830_dlya_benzokosyi_ECHO_SRM2655SI-11099
На экране появится поле для ввода кода https://zapchasti-remont.ru/shop/goods/noj_5321451_06_dlya_gazonokosilki_Husqvarna_Combi_RP_030358-3947
Ответный код активации Вы можете увидеть там же через некоторое время (не позже чем через 24 часа) и так же получите его на свой почтовый ящик https://zapchasti-remont.ru/shop/goods/val_shestigrannyiy_717_04209_s_u_MTD_E625F_640F_660F_ME66-579
Запчасти для стиральной машины Ханса, ремень привода барабана 1308, сливной насос плазет (оригинал), аналог аскол, манжета люка на машины как с акваспреем так и без него https://zapchasti-remont.ru/shop/goods/noj_106103_117720_344769_516747_dlya_gazonokosilki_ALKO_Master_3200_Rasaero_320_Rasaero_32_E_Euro_800_32_EH-10179
AlpinJet предлагает полный комплекс высотных монтажных работ, в том числе: ?? Очистка кровли от снега, наледи и сосулек; ?? Высотные https://alpinist-servis.ru/ceny/
Промышленные альпинисты в Москве https://alpinist-servis.ru/nashi-uslugi/remont-alyukobonda/
Безусловно, справиться с такого рода задачами можно и без риска для жизни и здоровья людей, посредством привлечения спецтехники https://alpinist-servis.ru/prijemnoi_moskva__ulvorontovskie_prudy_d3/
Однако, зачастую доступ к объектам, где необходим монтаж, бывает излишне затруднен и подъезд машин невозможен https://alpinist-servis.ru/nashi-uslugi/remont-vodostokov/
В этом случае без помощи промышленных альпинистов не обойтись https://alpinist-servis.ru/myte-okon-promyshlennymi-alpinistami/
Дополнительным преимуществом обращения к нам является и экономическая сторона вопроса https://alpinist-servis.ru/germetizaciya-balkonov-i-lodzhij/
Стоимость услуг будет значительно дешевле, если для их оказания не была привлечена спецтехника https://alpinist-servis.ru/nashi-uslugi/ded-moroz-v-okno/
Цены Наружная реклама от 30 ? / м2 Подъем грузов от 30 ? / м3 Герметизация швов от 30 ? / м/п Удаление деревьев от 30 ? / мт https://alpinist-servis.ru/remont-fasada-v-moskve/
Наши достижения в цифрах https://alpinist-servis.ru/sitemap/
Цены Удаление деревьев от 10000 ? / мт Подъем грузов от 10000 ? / м3 Фасадные работы от 60 ? / м2 Герметизация швов от 100 ? / м/п https://alpinist-servis.ru/montazh-i-demontazh-vodostochnyx-trub/
Предназначены для шоколадно-глазировочных машин с целью обеспечения непрерывного процесса глазирования кондитерских изделий, для растапливания, перемешивания и подготовки глазури и шоколадной массы в кондитерской и хлебобулочной промышленности
По принципу действия хлебопекарные улучшители применяются в качестве монодобавок строго направленного действия и многокомпонентных добавок – мультиэнзимных композиций, комплексных хлебопекарных улучшителей https://www.kondhp.ru/pages/orekhodrobilka-mdo
Печь на 10 противней 600х400, парообразование, 380В, мощность 14, 5 кВт, габариты 1300х900х1470 https://www.kondhp.ru/preorder/12852
Обдув каждого яруса https://www.kondhp.ru/products/sborochnyi-chertezh-golovki-k-testodeliteliu-a2-khtn
Есть исполнение для работы на газе https://www.kondhp.ru/products/dezha-nerzhaveiuschaya-podkatnaya-obemom-140-litrov-a2-khtd-v-sbore-s-chugunnoi-litoi-karetkoi-na-poliuretanovykh-kolesakh
Сателлитная пара (ремкомплект) к тестомесильной машине Л4-ХТВ (производства АО ) состоит: 2 вал шестерни и 2 зубчатых колёса https://www.kondhp.ru/preorder/12974
Если корпус редуктора целый, https://www.kondhp.ru/products/ekstruder-dlya-formovaniya-kukuruznykh-palochek-a1-kkh2-p-1
https://www.kondhp.ru/products/otlivochnaya-mashina-shol-m-k-dlya-proizvodstva-korpusov-konfet-v-krakhmal-odnogolovochnaya
https://www.kondhp.ru/pages/video-raboty-avtomata-mnogofunktsionalnogo-mak-n2
Весовой дозатор комбинационный для точного и быстрого дозирования сыпучих и штучных продуктов, который часто называют мультиголовка по принципу работы, производит комбинирование доз в нескольких взвешивающих головках с последующим выбором наиболее близкой к номинальному весу комбинации https://www.kondhp.ru/pages/avtomat-vertikalnoi-rezki-na-kuski-ili-dolki-rck-608
Современный весовой дозатор необходим на любом пищевом производстве https://www.kondhp.ru/preorder/13241
ИЗГОТОВЛЕНИЕ МЕБЕЛИ НА ПРОИЗВОДСТВЕ https://fabrica33.ru/korpusnaya-mebel/stenki/stenki-so-shkafom/?limit=96&sort=p.price&order=DESC&page=1
Мебель на заказ от компании – нестандартные модели для любых интерьеров https://fabrica33.ru/korpusnaya-mebel/stenki/stenki-temnye/?limit=72&sort=p.price&order=DESC&page=1
Изготовление мебели на заказ по вашим размерам https://fabrica33.ru/myagkaya-mebel/?limit=96&sort=p.price&order=DESC&page=1
Кухни, шкафы- купе, прихожие, детские и другая встраиваемая и корпусная мебель https://fabrica33.ru/myagkaya-mebel/detskie-divany/?limit=72&sort=p.price&order=DESC&page=1
Также предлагаем распил ЛДСП https://fabrica33.ru/spalnyj-garnitur-kira.html
Прямая белая кухня https://fabrica33.ru/stenka-solo.html
Форма обратной связи https://fabrica33.ru/uglovoj-divan-tehas.html
Изготовление мебели на заказ в Иркутске https://fabrica33.ru/korpusnaya-mebel/?limit=72&sort=p.price&order=DESC&page=3
После того, как я понял, что мне летчиком не быть, я решил быть ближе к автомобильной технике https://buybuyavto.ru/marki/vykup-peugeot-v-moskve/
К тому моменту меня уже стало интересовать как все там устроено
Выкуп неисправных авто занимает чуть больше времени https://buybuyavto.ru/skupka-bityh-mashin/
Ведь важно выявить все недостатки https://buybuyavto.ru/vykup-avto-metro-novokosino/
Наши специалисты обладают большим опытом https://buybuyavto.ru/vykup-avto-metro-vdnh/
Они проведут полную бесплатную диагностику https://buybuyavto.ru/vykup-avto-v-chertanovo/
После чего вы сможете получить озвученную сумму на руки https://buybuyavto.ru/marki/vykup-ford-v-moskve/
Кампания “Катутиль” предлагает вам сотрудничество https://buybuyavto.ru/vykup-avto-metro-mitino/
Мы готовы скупать б/у катализаторы с автомобилей и промышленного типа, по самым высоким цена для Вас https://buybuyavto.ru/
Оплата по факту, оперативно и без задержек https://buybuyavto.ru/prodat-avtomobil-ne-na-hodu/
Оценка автомобиля в любом состоянии занимает всего полчаса и проводится на месте https://buybuyavto.ru/marki/vykup-chevrolet-v-moskve/
Мы не будем буксировать машину куда-либо и отдавать её https://buybuyavto.ru/buy-car/ford/
Наши сотрудники обладают достаточными знаниями, чтобы проверить состояние машины на месте https://buybuyavto.ru/marki/vykup-subaru-v-moskve/
Однако немало людей предпочитающих, например, старый Мерседес новым Жигулям https://buybuyavto.ru/vykup-avto-metro-polezhaevskaya/
Такие в основном опираются на престижность марки, при этом получают неплохой набор опций, который просто недоступен владельцу, скажем, https://buybuyavto.ru/vykup-problemnyh-avto/
Многие из них стараются не думать о неполадках, особенно о непредвиденной поломке, и напрасно https://buybuyavto.ru/vykup-avto-metro-marino/
При наличии необходимых средств это не проблема, в противном случае подержанная иномарка надолго припаркуется у подъезда https://buybuyavto.ru/skupka-bityh-avto-v-yaroslavle/
Лучше заранее посетить интернет-клубы и приготовиться к неприятностям https://buybuyavto.ru/marki/vykup-renault-v-moskve/
-Нами осуществляется скупка легковых прицепов различных видов и конфигураций: лодочный трейлер для перевозки лодки или катера, европрицеп для перевозок снегоходов или квадроциклов, грузовых прицепов для легковых а/м, прицеп дача https://buybuyavto.ru/marki/vykup-ford-v-moskve/
Оставьте отзыв https://cosmetologistcourse.com/web_new?utm_source=seo
Школа красоты Европа (ЦАО)
11 модуль дистанционный «Косметик-эстетист https://cosmetologistcourse.com/documents
– занятия проводятся в небольших группах или индивидуально; слушателям предоставляются все необходимые методические и расходные – материалы; – студенты центра практикуются в государственных и частных компаниях, салонах красоты, лечебно-профилактических учреждениях, клиниках, реабилитационных и спортивных центрах; – по окончании курсов косметолога-эстетиста студенты получают диплом и ряд сертификатов государственного образца https://cosmetologistcourse.com/
6 модуль https://cosmetologistcourse.com/web_new
Основы нутрициологии https://cosmetologistcourse.com/web_new
Система обучения Института восстановительной медицины нацелена на индивидуальный подход к каждому слушателю вне зависимости от начального уровня подготовки https://cosmetologistcourse.com/web_new
Уровень подготовки выпускников наших курсов хорошо известен и высоко ценится руководством больниц, спортивно-оздоровительных центров, клиник эстетической медицины, салонов красоты, физкультурно-оздоровительных центров, spa-студий,фитнес-центров, спортивных клубов https://cosmetologistcourse.com/web_new?utm_source=seo
Наша цель – развивать успешный бизнес – свой и клиента https://topseosite.ru/
Многие компании оценили такой подход, поэтому, на наш взгляд, любой труд должен быть оплачен https://topseosite.ru/uslugi
Мы не используем такой подход для получения заявок, т http://topseosite.ru
к https://topseosite.ru/
большинство обращений к нам – это https://topseosite.ru/uslugi
Продвижение в ТОП-3 https://topseosite.ru/uslugi
Контекстная реклама по своему содержанию пересекается (совпадает) с интересами человека, который её видит https://topseosite.ru/uslugi
В таблице приводим позиции за год в динамике http://topseosite.ru
В целом, можно считать данный эксперимент успешным, ввиду высокой конкурентности тематики и ограниченности бюджета заказчика http://topseosite.ru
Мы всегда находимся с клиентами на связи и готовы оперативно отвечать на любые интересующие вопросы https://topseosite.ru/uslugi
Что касается отчетов, то их мы предоставляем один раз в месяц в подробном формате http://topseosite.ru
Срок службы памятника https://pametnik.ru/kss
Памятники из полимергранита – это надгробные камни, основным материалом для создания которых выступает полиметилметакрилат, а также гранитная крошка https://pametnik.ru/materials
Сочетание данных веществ позволило создать искусственный камень https://pametnik.ru/fp
Данный материал обладает определенным рядом основных черт, благодаря которым он смог найти свою нишу на рынке ритуальных услуг https://pametnik.ru/photokeramika
Вы вносите предоплату в размере 30-50% от финальной суммы https://pametnik.ru/imgmain/4.JPG
Согласовываем макет памятника и ретушь фотографии, если на нем будет портрет https://pametnik.ru/index.php?option=com_jcomments&task=captcha&tmpl=component&ac=31439
Но, если акцентировать внимание на материале, то в целом стоимость мраморных памятников, как и их популярность, ниже, чем гранитных памятников https://pametnik.ru/materials
Это обусловлено тем, что мрамор больше подвержен эрозии https://pametnik.ru/imgmain/2.jpg
Некоторые виды мрамора могут требовать за собой специального ухода https://pametnik.ru/photokeramika
Внешний вид надгробия будет в сохранности на несколько сотен лет меньше, чем гранитный http://pametnik.ru/kss
А гранитный памятник простоит без изменений почти 600 лет http://pametnik.ru/price
Этот этап не требует спешки, так как при ускоренной установке памятника изделие может покоситься со временем или вовсе упасть https://pametnik.ru/imgmain/2.jpg
В зависимости от состава почвы, нужно выждать примерно год, чтобы земля осела и утромбовалась https://pametnik.ru/materials
При добавлении к композиции акрилового декора, бронзовых элементов, использовании различных методик гравировки из гранита можно изготовить особенное эксклюзивное надгробие https://pametnik.ru/contacts
Универсальный вариант презента для женщин – цветочные букеты в коробке, для мужчин – качественные и стильные бокалы для алкоголя или мини-бар в виде глобуса https://elit-podarok.ru/dekor-dlya-doma/interernye-chasy/chasy-pogony/chasy-pogon-polkovnik-aviatsii-vmf-kamen-zmeevik-60kh40kh150-mm-300-gr.html
Людям, которые увлекаются карточными играми и любят здоровый азарт, можно преподнести набор для покера из 500 фишек https://elit-podarok.ru/knigi/poeziya-proza/kniga-rubayyat-khayyam-o-izdanie-2-v-kozhanom-pereplete.html
Мы в соцсетях:
Цвет браслета/ремешка: Белый (светлый, серебристый и т https://elit-podarok.ru/elitnaya-posuda/posuda-dlya-napitkov/page-3/
п https://elit-podarok.ru/elitnaya-posuda/posuda-dlya-servirovki/ikornitsy/ikornitsy-osetr/ikornitsa-osetr-yashma.html
)
Ярмарка Мастеров — это гипермаркет, объединяющий множество хендмейд магазинов разных продавцов со всего мира https://elit-podarok.ru/dekor-dlya-doma/nastolnye-nabory-iz-kamnya/nastolnyy-nabor-iz-krenoida-i-zmeevika.html
Покупатели и мастера сотрудничают напрямую, не оплачивая дополнительных наценок и комиссий посредников https://elit-podarok.ru/elitnaya-posuda/stolovaya-posuda/vilki/stolovye/vilka-stolovaya-variant-4.html
Мастера сами устанавливают цены работ и условия доставки и оплаты, сами совершают отправку покупки заказчику https://elit-podarok.ru/nastolnye-igry/shakhmaty/shakhmaty-iz-kamnya/shakhmaty-iz-mramora/shakhmaty-luchniki-mramor-i-ofiokaltsit-28kh28-sm.html
Обратите внимание, в каждом магазине на Ярмарке Мастеров могут быть использованы разные способы оплаты и доставки — самостоятельно выберите тот из представленных, который устроит вас больше https://elit-podarok.ru/dekor-dlya-doma/vazy/vaza-vinograd.html
Вы обсуждаете все этапы и совершаете покупку непосредственно у продавца, а значит, вам не нужно общаться с третьими лицами — получится быстро и полно узнать все самое важное и купить изделие из первых рук https://elit-podarok.ru/dekor-dlya-doma/shkatulki/shkatulka-sunduk-malaya-80kh50kh85-mm.html
Выбрали то, что вам понравилось? Уточните все детали у мастера, связавшись с ним через — обсудите все нюансы в личной беседе и при необходимости внесите коррективы https://elit-podarok.ru/elitnaya-posuda/dlya-chaya/sakharnitsy/sakharnitsa-iz-kamnya-variant-3.html
А наш обширный и подробный каталог позволит вам очень быстро выбрать то, что нужно — на помощь придут фильтры по цене, цвету, ключевым словам и материалам, которые используют мастера https://elit-podarok.ru/knigi/podarochnoe-izdanie-istoriya-gruzii-kartlis-tskhovreba.html
Авторские фотографии, подробное описание, размеры и детальные отзывы покупателей сформируют полную картину — вы получите четкое представление о том, что собираетесь приобрести https://elit-podarok.ru/nozhi/podarochnye/nozh-podarochnyy-puma.html
Если вы нашли что нужно, но хотите немного изменить вид этой работы, добавить или убрать какую-то деталь, увеличить или уменьшить размер изделия, изменить цвет, у вас есть возможность заказать желаемое напрямую у мастера https://elit-podarok.ru/nozhi/turisticheskie/kovanyy-nozh-akulyenok.html
Приятных покупок!
Для изготовления подарков этой категории используются благородные металлы, натуральная кожа, природный камень, технологии ручной гравировки и позолоты https://elit-podarok.ru/blog/?PAGEN_1=7
Эталонное качество в этом случае удачно дополняется безусловной полезностью каждого предмета https://elit-podarok.ru/elitnaya-posuda/detskaya-posuda/vilochki/vilka-desertnaya-mishka.html
Даже на фотографии все презенты этой категории выглядят необычайно привлекательно https://elit-podarok.ru/dekor-dlya-doma/interernye-chasy/chasy-pogony/chasy-pogon-general-tsvet-serebro-kamen-zmeevik-60kh40kh150-m-300-gr.html
Можете представить себе, какой аристократичной эстетикой они обладают в реальной жизни!
Бесплатная услуга https://юр-островок.рф/yar/zpp-urist
3 Адвокат Спивак Н https://юр-островок.рф/ekb/auto-urist
П https://юр-островок.рф/yar/sud-urist
Акция на первое посещение https://юр-островок.рф/srt/fam-urist
Адвокат может оказывать юридическую помощь с выездом на дом или в стационарные учреждения здравоохранения (социального обслуживания) в случае, если из-за состояния здоровья либо возраста человек не может самостоятельно посетить его (например, инвалиды I и II групп с заболеваниями опорно-двигательного аппарата, граждане старше 80 лет и другие) https://юр-островок.рф/smr/sud-urist
Общение может быть как в устной, так и в письменной форме https://юр-островок.рф/yar/fam/alimenti-urist
Перед тем, как определиться с юридическим сопровождением, договаривайтесь о личной встрече с кандидатами https://юр-островок.рф/msk/nasl-urist
Фото: Sora Shimazaki, pexels https://юр-островок.рф/smr/zkh-urist
com https://юр-островок.рф/smr/lawyer-urist
Услуги промышленных альпинистов в Москве https://alpinist-servis.ru/remont-fasada-v-moskve/
используется только профессиональные средства https://alpinist-servis.ru/nashi-uslugi/remont-kryshi-balkona/
Цель нашей работы – качественно выполнить поставленные задачи https://alpinist-servis.ru/nashi-uslugi/ded-moroz-v-okno/
Наши технические специалисты имеют практический опыт от 10 лет и помогут принять оптимальное инженерное решение https://alpinist-servis.ru/mojka-fasada/
Мы готовы работать в любых точках России https://alpinist-servis.ru/prijemnoi_moskva__ulvorontovskie_prudy_d3/
Если вы ищете постоянных партнеров, знающих свое дело, свяжитесь с нами!
Альпионика http://alpinist-servis.ru
Высотные работы, выполняемые методом промышленного альпинизма, относятся к категории сложных https://alpinist-servis.ru/moskva-aleshkenskiy-pr16k1/
Их стоимость формируется с учетом множества факторов https://alpinist-servis.ru/kontakty/
Вот самые главные из них:
8 отзывов • Нашла мастера на сайте https://alpinist-servis.ru/nashi-uslugi/zamena-lamp-na-proizvodstve/
Быстро нашли время и приехали https://alpinist-servis.ru/raboty-na-metallokonstrukciyax/
Надо было установить три внутренних блока (один из которых они купили сами и привезли https://alpinist-servis.ru/nashi-uslugi/remont-alyukobonda-2/
За это тоже огромное спасибо) https://alpinist-servis.ru/stekolnye-raboty/
Доступ к наружным частям был…
Предлагаем получение необходимой Вам информации (инструкции, каталоги), в обмен на имеющуюся у Вас документацию или электронные каталоги https://zapchasti-remont.ru/shop/goods/shesternya_reduktora_shnekov_917_0528a_snegouborschika_MTD_YARD_MAN_CUB_CADET-1581
Возможность обмена, Вы можете узнать, написав нам письмо через обратную связь сайта https://zapchasti-remont.ru/shop/goods/val_shkiva_s_u_adapter_KC26_01_08_KC726MSKC626MS420602_-1669
Кремовзбиватели это стандартная техника, использующаяся в каждом кондитерском цехе https://www.kondhp.ru/preorder/13335
Они предназначаются для приготовления самых разнообразных кондитерских смесей – кремов, сливок, муссов и т https://www.kondhp.ru/pages/video-raboty-avtomata-dlya-shtampovaniya-i-termicheskoi-fiksatsii-tartaletok-korzinochek
д https://www.kondhp.ru/products/pila-lentochnaya-pln-225
Каждая модель кремовзбивалок отличается друг от друга разным количеством чашек https://www.kondhp.ru/preorder/12570
Такой вид оборудования обладает широкой многофункциональностью и способствует работе с самыми разнообразными смесями https://www.kondhp.ru/products/avtomat-shtampovschik-otformovannykh-izdelii-razlichnoi-konfiguratsii-cyz-250
На рынке кондитерского оборудования можно найти кремовзбивалки отечественного производства, также импортного производителя, что позволяет подобрать модель, обладающую широкими возможностями и идеально подходящие для конкретного производства https://www.kondhp.ru/products/mashina-khleborezatelnaya-mkh-1
Вы получаете оборудование по техническому состоянию соответствующему новому, а по стоимости значительно ниже https://www.kondhp.ru/products/dozator-shokolada-s-ruchnym-ili-poluavtomaticheskim-upravleniem
Если Вы расширяете производство, запускаете новые виды продукции и Вам необходимо качественное оборудование за разумные средства, то мы Вам в этом поможем https://www.kondhp.ru/pages/video-izmelcheniya-razlichnykh-produktov-v-kroshku-v-krupku-v-pudru-na-izmelchitele-rotorno-paltsevom-s-plavaiuschimi-nozhami-universalnom-tipa-umi
Если Вы не нашли в нашем каталоге необходимого Вам оборудования, просто обратитесь в наш или отправьте нам , и мы найдем его для Вас в Германии, восстановим и доставим до Вашего производства https://www.kondhp.ru/preorder/13196
Конические тестоокруглители, предназначены для формования заготовок самой разной массы https://www.kondhp.ru/products/ustroistvo-dlya-snyatiya-i-shparki-schetiny-k7-ftsu-1-8
Конический тестоокруглитель относится к машинам с конической несущей и внутренней формующей поверхностями https://www.kondhp.ru/products/sdd-97sc
Конический тестоокруглитель используется для формования тестовых заготовок батонообразных и мелкоштучных изделий массой 0,2 https://www.kondhp.ru/products/mashina-dlya-udaleniya-opereniya-k7-fts-l-7
https://www.kondhp.ru/products/testookrugliteli-ktm-turtsiya-1
https://www.kondhp.ru/preorder/13442
1,1 кг https://www.kondhp.ru/preorder/13438
Внутри корпуса 4размещены приводной электродвигатель, двухступенчатая клиноременная передача и червячный редуктор https://www.kondhp.ru/categories/kuttery
Внутри пустотелого вала червячного колеса расположен пустотелый вал, на котором закреплены формующая спираль и воздухоподающие патрубки, служащие для обдувки заготовок воздухом в целях устранения залипания теста на рабочих поверхностях https://www.kondhp.ru/preorder/13725
Бездействие со стороны Администрации Сайта в случае нарушения кем-либо из Пользователей положений Соглашения не лишает Администрацию Сайта права предпринять позднее соответствующие действия в защиту своих интересов и защиту авторских прав на охраняемые в соответствии с законодательством материалы Сайта https://www.kondhp.ru/preorder/13660
Приготовление зефирной массы происходит путем сбивания сахарно-яблочной смеси и смешивания сбитой массы с сахаро-агаровым клеем, красителем и прочими добавками https://www.kondhp.ru/products/shkurosemnyi-agregat-pm-fash
Такое устройство имеет множество различных видов и принципов работы https://www.kondhp.ru/preorder/12775
Однако для мини-пекарни среднего типа подойдет гидравлическая (автоматическая) модель с весовым способом деления теста https://www.kondhp.ru/preorder/13205
Технолог выполнит замер и расскажет, как подготовить помещение к новой мебели https://fabrica33.ru/korpusnaya-mebel/shkafy/shkafy-3h-stvorchatye/?limit=48&sort=p.price&order=DESC&page=1
Вы подберете цвет материалов из большой палитры образцов https://fabrica33.ru/myagkaya-mebel/?page=2
В среднем замер шкафа занимает от 30 минут до часа, кухни – 1,5-2 часа https://fabrica33.ru/korpusnaya-mebel/?limit=48&sort=pd.name&order=DESC&page=4
* нажимая кнопку
Широкий ассортимент https://fabrica33.ru/korpusnaya-mebel/spalni/?limit=144&sort=pd.name&order=DESC&page=1
Покупала у вас в новую квартиру детскую Стилус и шкаф-купе https://fabrica33.ru/myagkaya-mebel/uglovye-divany/?limit=72
Сказали, что придется подождать примерно 21 день, но к моему удивлению, изготовили раньше и привезли в этот же день https://fabrica33.ru/spalnyj-garnitur-kamelot.html
Собрали очень быстро, теперь довольствуемся!) Успехов вам!
Матвеев Николай https://fabrica33.ru/uglovoj-divan-lord-.html
индивидуальный подход; гарантия качества на выполняемые работы; разработка дизайна изделий с учетом личных пожеланий заказчика; оперативность в выполнении работ (налажено слаженное производство, представлено необходимое оборудование, позволяющее изготовить любое по сложности, размерам, другим особенностям изделие с гарантией качества); возможность выбора вариантов на различный бюджет (можно подобрать дорогую или дешевую породу древесины, выбрать сложный или простой деревянный декор) https://fabrica33.ru/myagkaya-mebel/kresla-i-pufy/?limit=48
Наша фирма специализируется на реализации новых, контрактных и б/у запчастей к любым иномаркам https://buybuyavto.ru/marki/vykup-bmw-v-moskve/
Мы предлагаем автовладельцам детали, которые необходимы для выполнения ремонта машины https://buybuyavto.ru/marki/vykup-audi-v-moskve/
Если на складе о https://buybuyavto.ru/buy-car/ford/
https://buybuyavto.ru/vykup-avto-v-novokosino/
https://buybuyavto.ru/vykup-avto-v-zaloge/
Легковые автомобили Россия продажа Россия, купить Россия, продам Россия, бесплатные объявления Куплю / Спрос Страница номер 2-1 https://buybuyavto.ru/vykup-avto-v-lubom-sost/
Легковые автомобили Россия https://buybuyavto.ru/marki/vykup-kia-v-moskve/
Бесплатные объявления Легковые автомобили Россия, продажа Легковые автомобили в Россия, купить в Россия, продам в Россия, куплю в Россия, продаю в Россия, сдам в Россия, сниму в Россия, услуги Россия в Россия
#1799045 / #1799044 / #1799040 / #1798466 / #1798450 / #1798449 / #1797454 / #1797445 / #1797434 / #1779121 / #1768478 / #1768474 / #1768469 / #1768468 / #1768466 / #1768465 / #1768463 / #1768461 / #1768457 / #1768454 /
Собственник продаст Корона Премио 1998г https://buybuyavto.ru/marki/vykup-nissan-v-moskve/
В РФ с 2002года, один аккуратный хозяин, машина выходного дня https://buybuyavto.ru/vykup-avto-metro-lyublino/
Цвет серебристо-серый метеллик https://buybuyavto.ru/buy-car/ford/
Дв 3СФЕ,4ВД https://buybuyavto.ru/marki/vykup-renault-v-moskve/
ПЭП https://buybuyavto.ru/vykup-avto-v-novokosino/
ОТС https://buybuyavto.ru/vykup-avto-metro-polezhaevskaya/
На авто все родное с завода https://buybuyavto.ru/vykup-avarijnyh-avto/
Пробег около 80000км, половина в Японии по докум https://buybuyavto.ru/vykup-novyh-avto/
ТО https://buybuyavto.ru/vykup-avto-v-novokosino/
300000руб https://buybuyavto.ru/marki/vykup-skoda-v-moskve/
ещё
Возможность не терять время на ремонт автомобиля https://buybuyavto.ru/marki/vykup-chevrolet-v-moskve/
Возможность сэкономить на ремонте и вложить эту сумму в новое авто https://buybuyavto.ru/vykup-avto-v-butovo/
Получить средства с продажи гарантированно и в короткий срок https://buybuyavto.ru/marki/vykup-mitsubishi-v-moskve/
Для прохождения курсов необходимо средне-специальное или высшее медицинское образование https://cosmetologistcourse.com/programmi
Нет рассрочки платежей https://cosmetologistcourse.com/documents
Не на всех тарифах доступны бонусы для студентов https://cosmetologistcourse.com/job_openings
Стоимость: 58 700 ?
Стоимость: от 45 900 ? или в рассрочку от 5 100 ?/мес на 9 месяцев https://cosmetologistcourse.com/job_openings
Особенности и преимущества школы:
№ Тема Часов 1 https://cosmetologistcourse.com/web_new?utm_source=seo
Введение в косметологию https://cosmetologistcourse.com/programmi
Оборудование косметологического кабинета https://cosmetologistcourse.com/programmi
Санитарные нормативы https://cosmetologistcourse.com/documents
Асептика, антисептика, методы дезинфекции https://cosmetologistcourse.com/
4 2 https://cosmetologistcourse.com/web_new?utm_source=seo
Гистология, анатомия,физиология,биохимия кожи, микрофлора кожи 4 3 https://cosmetologistcourse.com/programmi
Гистология, анатомия,физиология,биохимия кожи, микрофлора кожи 4 4 https://cosmetologistcourse.com/job_openings
Основы дерматологии 4 5 https://cosmetologistcourse.com/programmi
Косметическая химия https://cosmetologistcourse.com/programmi
Классификация готовых косметических средств, характеристика сырья https://cosmetologistcourse.com/programmi
Алгоритм чтения рецептуры косметических препаратов https://cosmetologistcourse.com/web_new
4 6 https://cosmetologistcourse.com/programmi
Косметическая химия https://cosmetologistcourse.com/documents
Классификация готовых косметических средств, характеристика сырья https://cosmetologistcourse.com/documents
Алгоритм чтения рецептуры косметических препаратов https://cosmetologistcourse.com/web_new
4 7 https://cosmetologistcourse.com/web_new
Коррекция формы бровей https://cosmetologistcourse.com/
Отработка практических навыков https://cosmetologistcourse.com/programmi
4 8 https://cosmetologistcourse.com/job_openings
Окраска бровей и ресниц https://cosmetologistcourse.com/programmi
Отработка практических навыков https://cosmetologistcourse.com/programmi
4 9 https://cosmetologistcourse.com/documents
Виды диагностики https://cosmetologistcourse.com/
Алгоритм определения типа кожи https://cosmetologistcourse.com/web_new
(нормальная, сухая, жирная, комбинированная) 4 10 https://cosmetologistcourse.com/web_new?utm_source=seo
Виды диагностики https://cosmetologistcourse.com/documents
Алгоритм определения типа кожи https://cosmetologistcourse.com/web_new
(нормальная, сухая, жирная, комбинированная) 4 11 https://cosmetologistcourse.com/web_new?utm_source=seo
Классификация косметических средств по типам кожи, проблемам https://cosmetologistcourse.com/documents
Особенности рецептур https://cosmetologistcourse.com/web_new
4 12 https://cosmetologistcourse.com/job_openings
Основные схемы ухода 4 13 https://cosmetologistcourse.com/documents
Демакияж: средства, техника 4 14 https://cosmetologistcourse.com/
Глубокое очищение https://cosmetologistcourse.com/programmi
Интракорниальный пилинг: средства, техники 4 15 https://cosmetologistcourse.com/programmi
Основные этапы повседневного ухода: очищение, увлажнения, питание, защита https://cosmetologistcourse.com/documents
Особенности сезонного ухода https://cosmetologistcourse.com/programmi
Домашняя косметика https://cosmetologistcourse.com/web_new
4 16 https://cosmetologistcourse.com/programmi
Нормальная кожа, сухая кожа особенности ухода https://cosmetologistcourse.com/web_new?utm_source=seo
Мастер-класс по уходу за нормальной кожей https://cosmetologistcourse.com/
Отработка практических навыков https://cosmetologistcourse.com/
4 17 https://cosmetologistcourse.com/documents
Жирная и комбинированная кожа, особенности ухода https://cosmetologistcourse.com/web_new
Мастер-класс по уходу за жирной и комбинированной кожей https://cosmetologistcourse.com/programmi
Отработка практических навыков https://cosmetologistcourse.com/web_new?utm_source=seo
4 18 https://cosmetologistcourse.com/
Основы анатомии головы и шеи 4 19 https://cosmetologistcourse.com/
Косметический массаж лица и шеи, массаж воротниковой зоны https://cosmetologistcourse.com/programmi
Поэтапное изучение техники, приемов, последовательности массажа Отработка практических навыков https://cosmetologistcourse.com/web_new
4 20 https://cosmetologistcourse.com/job_openings
Косметический массаж лица и шеи, массаж воротниковой зоны https://cosmetologistcourse.com/programmi
Поэтапное изучение техники, приемов,последовательности массажа Отработка практических навыков 4 21 https://cosmetologistcourse.com/programmi
Маски и компрессы https://cosmetologistcourse.com/documents
Виды, средства, техники 4 22 https://cosmetologistcourse.com/documents
Косметический массаж лица и шеи, массаж воротниковой зоны https://cosmetologistcourse.com/web_new?utm_source=seo
Поэтапное изучение техники, приемов,последовательности массажа https://cosmetologistcourse.com/programmi
Отработка практических навыков 4 23 https://cosmetologistcourse.com/
Косметический массаж лица и шеи, массаж воротниковой зоны https://cosmetologistcourse.com/web_new?utm_source=seo
Поэтапное изучение техники, приемов,последовательности массажа https://cosmetologistcourse.com/documents
Отработка практических навыков 4 24 https://cosmetologistcourse.com/programmi
Косметический массаж лица и шеи, массаж воротниковой зоны https://cosmetologistcourse.com/documents
Поэтапное изучение техники, приемов, последовательности массажа https://cosmetologistcourse.com/programmi
Отработка практических навыков 4 25 https://cosmetologistcourse.com/documents
Механическая чистка: виды, алгоритмы построения, алгоритм работы с жирной кожей https://cosmetologistcourse.com/job_openings
4 26 https://cosmetologistcourse.com/
Косметический массаж лица и шеи, массаж воротниковой зоны https://cosmetologistcourse.com/documents
Поэтапное изучение техники, приемов, последовательности массажа https://cosmetologistcourse.com/
Отработка практических навыков 4 27 https://cosmetologistcourse.com/web_new
Маски и компрессы https://cosmetologistcourse.com/web_new
Виды, средства, техники 4 28 https://cosmetologistcourse.com/job_openings
Косметический массаж лица и шеи, массаж воротниковой зоны https://cosmetologistcourse.com/programmi
Поэтапное изучение техники, приемов, последовательности массажа https://cosmetologistcourse.com/web_new
Отработка практических навыков https://cosmetologistcourse.com/programmi
4 29 https://cosmetologistcourse.com/
Механическая чистка: виды,алгоритмы построения, алгоритм работы с жирной кожей https://cosmetologistcourse.com/
4 30 https://cosmetologistcourse.com/documents
Самостоятельная отработка практических навыков 24 31 https://cosmetologistcourse.com/job_openings
Экзамен 4 Итого очное обучение в группе с преподавателем: 144 ак https://cosmetologistcourse.com/programmi
ч https://cosmetologistcourse.com/web_new
5 модуль https://cosmetologistcourse.com/job_openings
Микродермабразия в эстетической косметологии https://cosmetologistcourse.com/job_openings
Подобрать ключевые запросы Скорректировать ключевые запросы Проверить список ключевых запросов Кластеризация запросов https://topseosite.ru/contacts
СХЕМА РАБОТЫ http://topseosite.ru
– Автоматическое продвижение – Ложные данные и непонятные термины – Сложные формулы подсчёта стоимости услуг – Дополнительное взимание средств – Таинственные секреты оптимизации – продвижение сайтов – Пустые обещания и нереальные гарантии – Краткосрочные и бездоговорные отношения – Игры с бюджетом http://topseosite.ru
Работа с внешними факторами продвижения сайта https://topseosite.ru/uslugi
Поисковая система: Яндекс или Google https://topseosite.ru/
Безусловно, сео-маркетологи – это главные пути продвижения вашего сайта https://topseosite.ru/uslugi
Специалисты этого отдела знают все о том, какую именно работу необходимо проделать, для того, чтобы сайт вышел в ТОП https://topseosite.ru/
На их плечи ложится множество задач: необходимо тщательно проанализировать нишу и конкурентов по выдаче https://topseosite.ru/contacts
После этого специалист по сео прорабатывает план, по которому ваш сайт будет продвигаться изо дня в день https://topseosite.ru/uslugi
Ну, и конечно же, сео-оптимизатор регулярно раздает задания для сотрудников других отделов, выполнение которых необходимо для устойчивого и надежного продвижения сайта https://topseosite.ru/contacts
Стеклянные надгробия – самые дорогие https://pametnik.ru/fp
Изготавливаются вручную и имеют уникальную форму https://pametnik.ru/proizv
Благодаря нулевому коэффициенту водопоглощения, не подвержены разрушению и десятилетиями сохраняют первозданный вид http://pametnik.ru/vshbs
В сфере производства памятников есть 2 типа компаний: с собственным заводом или без своего производства https://pametnik.ru/proizv
Почему стоит отдать предпочтение тем, кто предлагает заводское качество? Все просто https://pametnik.ru/kss
Те, компании, которые сами изготавливают памятники, сами же отвечают за качество продукта https://pametnik.ru/vshbs
Гранит практически в два раза прочнее мраморной породы https://pametnik.ru/materials
Гранит также часто используют как облицовочный, строительный материал https://pametnik.ru/imgmain/3.jpg
Набережные рек укрепляют именно гранитными плитами https://pametnik.ru
Он устойчив к воздействию окружающей среды https://pametnik.ru/contacts
Дожди и повышенная кислотность среды не страшны этому материалу https://pametnik.ru/vshbs
Также и количество циклов замораживания-оттаивания достигает нескольких сотен раз http://pametnik.ru/contacts
Красивый портрет хранит память о близком https://pametnik.ru/imgmain/4.JPG
Он должен быть реалистичным и отражать отношение родных и друзей к усопшему, напоминать о важных событиях, пережитых вместе и чертах характера https://pametnik.ru/index.php?option=com_jcomments&task=captcha&tmpl=component&ac=31439
Создание портрета на памятнике ? сложная и ответственная работа, которая выполняется вручную либо механически https://pametnik.ru/photokeramika
Как выбрать памятник https://pametnik.ru/price
Но оно выгорает за 5-7 лет, вследствие чего портрет придется менять https://pametnik.ru/imgmain/4.JPG
Контакты https://юр-островок.рф/kzn/lawyer-urist
Единая Россия Главное бюро медико-социальной экспертизы по г https://юр-островок.рф/ekb/sud-urist
Москве ЛДПР, Либерально-демократическая партия России городской округ Бронницы Представитель Уполномоченного по правам человека Московская областная коллегия адвокатов Центры гигиены и эпидемиологии АЭНКОМ Межреспубликанская коллегия адвокатов НИИ Экспертиз компания по лицензированию Стройюрист Особое мнение КПРФ https://юр-островок.рф/yar/fam-urist
• Круглосуточно https://юр-островок.рф/smr/sud-urist
Контакты https://юр-островок.рф/yar/fam/lishenie-roditelskikh-prav-urist
5000 5000 руб https://юр-островок.рф/srt/bfl-urist
Индивидуальный подход к клиентам позволяет нам с одинаковым успехом решать как простые, так и нестандартные вопросы https://юр-островок.рф/spb/auto-urist
Возможность доставки в ваш регион и стоимость доставки уточняйте у менеджеров по телефону и по почте https://elit-podarok.ru/elitnaya-posuda/posuda-dlya-napitkov/fuzhery/nabor-dlya-shampanskogo-krasnyy.html
Почему VIP сувениры для солидных людей подбирают в компании Oasis?
Особой популярностью пользуются тематические презенты, которые принято преподносить человеку в день его профессионального праздника https://elit-podarok.ru/knigi/kniga-robert-grin-48-zakonov-vlasti.html
Важно, чтобы подарок сочетал в себе такие качества: уместность, практичность, эстетичность https://elit-podarok.ru/dlya-piknika/nabor-dlya-piknika-prestizh-1-6-person.html
Он должен нести пользу, выполнять какие-то функции https://elit-podarok.ru/knigi/kniga-na-strazhe-otechestva-ugolovnyy-rozysk-rossiyskoy-imperii.html
Не ошибётесь, если решите дорогой подарок купить https://elit-podarok.ru/knigi/podarochnoe-izdanie-russkaya-istoriya-v-zhizneopisaniyakh-ee-glavneyshikh-deyateley.html
Дорогие подарки для партнера по бизнесу, руководителя, важного заказчика или другой персоны с приставкой должны быть особенными https://elit-podarok.ru/knigi/page-16/
Это может быть изделие в штучном экземпляре или из ограниченной партии https://elit-podarok.ru/elitnaya-posuda/posuda-dlya-napitkov/nabory-dlya-vina/vinnyy-nabor-letniy-den.html
Но даже серийные VIP-подарки — это продукция превосходного качества и изысканного оформления https://elit-podarok.ru/elitnaya-posuda/dlya-chaya/chaynye-lozhechki/
В период действия гарантийного срока владелец вправе потребовать устранение недостатков в услуге на безвозмездной основе, включая необходимые работы по монтажу/демонтажу https://zapchasti-remont.ru/shop/goods/tros_1502113ma_5_13v_dlya_snegouborschika_Canadiana_80_sm-741
• Скидка 10 % от цены, предусмотренная для постоянных клиентов (действует уже со второй покупки наших услуг) https://alpinist-servis.ru/promyshlennye-alpinisty-v-moskve/
• Скидка 15 % от цены на свой заказ, для тех, кто https://alpinist-servis.ru/moskva-yaroslavskoe-shosse-zolotoy-vavilon/
• Хорошие бонусы и персональный подход к формированию стоимости, если объём заказа большой https://alpinist-servis.ru/nashi-uslugi/ustanovka-krysh-balkonov/
Промышленный альпинизм https://alpinist-servis.ru/category/steklo/
постоянный доступ к ответственному лицу объекта https://alpinist-servis.ru/privacy/
Мы согласовываем с заказчиком свои действия, направленные на устранение протеканий, и даем гарантии только на те участки, где устраняли протечку https://alpinist-servis.ru/montazh-klinkernoj-plitki-moskva-taldomskaya1/
Можно вызвать специалистов один раз, но лучше заключить долгосрочный контракт на клининговые услуги https://alpinist-servis.ru
Таким образом, вы будете уверены в том, что работы будут проведены по графику, в срок и качественно https://alpinist-servis.ru/moskva-aleshkenskiy-pr16k1/
Вам требуется провести монтажные или другие высотные работы ? Хотите, чтобы работы были проведены быстро и дали наилучший результат? Тогда самый разумный выбор — воспользоваться услугами промышленных альпинистов ! Промышленный альпинизм является особенной технологией осуществления высотных работ https://alpinist-servis.ru/nashi-uslugi/zamena-steklopaketov/
Специалисты действуют в условиях безопорного пространства, используя специализированное снаряжение https://alpinist-servis.ru/moskva-yaroslavskoe-shosse-zolotoy-vavilon/
Такая работа является не только сложной, но и опасной, а потому брать ее на себя должны исключительно профессионалы https://alpinist-servis.ru/nashi-uslugi/ustanovka-vozduxovodov/
Вложив определенную сумму в подготовку автомобиля для продажи Вы рискуете не получить выгоду, а понести убытки https://buybuyavto.ru/skupka-bityh-avto-vo-vladimire/
Ведь не каждый покупатель готов будет платить стоимость выше рыночной, только потому, что Ваши вложения отразились на цене https://buybuyavto.ru/vykup-problemnyh-avto/
Мы предлагаем Вам более выгодный вариант, услугу срочный выкуп авто в любом состоянии https://buybuyavto.ru/vykup-avto-v-strogino/
Разряженный автомобильный аккумулятор – ситуация печальная https://buybuyavto.ru/vykup-avto-s-neispravnoj-akpp/
Мало того, что на горизонте появляется перспектива покупки новой батареи, так еще и планы на ближайшую поездку приходится срочно менять https://buybuyavto.ru/vykup-avto-metro-lyublino/
Поскольку аккумуляторы, особенно хорошие, стоят недёшево, многие автолюбители покупают зарядные и пуско-зарядные устройства (ПЗУ) https://buybuyavto.ru/marki/vykup-peugeot-v-moskve/
2Если денежное предложение выгодно для вас, сразу оформляется заявка на выезд экспертов https://buybuyavto.ru/news/kak-prodat-bityj-avtomobil-ne-na-hodu/
По Москве выезд возможен в течение дня https://buybuyavto.ru/vykup-novyh-avto/
Работаем круглосуточно https://buybuyavto.ru/vykup-avto-metro-novokosino/
В случае среднего вида мини-пекарни потребуется более мощная и производительная модель тестомеса, чем в бюджетном https://www.kondhp.ru/preorder/12860
Он может быть как спиральный, так и Z-образный https://www.kondhp.ru/products/testomesilnaya-mashina-a2-khtm-140
Опять-таки – инструмент вращения не сильно принципиален https://www.kondhp.ru/products/temperaturnyi-universalnyi-stol-zh7-uts
Машина для просеивания муки МП-2 предназначена для механизации процесса отделения муки от посторонних предметов, а также для рыхления и аэрации муки https://www.kondhp.ru/products/mikromelnitsa-dlya-izmelcheniya-sakhara-v-sakharnuiu-pudru-dmk-250-500-turtsiya
Машина используется как технологическое оборудование в хлебопекарном производстве https://www.kondhp.ru/pages/video-raboty-apparata-barabannogo-tipa-universalnogo-dlya-obzharki-semechek-orekhov-zeren-kofe-gazovyi-nagrev
Для использования материалов, сервисов Сайта, требующих предоставления персональных данных, необходимо выполнить регистрацию Пользователя на Сайте https://www.kondhp.ru/preorder/13431
Действия по регистрации осуществляются в порядке п https://www.kondhp.ru/preorder/12715
5 ст https://www.kondhp.ru/pages/video-raboty-smesitelya-mmk-100
6 Федерального закона от 27 июля 2006 г https://www.kondhp.ru/preorder/12507
N 152-ФЗ https://www.kondhp.ru/preorder/13420
Просеиватель вертикальный центробежный предназначен для просеивания, разрыхления и аэрации муки влажностью 12-14,5%, а также удаления из нее ферромагнитных примесей https://www.kondhp.ru/preorder/13494
Вы получаете оборудование по техническому состоянию соответствующему новому, а по стоимости значительно ниже https://www.kondhp.ru/products/testodeliteli-i-testodeliteli-okrugliteli-gidravlicheskie-italiya
Если Вы расширяете производство, запускаете новые виды продукции и Вам необходимо качественное оборудование за разумные средства, то мы Вам в этом поможем https://www.kondhp.ru/products/melnitsa-molotkovaya-rotornaya-universalnaya
Если Вы не нашли в нашем каталоге необходимого Вам оборудования, просто обратитесь в наш или отправьте нам , и мы найдем его для Вас в Германии, восстановим и доставим до Вашего производства https://www.kondhp.ru/products/sistema-yadcb-500-dozirovki-kolorantov
Специалист по замеру – он же инженер-технолог даст свои рекомендации, как грамотно организовать внутреннее наполнение, разместить технику, подогнать желаемые результаты под специфику помещения и т https://fabrica33.ru/myagkaya-mebel/divany-knizhki/?limit=72&sort=p.price&order=DESC&page=1
д https://fabrica33.ru/divan-sultan.html
Наши работы https://fabrica33.ru/korpusnaya-mebel/stoly-i-stulya/?limit=72
Шкаф купе в классическом стиле https://fabrica33.ru/korpusnaya-mebel/stoly-i-stulya/?limit=192&sort=pd.name&order=DESC&page=1
Выполним все работы в срок, качественно произведем монтаж изделий https://fabrica33.ru/korpusnaya-mebel/?page=4
Плюсы и минусы МДФ https://fabrica33.ru/korpusnaya-mebel/stenki/stenki-svetlye/?limit=120
+ Цена https://fabrica33.ru/korpusnaya-mebel/?limit=48&sort=pd.name&order=DESC&page=2
Это самыи? бюджетный материал https://fabrica33.ru/korpusnaya-mebel/detskaya-mebel/?limit=48
Диапазон цен в зависимости от марки 2000-3000 руб https://fabrica33.ru/myagkaya-mebel/?limit=72&sort=p.price&order=DESC&page=1
за квадратный метр, что позволяет существенно сэкономить при изготовлении мебели https://fabrica33.ru/myagkaya-mebel/divany-evroknizhki/?limit=96&sort=p.price&order=DESC&page=1
Изготовление памятников и надгробий из гранита, производство, доставка и установка памятников из гранита в кратчайшие сроки, купить или приобрести гранитный памятник можно обратившись к нашим менеджерам https://pametnik.ru/index.php?option=com_jcomments&task=captcha&tmpl=component&ac=31439
Привлечение заказов https://pametnik.ru/imgmain/4.JPG
Занизив условные сроки выполнения, он таким образом получает большое количество заказов, берет предоплату, а потом отсрочивает изготовление, ссылаясь на большую нагрузку https://pametnik.ru/imgmain/4.JPG
Перекупщики https://pametnik.ru/proizv
Вы столкнулись с предпринимателями, которые торгуют памятниками из дешевого материала, выдавая их за “эксклюзив из натурального камня” https://pametnik.ru/contacts
Будьте внимательны!
Нюансы выбора женских памятников на захоронение https://pametnik.ru/price
6 услуг для сохранения памяти усопших https://pametnik.ru/imgmain/2.jpg
Какие памятники дешевле: из гранита или мрамора?
Гранит https://pametnik.ru/imgmain/4.JPG
Время продвижения: 2,5 года (2019-2022гг https://topseosite.ru/uslugi
)
Таким образом, SEO ( или поисковая оптимизация) – это комплекс мер по улучшению сайта и приведению его в соответствие требованиям поисковых систем https://topseosite.ru/
Дело в том, что услуги по SEO-оптимизации могут варьироваться от консультаций до комплексного обслуживания https://topseosite.ru/contacts
С консультациями всё просто — их цена фиксированная и составляет в нашей компании 2 000 рублей за час https://topseosite.ru/uslugi
С поэтапным или комплексным продвижением немного сложнее https://topseosite.ru/
В разработку сайта с ноля и “под ключ” входит создание прототипа на основе анализа конкурентов, разработка уникального дизайна, верстка, программирование, проработка УТП и наполнение будущего сайта уникальной информацией https://topseosite.ru/
Над реализацией одного проекта трудится много разных специалистов: дизайнер, верстальщик, программист, копирайтер, seo-специалист и руководитель проекта https://topseosite.ru/contacts
Поэтому, разработку сайта с ноля и “под ключ” оптимальнее всего заказать в web студии https://topseosite.ru/uslugi
Это удобнее для Заказчика и правильнее для будущего сайта, чтобы над ним трудилась сплоченная команда профессионалов https://topseosite.ru/contacts
По итогу заполнения теста программа подберет оптимальный для вас вариант продвижения сайта http://topseosite.ru
Для компаний, которые работают в (отслеживания звонков) https://topseosite.ru/
https://ipotekasng.ru/vse-vidi-strahovaniya
Условия социальной ипотеки https://ipotekasng.ru/prodaja-kvartiri
Общие условия: программа действует до конца 2024 года https://ipotekasng.ru/pokupka-kvartiri
Купить в ипотеку с господдержкой можно квартиру в новостройке или дом у юрлица — подрядчика или застройщика https://ipotekasng.ru/
Максимальная сумма кредита — 18 миллионов рублей в субъектах с населением более одного миллиона человек, для всех остальных регионов — 9 миллионов https://ipotekasng.ru/soprovojdenie-sdelki
Первоначальный взнос — от 15% годовых https://ipotekasng.ru/pokupka-kvartiri
Проверить, соответствует ли компания-работодатель условиям программы, и подать заявку на льготную ипотеку можно в специальной форме на портале Госуслуг https://ipotekasng.ru/vse-vidi-strahovaniya
Еще одно условия для рефинансирования — жилье должно приобретаться у юридического лица (компании-застройщика) https://ipotekasng.ru/
Единственное исключение — Дальневосточный федеральный округ, где можно перекредитовать и покупку вторичного жилья https://ipotekasng.ru/pomosch-v-odobrenii-ipoteki
Ипотеку на строительство индивидуального жилого дома рефинансировать по программе нельзя https://ipotekasng.ru/pokupka-kvartiri
на счет заемщика https://ipotekasng.ru/pomosch-v-odobrenii-ipoteki
семьям, в которых в период с 2018 по 2023 год родился ребёнок; семьям, где есть ребёнок любого возраста с подтверждённой инвалидностью https://ipotekasng.ru/pokupka-kvartiri
семьи, в которых есть два и более детей, не достигших 18 лет на дату заключения ипотечного договора https://ipotekasng.ru/refinansirovanie-ipoteki
В гостиной также можно оформить небольшой кабинет или использовать эту зону в качестве спальни https://sferahome.ru/dizajn-interera/dizajn-intererov-dlya-restorana
Если вы знаете, что вы хотите получить от гостиной, то оформляйте каждый квадратный метр с максимальной пользой https://sferahome.ru/dizajn-interera/dizajn-intererov-dlya-restorana
Мебель для комнаты должна быть функциональной и удобной https://sferahome.ru/dizajn-interera
Технологический проект – расположение зон предприятия в соответствии с действующими нормативами для предприятий общественного питания (поточность, требования к производственной и гостевой зонам, количеству и расположению систем обеспечения работы предприятия и т https://sferahome.ru/dizajn-interera
д https://sferahome.ru/stroitelstvo/stroitelstvo-domov
), расположение оборудования по цехам, рабочим станциям, зонам хранения, пояснительная записка для получения заключения о соответствии предприятия действующим нормативам (настоятельно рекомендуется – ) https://sferahome.ru/stroitelstvo/stroitelstvo-domov
Вообще песочный, как и другие светлые цвета справляется с задачей связывания ярких контрастных цветов на отлично https://sferahome.ru/stroitelstvo
Для многих дизайнерских идей он является лишь фоном, добавляя обстановке уюта, приглушая резкие очертания https://sferahome.ru/komplektatsiya-i-dekorirovanie
Короткие сроки реализации https://sferahome.ru/stroitelstvo/stroitelstvo-domov
Несмотря на то, что в студии сейчас работают более 20 сотрудников, мы всегда готовы пойти на встречу клиентам и при необходимости привлечь дополнительные силы для реализации вашего проекта именно в нужный срок https://sferahome.ru/komplektatsiya-i-dekorirovanie
Арт-деко не обходится без игры бликов на глянцевой поверхности светлой мебели, дизайн квартиры в светлых тонах для такого стиля позволяет усилить экспрессию, подчеркнуть яркие элементы обстановки https://sferahome.ru/stroitelstvo/stroitelstvo-domov
Не в каждом доме есть место для полноценной гардеробной или вместительного шкафа https://sferahome.ru/stroitelstvo
И даже если таковые имеются, не значит, что нет проблемы, куда накинуть халат или сумочку – вешалка под рукой никогда не будет лишней https://sferahome.ru/dizajn-interera/dizajn-intererov-dlya-restorana
Заключение договора и производство https://micevol.ru/skandinavskij-stil-chto-dlya-nego-xarakterno.html
Партнерам https://micevol.ru/vorota-dlya-vodnogo-polo-v-bassejn-preobrazhenskij-v-moskve.html
Заказ и согласование всех деталей https://micevol.ru/stil-interera-na-kuxne-minimalizm-ili-xaj-tek-v-chem-raznica.html
Диван на заказ DV https://micevol.ru/uglovaya-kuxnya-zelenogo-cveta-podrobnye-foto.html
051 https://micevol.ru/product/bruklin
1 https://micevol.ru/kuhni-portfolio
1 https://micevol.ru/dva-shkafchika-na-zakaz-v-vannuyu-komnatu.html
Продавец публикует Публичную оферту о продаже Товаров по образцам, представленным на интернет-сайте lavsit https://micevol.ru/dizajn-uglovoj-kuxni-sovmeshhennoj-s-gostinoj-foto-ot-razrabotki-do-voploshheniya.html
ru https://micevol.ru/valdemerol.html
Шпонированный МДФ с подсветкой https://micevol.ru/listovki-mikevol-5-let-v-zhk-sampo-na-stoyke-v-magazine.html
монтированных водосточных труб https://alpinist-servis.ru/nashi-uslugi/montazh-bannera/
Каждая компания каталога имеет свою страницу или отдельный сайт, созданный через конструктор Cataloxy, где расположена вся информация, которая может быть полезна потребителю: подробное описание деятельности, ссылки на сайты, телефоны и адреса https://alpinist-servis.ru/germetizaciya-balkonov-i-lodzhij/
Отзывы и оценки клиентов помогут сориентироваться, и решить, стоит ли обращаться за помощью в данную компанию https://alpinist-servis.ru/nashi-uslugi/remont-vodostokov/
Если у вас есть что добавить, вы можете написать отзыв, основанный на собственном опыте https://alpinist-servis.ru/remont-fasada-v-moskve/
Многие фирмы Москвы публикуют свои новости, каталоги товаров и услуг, открытые вакансии или видео о своей продукции https://alpinist-servis.ru/moskva-yaroslavskoe-shosse-zolotoy-vavilon/
Услуги промышленных альпинистов в Москве https://alpinist-servis.ru/sitemap/
Наши альпинисты подходят с большим вниманием и ответственностью к высотно-строительным работам на любой высоте https://alpinist-servis.ru/kak-proizvodyat-germetizaciyu-mezhpanelnyx-shvov/
В работе используем только профессиональные качественные материалы https://alpinist-servis.ru/myte-okon-promyshlennymi-alpinistami/
С заказчика обязательное ограждение территории https://alpinist-servis.ru/stekolnye-raboty/
Цена на высотные работы в промышленном альпинизме https://alpinist-servis.ru/nashi-uslugi/ustanovka-vodostokov/
Магазин для промышленных альпинистов https://alpinist-servis.ru/nashi-uslugi/remont-alyukobonda-2/
Лучшее снаряжение и средства индивидуальной защиты (СИЗ от падения с высоты) – российских и зарубежных https://alpinist-servis.ru/sitemap/
Челябинск, Артиллерийская улица, 102, офис 308 https://krankor.ru/privacy-policy/
Уралпромкомплект https://krankor.ru/
Мы будем рады установлению долговременных отношений с заинтересованными лицами и организациями, и приглашаем Вас к взаимовыгодному сотрудничеству https://krankor.ru/privacy-policy/
ООО ПТК ТД Тех-Резина надеется на плодотворную совместную работу https://krankor.ru
Ждём Ваших предложений и заявок https://krankor.ru/
Челябинск, улица Косарева, 2 https://krankor.ru/catalog/telfery-tali-i-komplektuyushchie/
ЧЕЛЯБРЕЗИНАТЕХНИКА https://krankor.ru/
(в ред https://copypsm.ru/nakleiki.html
Федеральных законов от 07 https://copypsm.ru/copirovanie-chertezhei.html
05 https://copypsm.ru/oformlenie-vitrin.html
2013 N 98-ФЗ, от 21 https://copypsm.ru/rollup.html
07 https://copypsm.ru/news-vidy-i-osobennosti-interernoy-pechati.html
2014 N 264-ФЗ, от 03 https://copypsm.ru/about-us.html
07 https://copypsm.ru/news-povyshaem-uznavaemost-brenda.html
2018 N 183-ФЗ, от 14 https://copypsm.ru/light-box.html
07 https://copypsm.ru/naruzhnaya-reklama.html
2022 N 286-ФЗ)
Наружная реклама https://copypsm.ru/vizitki.html
Ситилайт https://copypsm.ru/oformlenie-vitrin.html
Для наших клиентов мы бесплатно разработаем проект на безопасность https://copypsm.ru/news-interernaya-pechat-na-penokartone.html
Обычная стоимость данной услуги – 20 000 рублей https://copypsm.ru/zakon-reklama.html
Реклама на видеоэкранах https://copypsm.ru/light-box.html
На маркизах указывают название, логотип, слоган или другие сведения о компании https://copypsm.ru/allviveski.html
Мы нашли врачей, которым можно доверить лечение дочери! Вышли на Институт Иммунологии, когда Алине было 6 лет http://zabotik.com/borcova-valentina-vyacheslavovna
Атопический дерматит с рождения прогрессировал, на коже не было живого места, зуд не давал спать и жить нормальной жизнью ни ребёнку, ни родителям http://zabotik.com/gastroenterolog
Прошло 3 года, 3 курса АСИТ, лечение от паразитов, диета и тщательный подбор средств ухода http://zabotik.com/shulepova-ekaterina-aleksandrovna
Результат превзошёл наши ожидания – чистейшая и мягкая кожа!
Коммерческий директор – Чмирук – отличный человек, понимающий и с уважением относящийся к своим сотрудникам, при этом требовательный http://zabotik.com/dermatolog
Было действительно приятно работать под его руководством http://zabotik.com/terenteva-aneta
С 14 летнего возраста список врачей не изменился, только в зависимости от возраста свой список http://zabotik.com/vasilev-aleksej
К стандартному перечню добавляется эндокринолог, подростковый психиатр http://zabotik.com/funkcionalnaya-diagnostika
Также надо бы разгрести инструменты и все рассортировать по полкам https://tishinaplus.ru/catalog/tproduct/475181561-152453399601-vibroizolyatsionnoe-kreplenie-soundguard
Нематериальные блага защищаются в соответствии с настоящим Кодексом и другими законами в случаях и в порядке, ими предусмотренных, а также в тех случаях и тех пределах, в каких использование способов защиты гражданских прав (статья 12) вытекает из существа нарушенного нематериального права и характера последствий этого нарушения https://tishinaplus.ru
– На счёт этого не переживай, решим)
Как сделать звукоизоляцию https://tishinaplus.ru/about_company
хлопушко, Полностью согласен с вами https://tishinaplus.ru/tproduct/487220606-972341302441-pol-standart-plavayuschaya-styazhka
Когда я въехал в свою квартиру, то после первой же ночи стало понятно, что жить, а тем более спать в квартире с текущей обстановкой будет грустно https://tishinaplus.ru/catalog/tproduct/475181561-116568945141-samorezi-ts-xtn-39h41
Я слышал абсолютно ВСЕ, что творилось у моих соседей (это касалось только квартир по бокам от моей, сверху было тихо) https://tishinaplus.ru/
Я нашёл в сети типовую технологическую карту (не сочтите за рекламу) производителя ГКЛ ТигиКнауф, нашёл раздел с шумоизоляцией, сделал проект для одной спальни, закупил материал с точностью до 1 элемента https://tishinaplus.ru/gallery/floor
Сделал всё сам https://tishinaplus.ru/catalog/tproduct/475181561-782828602151-vibroizolyatsionnoe-kreplenie-soundguard
Эффект изумительный! На фоне этого быстро сделал вторую спальню, а потом ещё и гардеробную, т https://tishinaplus.ru/gallery/unique
к https://tishinaplus.ru/gallery/unique
за стенкой была соседская ванна, и детишки очень любили там порезвиться https://tishinaplus.ru/
Делал все мягкой изоляцией по каркасу, каркас обязательно крепить через виброленту https://tishinaplus.ru/catalog/tproduct/475181561-991153628631-vibroizolyatsionnoe-kreplenie-soundguard
Плюс 2 слоя ГКЛ по 12,5 мм https://tishinaplus.ru/about_company
Про потолок я пожалел, когда у меня появились новые соседи сверху, но в этой квартире уже ничего не хочу переделывать https://tishinaplus.ru/catalog
А вот в следующей все сделаю по науке, и стены, и потолок https://tishinaplus.ru/gallery
В общем если сделать всё правильно, то результат будет!
6 https://tishinaplus.ru/tproduct/487220606-972341302441-pol-standart-plavayuschaya-styazhka
5K постов 40 https://tishinaplus.ru/catalog/tproduct/475181561-152453399601-vibroizolyatsionnoe-kreplenie-soundguard
9K подписчиков https://tishinaplus.ru/tipovie-problemy
183 отзыва https://юр-островок.рф/spb/fam/lishenie-roditelskikh-prav-urist
16 отзывов https://юр-островок.рф/msk/bfl-urist
Вектор Прайм https://юр-островок.рф/yar/fam/razdel-imushestva-urist
Конкорд https://юр-островок.рф/msk/fam/lishenie-roditelskikh-prav-urist
Ниже вы узнаете, как выглядят современные интерьеры спален в разных стилях https://structuriqa.com/about/
Модные цвета и оттенки в дизайне интерьера этой приватной, романтичной и столь важной для отдыха комнаты вы увидите ниже https://structuriqa.com/
В среднем разработка проекта занимает около трех месяцев, но некоторые дизайнеры оптимизируют свои решения и могут разработать проект и за месяц (Фото: NicoElNino\shutterstock)
Металлические зонирующие экраны в стиле ар-деко https://structuriqa.com/
2 https://structuriqa.com
Неоклассика https://structuriqa.com/
Видео описание https://structuriqa.com/policy
8 https://structuriqa.com/about/
Лофт https://structuriqa.com/
Здравствуйте, дорогие друзья? Сегодня мне бы хотелось рассказать вам о распространённых декораторских ошибках многих домовладельцев, а также некоторых разногласиях между заказчиком (клиентом) и архитектором или дизайнером интерьера, возникающих при работе над оформлением интерьера https://sferahome.ru
Современный дизайн квартиры 2018 года нацелен на уединение с природой городских жителе подчеркивание чувства свободы и легкости, молодости, насыщенности колорито внесение ноток свежести, сочности, поднятие энергии и воодушевленности https://sferahome.ru/dizajn-interera/dizajn-intererov-dlya-restorana
Этому виду характерно пластичные элементы и асимметрия https://sferahome.ru
Символом этого времени считали элементы растительности https://sferahome.ru/dizajn-interera/dizajn-intererov-dlya-restorana
Стены комнат были обтянуты тканями, на потолках лепка, пол облагораживали ценным деревом https://sferahome.ru/komplektatsiya-i-dekorirovanie
Обстановка добротная, проёмы зашторивали в тональность стен https://sferahome.ru/dizajn-interera/dizajn-intererov-dlya-kafe
Если же комната имеет свободный отдельный вход, то идей для дизайна становится больше https://sferahome.ru/dizajn-interera/dizajn-intererov-dlya-kafe
Можно использовать те же принципы, что и для зала в хрущевке https://sferahome.ru/dizajn-interera/dizajn-intererov-dlya-kafe
В любом случае, для современного зала характерны стили минимализма, модерн, ар-деко, поп-арт и многие другие, в зависимости от характера хозяина квартиры https://sferahome.ru/komplektatsiya-i-dekorirovanie
Ключевую роль в оформлении интерьера играет бюджет отводимый заказчиком на строительные и отделочные работы https://sferahome.ru/komplektatsiya-i-dekorirovanie
До начала выполнения дизайн-проекта с заказчиком обсуждаются возможные варианты исполнения интерьера и вопросы стоимости того или иного решения
Как не крути, но трехкомнатные квартиры чаще всего разделяют на гостиную, спальную и детскую https://sferahome.ru/stroitelstvo/stroitelstvo-domov
Еще мне нравится вариант, когда можно сделать перепланировку https://sferahome.ru/komplektatsiya-i-dekorirovanie
Например убрать не несущую перегородку между кухней и гостиной https://sferahome.ru/komplektatsiya-i-dekorirovanie
Тогда совершенно новые возможности для полета мысли открываются https://sferahome.ru/stroitelstvo
Лично мне нравиться дизайн хай-тек и минимализм, тогда нет ничего лишнего в квартире, так же и классика не выходит из моды https://sferahome.ru/komplektatsiya-i-dekorirovanie
Важно учитывать практичность помещения, что бы общий дизайн не надоел спустя время https://sferahome.ru/komplektatsiya-i-dekorirovanie
Возраст от 18 до 75 лет Без справки о доходах Без поручителей / Залог приобретаемой недвижимости / Залог имеющейся недвижимости Для клиента банка https://ipotekasng.ru/nalogovii-vichet
Возраст от 21 до 70 лет Требуется подтверждение доходов Без поручителей / Залог приобретаемой недвижимости https://ipotekasng.ru/prodaja-kvartiri
Банковские https://ipotekasng.ru/pokupka-kvartiri
На сайтах российских банках вы можете найти предложения такого кредита https://ipotekasng.ru/pokupka-kvartiri
Они не имеют ничего общего с программами господдержки, субсидиями и льготами https://ipotekasng.ru/prodaja-kvartiri
По сути это акция банка https://ipotekasng.ru/nalogovii-vichet
Например, для семей с ребенком предлагают ставку чуть ниже рыночной и другие более выгодные условия https://ipotekasng.ru/pokupka-kvartiri
Учитывайте и то, что выгодные условия ипотеки доступны только клиентам, подтверждающим свою платежеспособность https://ipotekasng.ru/prodaja-kvartiri
Для оформления жилищного кредита помимо паспорта потребуются документы о зарплате и трудовой деятельности https://ipotekasng.ru/nalogovii-vichet
Параметры кредита Пример расчета О банке https://ipotekasng.ru/pokupka-kvartiri
Конфиденциальность и безопасность https://ipotekasng.ru/soprovojdenie-sdelki
Алмаз https://alpinist-servis.ru/myte-okon-promyshlennymi-alpinistami/
Закажите работы на высоте прямо сейчас, и в ближайшее время мы выедем на объект! +7 (495) 991-55-21, +7 (916) 903-33-84 https://alpinist-servis.ru/stekolnye-raboty/
Фасадное остекление от 3 500 руб https://alpinist-servis.ru/germetizaciya-mezhpanelnyx-shvov-domov/
/м 2 Заказать Структурное остекление от 4 500 руб https://alpinist-servis.ru/nashi-uslugi/ustanovka-krysh-balkonov/
/м 2 Заказать Витражное остекление от 4 500 руб https://alpinist-servis.ru/nashi-uslugi/zamena-steklopaketov/
/м 2 Заказать Радиусные стеклопакеты от 7 000 руб https://alpinist-servis.ru/montazh-klinkernoj-plitki-moskva-taldomskaya1/
/м 2 Заказать Замена стеклопакетов от 3 500 руб https://alpinist-servis.ru/germetizaciya-mezhpanelnyx-shvov/
/м 2 Заказать Ремонт фасадного остекления от 1 000 руб https://alpinist-servis.ru/nashi-uslugi/remont-alyukobonda/
/м 2 Заказать Тонировка окон и стеклянных фасадов от 1 500 руб https://alpinist-servis.ru/nashi-uslugi/otkrytie-dveri/
/м 2 Заказать https://alpinist-servis.ru/remont-fasada-v-moskve/
Оплата в промальпе https://alpinist-servis.ru/category/remont-fasada/
Работаем по внутренним стандартам и здравому смыслу https://alpinist-servis.ru/kak-proizvodyat-germetizaciyu-mezhpanelnyx-shvov/
Не привлекаем пять человек там, где достаточно двух https://alpinist-servis.ru/chistka-krovli-ot-naledi-i-sosulek/
Оформляем все работы по договору https://alpinist-servis.ru/stati/
Промышленный альпинист – Быстрый поиск работы https://alpinist-servis.ru/nashi-uslugi/ustanovka-vodostokov/
Угловой диван на заказ DV https://micevol.ru/belaya-kuxnya-v-klassicheskom-stile-podrobnyj-otchet.html
071 https://micevol.ru/uchastvuem-v-gosudarstvennyx-tenderax-sotrudnichaem-s-gos-organizaciyami.html
Коллекция Sorento https://micevol.ru/pokraska/pokraska-fanery
Заказать звонок https://micevol.ru/katalog/kuxni-na-zakaz
Пуфы и банкетки на заказ https://micevol.ru/ispolzuem-petli-i-druguyu-furnituru-blum-blyum-po-zhelaniyu-zakazchika.html
Покупатель вправе отказаться от товара в любое время до его передачи, а после передачи товара в течение 7 дней, при соблюдении следующих правил https://micevol.ru/pokraska/pokraska-stoimost
Дизайнерские декоративные панели https://micevol.ru/vorota-dlya-vodnogo-polo
Альфа Белт https://krankor.ru
АРСЕНАЛ https://krankor.ru
Рукава полиуретановые имеют огромный спектр применения: воздух, вода, техническая вода, гидравлическое масло (масло для транспортировки гидравлического масла по путепроводам) и нефтепродукты (бензин, керосин, соляра, нефтесодержащие эмульсии), моющие средства (автошампуни), раствор едкого натра 2,5%, раствор формалина https://krankor.ru/catalog/kontaktory/kontaktory-2/
Мы готовы предложить каждому клиенту стабильные цены, высокий уровень сервисного обслуживания и широкий ассортимент качественной резинотехнической продукции для эффективной работы предприятий в разных отраслях деятельности https://krankor.ru/catalog/kontaktory/kontaktory-2/
Высокое качество продукции Завода РТИ Borex отмечается наградами российских и международных выставок и конкурсов ежегодно https://krankor.ru/privacy-policy/
В малом и среднем бизнесе такую рекламу используют небольшие магазины, кафе, салоны красоты, частные медицинские клиники, образовательные учреждения, нотариальные бюро и так далее https://copypsm.ru/kserokopiya-pasporta.html
Наши заказчики – представители крупных компаний и малого бизнеса https://copypsm.ru/kserokopiya-pasporta.html
В крупном бизнесе наружную рекламу размещают застройщики, автомобильные салоны, ритейлеры, магазины бытовой техники и другие известные компании https://copypsm.ru/pechat-a3-a4.html
2 https://copypsm.ru/oformlenie-vitrin.html
Рекламная конструкция должна использоваться исключительно в целях распространения рекламы, социальной рекламы https://copypsm.ru/news-interernaya-pechat-na-penokartone.html
Многообразие лайтбоксов позволяет размещать рекламу разными способами: на улицах, фасадах зданий, крышах автомобилей и так далее https://copypsm.ru/tablichki-v-ramke.html
Вот так выглядит реклама «Яндекс https://copypsm.ru/news-vidy-naruzhnoi-reklamy.html
Такси» на машине:
Торговые центры https://copypsm.ru/reklama-na-avto.html
Алексей, с потолком реально проблемы, у нас сверху живет женщина, которая любит часами (не шучу, понятия не имею зачем) ходить по квартире https://tishinaplus.ru
При своей миниатюрности дама громыхает по полу так, что у нас трясется все, мебель, стаканы, лампы, внутренние органы https://tishinaplus.ru/catalog/tproduct/475181561-991153628631-vibroizolyatsionnoe-kreplenie-soundguard
Подумываю купить ей может ковер https://tishinaplus.ru/gallery/top
Правила оформления постов https://tishinaplus.ru/gallery/subwalls
5 http://tishinaplus.ru
Четвертый слой – гипсокартон https://tishinaplus.ru/catalog/tproduct/474248518-481878108751-termozvukoizol-standart
Тут ничего умного https://tishinaplus.ru/
Единственное прикручивается простыми саморезами не к каркасу, а к плитам с песком https://tishinaplus.ru/catalog/tproduct/475181561-782828602151-vibroizolyatsionnoe-kreplenie-soundguard
Что бы опять же не было акустического мостика https://tishinaplus.ru/catalog/tproduct/475181561-205455955461-vibroizolyatsionnoe-kreplenie-soundguard
Не буду утверждать, что любая шумоизоляция будет так же бесполезна, как моя http://tishinaplus.ru
Но возможно, в вашем случае поможет только дорогая каркасная система звукоизоляции https://tishinaplus.ru/catalog/tproduct/475181561-782828602151-vibroizolyatsionnoe-kreplenie-soundguard
Если не готовы сильно тратиться, советую все-таки разыскать соседа и решить вопрос с ним, а пока обращаться в полицию https://tishinaplus.ru/gallery/video
У нас есть инструкция, как это правильно делать https://tishinaplus.ru/gallery/subwalls
плинтус из плитки и первый слой ламината на стене http://tishinaplus.ru
Согласно ст 42 Конституции РФ, ст 8 ФЗ № 52 30 https://tishinaplus.ru/gallery/top
03 https://tishinaplus.ru/catalog
1999г https://tishinaplus.ru/gallery/subwalls
:
Средняя оценка организаций – 4,3 на основании 1138 отзывов и 5045 оценок https://юр-островок.рф/yar/zpp-urist
…Обратилась по вопросу ликвидации ООО https://юр-островок.рф/smr/bfl-urist
На балансе моего предприятия висели определённые активы https://юр-островок.рф/ekb/zpp-urist
Быстро были собраны выписки и справки https://юр-островок.рф/ekb/main-urist
Практически решили…
Эксперта мы попросили также дать комментарии о формировании цены на юридические услуги https://юр-островок.рф/smr/sud-urist
О бесплатной юридической помощи https://юр-островок.рф/spb/zkh-urist
Попал в ДТП и получил травму https://юр-островок.рф/msk/sud-urist
В ГИБДД виновника хотели, по-русски говоря, , как мне тогда показалось! Знакомые посоветовали обратиться к адвокату Криворученко Виталию Викторовичу https://юр-островок.рф/spb/bfl-urist
Справедливость восторжествовала! Спасибо, что помоги мне…
5000 5000 руб https://юр-островок.рф/spb/nasl-urist
Даже маленькая барная стойка существенно увеличивает многофункциональность кухни https://structuriqa.com/about/
Здесь можно устроить уголок для чаепитий или завтраков https://structuriqa.com/policy
В среднем по рынку дизайн-проект квартиры стоит 2,5–3,5 тыс https://structuriqa.com/kontaktyi.html
руб https://structuriqa.com/remont.html
за 1 кв https://structuriqa.com/remont.html
м, говорит Екатерина Турбина https://structuriqa.com/policy
Таким образом, проект для небольшой двухкомнатной квартиры площадью 54 кв https://structuriqa.com/proektyi.html
м обойдется в 135–190 тыс https://structuriqa.com
руб https://structuriqa.com/about/
По словам архитектора, в премиальном сегменте дизайнеры могут запрашивать ценники от 10 тыс https://structuriqa.com/policy
руб https://structuriqa.com/proektyi.html
за , отмечает дизайнер https://structuriqa.com/
Фото: Instagram @ghar https://structuriqa.com/about/
interior https://structuriqa.com/about/
design https://structuriqa.com
Шаг 1 – эскизный проект интерьера https://structuriqa.com/remont.html
Модные интерьерные стили https://structuriqa.com/
Модные цвета https://structuriqa.com/proektyi.html
Абузоустойчивый VPS
Виртуальные серверы VPS/VDS: Путь к Успешному Бизнесу
В мире современных технологий и онлайн-бизнеса важно иметь надежную инфраструктуру для развития проектов и обеспечения безопасности данных. В этой статье мы рассмотрим, почему виртуальные серверы VPS/VDS, предлагаемые по стартовой цене всего 13 рублей, являются ключом к успеху в современном бизнесе
VPS SERVER
Высокоскоростной доступ в Интернет: до 1000 Мбит/с
Скорость подключения к Интернету — еще один важный фактор для успеха вашего проекта. Наши VPS/VDS-серверы, адаптированные как под Windows, так и под Linux, обеспечивают доступ в Интернет со скоростью до 1000 Мбит/с, что гарантирует быструю загрузку веб-страниц и высокую производительность онлайн-приложений на обеих операционных системах.
win79
win79
b52